Configure Klarna Payments
About this article
Unlike Klarna Checkout (KCO), which handles payments and consumer information, Klarna Payments focuses solely on the payment aspect, allowing you to seamlessly integrate Klarna in your checkout process. Similarly to Klarna Payments, you can choose from a range of options, including pay now through card, direct debit, or bank transfer, as well as pay later and financing. By integrating Klarna Payments, you can streamline your customer’s checkout experience, offer payment options, and customize address collection as part of the checkout.
The main benefit of Klarna Payments is that it offers more flexibility in building a custom checkout without the need to use Klarna’s address collection modules. Instead, you can build your own address collection and only insert Klarna Payments’ payment widget into your checkout.
Klarna Payments vs Klarna Checkout - ownership of the integration components
Klarna Payments is an addition of payment methods to the existing merchant checkout, while Klarna Checkout is a complete checkout solution provided by Klarna including address collection. While the same payment methods are available in both solutions, there are differences in ownership of the components of the integration. See more details below:
| Integration Component | Ownership in Klarna Checkout | Ownership in Klarna Payments | Comments |
|---|---|---|---|
| Address Collection | Klarna | Frontend | |
| B2B customer information collection* | Klarna | Frontend | |
| Customer national identification number collection | Klarna | Klarna | Required for certain payment methods e.g. credit |
| Payment Methods | Klarna | Klarna | |
| Payment widget handling (display/lock/unlock) | Frontend via CentraCheckoutScript | Frontend | |
| Klarna session API Integration | Centra | Centra | |
| Klarna order API Integration | Centra | Centra | |
| Klarna server side callback handling | Centra | Centra |
*Please note that this describes Wholesale/B2B cases used in Direct to consumer (DTC). This is not to be confused with the Wholesale stores in Centra and the Digital Showroom.
Klarna Payments vs Klarna Checkout - supported use cases
An overview of all supported use cases in Klarna Payments and Klarna Checkout can be seen below:
| Use Case | Klarna Payments | Klarna Checkout | Comments |
|---|---|---|---|
| Age verification | No | Yes | |
| Subscriptions | No | Yes | |
| B2B Checkout* | Yes | Yes | |
| Paypal in Klarna as external payment method | No | Yes | |
| Post-purchase cross-sell | No | Yes | |
| Customer gender and birthdate collection | No | Yes | |
| Sending product images | Yes | Yes | |
| Sending product sizes | Yes | Yes | |
| Payment method cost | Yes | Yes | |
| US Tax calculation in the checkout | Only in multistep checkout implementation | Multistep checkout implementation or through address update callback | |
| Validation callback | No | Yes | Allows for additional validations in late stage of the checkout when payment is submitted by customer e.g. additional stock check |
*Please note that this describes Wholesale/B2B cases used in Direct to consumer (DTC). This is not to be confused with the Wholesale stores in Centra and the Digital Showroom.
Klarna Payments plugin configuration
To add the Klarna Payments plugin to your DTC store, follow the steps below:
- Go to 'System' in the main menu to the left
- Click ‘Stores’
- Click on your DTC store
- Scroll down to the ‘Plugins’ section and create a new plugin by clicking '+Add plugin method'
- Choose the plugin called 'Klarna Payments' in the plugin drop-down list
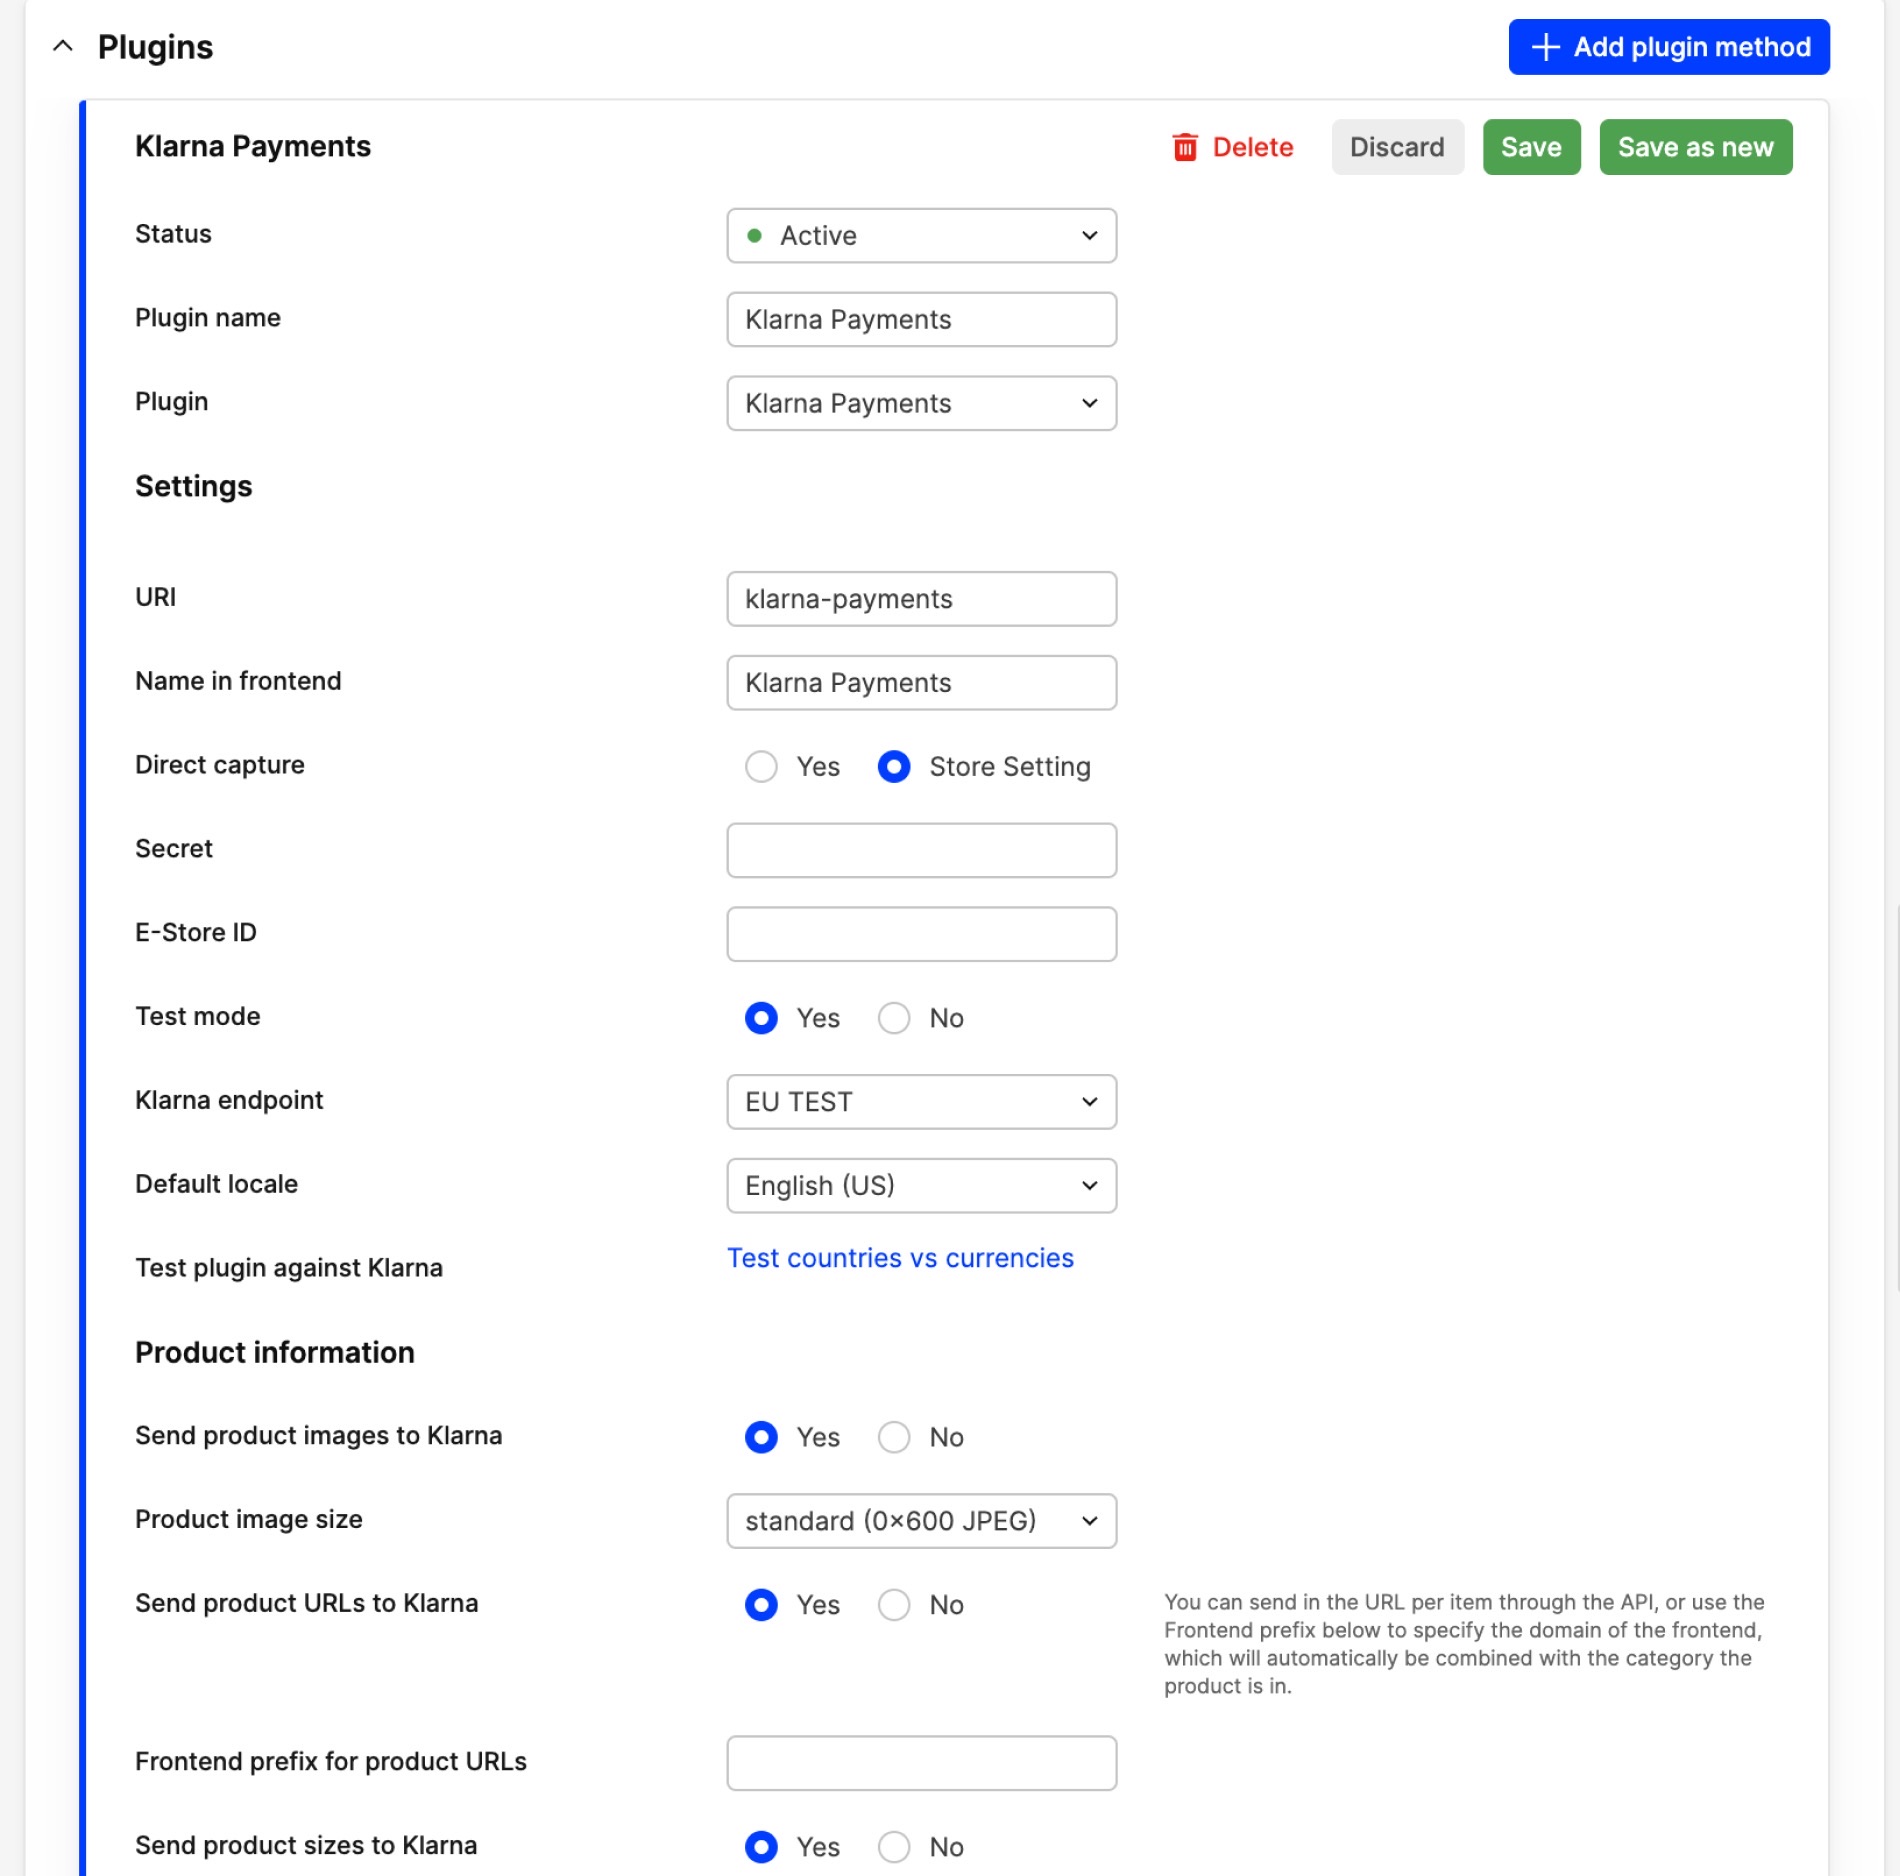
- Fill in the fields in the plugin as seen below:


Below you can read about each setting in more detail:
- Status - Make sure the plugin status is activated when you are satisfied with the setup
- Plugin name - Name your plugin, for example, Klarna Payments
- Plugin - Choose ‘Klarna Payments’
Settings:
- URI - This is automatically generated based on the name you enter in the name field. However, note that you can use a different URI if you wish. Make sure that you assign a unique URI to the plugin, especially if you're using multiple Klarna Payments plugins with plugin restrictions
- Name in frontend - Enter the name that should be displayed in the frontend
- Direct capture - Set Direct capture to ‘Yes’ for the capture to happen upon order placement. If set to ‘Store setting’, the option set on that setting is taken into account. This is especially good to choose if you don’t want Direct capture to occur, in which case you can set the store setting to ‘No’.
- Secret - Enter the API key that you receive from your Klarna Merchant Portal - Merchant ID (MID)
- E-Store ID - Enter your new EID that you get from your Klarna Merchant Portal. This is linked to your MID
- Test mode - This should be set to ‘No’ if you plan to go live in production with your new plugin. Otherwise, set it to ‘Yes’ in your QA environment for testing purposes
- Klarna endpoint - Here you select which Klarna endpoint you want to use. In the live environment you can use either EU PROD or NA PROD. If you’re based in the EU, you should select the EU PROD, which still allows you to sell to the US. This is because the setting takes into account where your business is located, but it doesn’t restrict where you can sell. If you’re based in North America, choose NA PROD here instead. Use EU TEST or NA TEST in your QA environment in a similar fashion. This should point toward the proper region as per your MID configuration
- Default locale - Klarna is available in many languages, but if you do not have localization active you can make sure that customers get the same language throughout their experience by setting a default language
- Test plugin against Klarna - This can be used to test your credentials against Klarna when you are finished setting up the plugin
Product information:
- Send product images to Klarna - Select ‘Yes’ if you would like to send product images to Klarna
- Product image size - Select the size of the image sent to Klarna
- Send product URLs to Klarna - You can send the product URL per item to Klarna through the API, or use the Frontend prefix below to specify the domain of the frontend that is automatically combined with the category the product is in
- Frontend prefix for product URLs - Fill this out if you want to define the Frontend prefix that your images should have when they are sent to Klarna
- Send product sizes to Klarna - Select ‘Yes’ if you would like to send the product size to Klarna
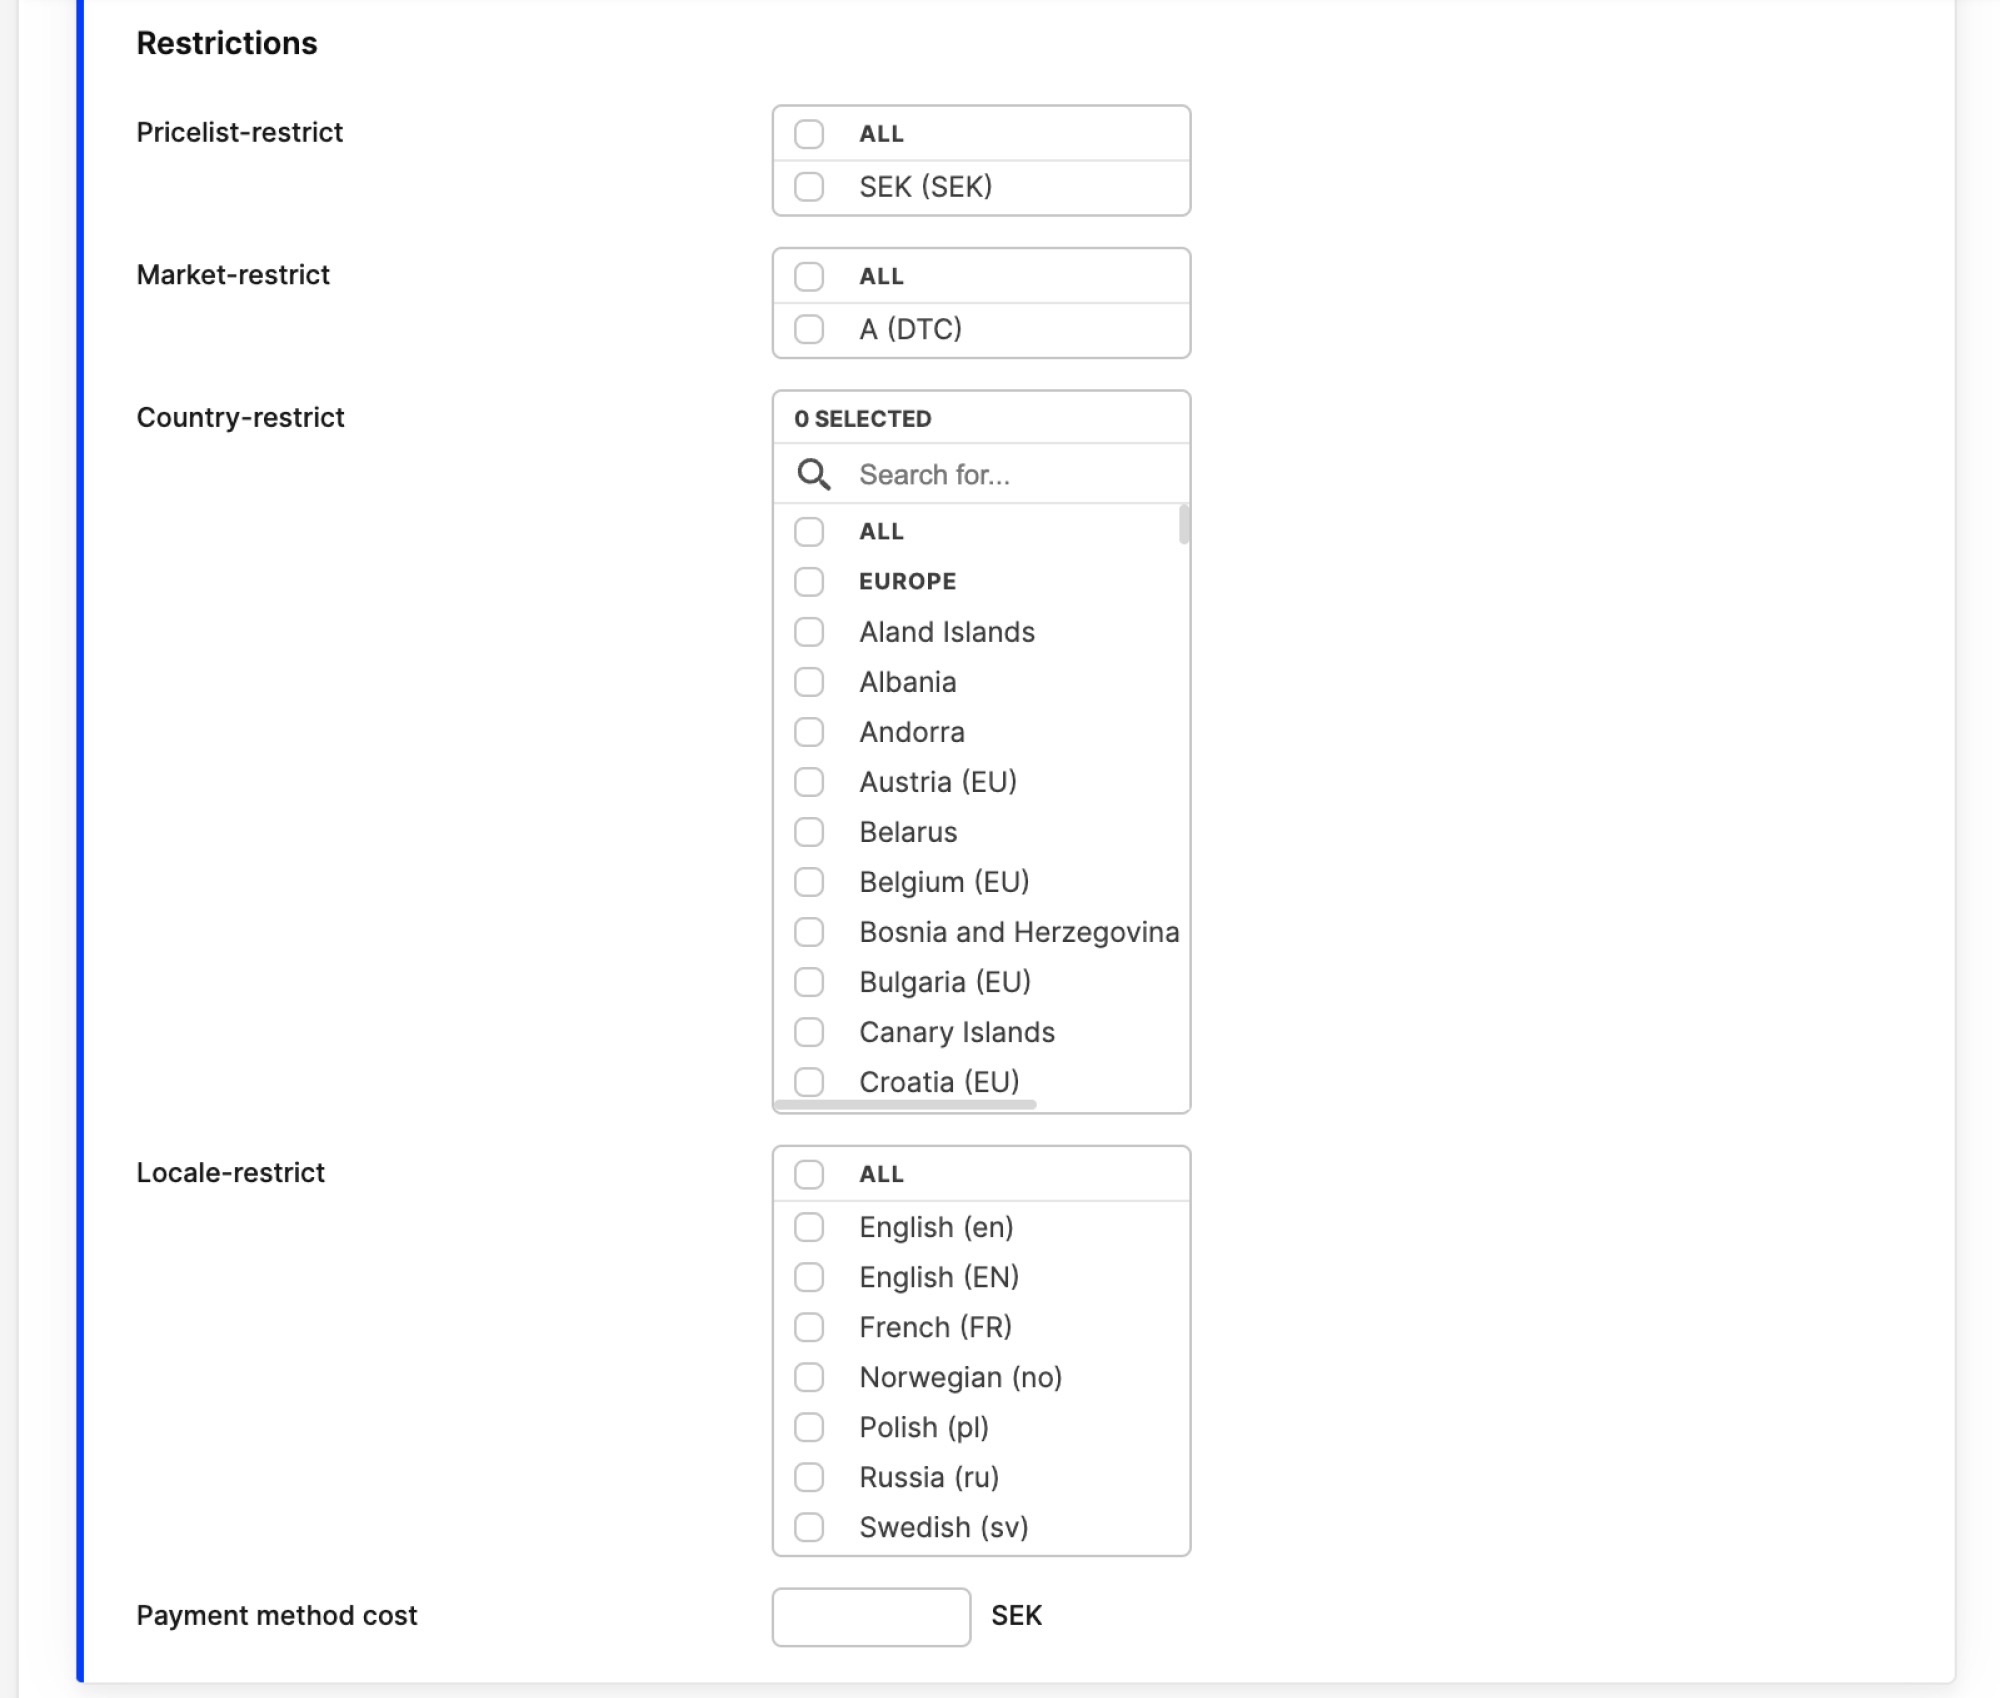
Restrictions:
- Pricelist-restrict - You can restrict which Pricelists have access to Klarna Payments by ticking the boxes of the respective Pricelists. If you don't select anything, it is available for all
- Market-restrict - You can restrict which markets have access to Klarna Payments by ticking the boxes of the respective markets. If you don't select anything, it is available for all
- Country-restrict - You can restrict which countries have access to Klarna Payments by ticking the boxes of the respective countries. If you don't select anything, it is available for all
- Locale-restrict - You can restrict which locales have access to Klarna Payments by ticking the boxes of the respective locales. If you don't select anything, it is available for all
- Payment method cost - Here you can add a Payment method cost to the order if the customer selects this payment option in the checkout. This is then listed as Handling cost on orders.
Click 'Save' when done.
For more technical information, please read our Klarna Payments developer documentation. You can also use Klarna’s demo store to test the checkout and see the difference between Klarna Payments and Klarna Checkout in real time.