How to install and integrate Fedex with Zebra printer on Mac/PC
Before you start
To integrate the Fedex shipping method, you need to prepare and setup some parts. Initially, you need to go through your product catalog and see that you have all the info that is required to integrate with Fedex. Required parameters on your products:
- SKU
- Weight
- Country of Origin
- Harm Code
- Harm Code Description
If your catalog contain this, you're ready to start. If not, please see the knowledge base on how you import or change this information on your products (Importing/Updating products from an Excel file)
Create developer keys and API access to Fedex
- Go to this link an login with your Fedex Account: https://www.fedex.com/wpor/web/jsp/drclinks.jsp?links=wss/develop.html
- Press the button in the bottom, Obtain Developer Test Key, fill in all info that is required.
- When you're done, you'll get a receipt with a bunch of keys and passwords. Save this information, since you will only get this information on this receipt page.
- You should also recieve an email with some additional information. Save this aswell.
-
Summarize the information you've got below the following titles:
- Test Account
- Test Meter number
- Test Developer Key
- Test Password
Some of the credentials were inside the receipt, and some of it was in the email you got on point 3 and 4 above. You will need this information later on in this tutorial.
- Now we should also activate some Production credentials. Go to: https://www.fedex.com/wpor/web/jsp/drclinks.jsp?links=wss/production.html and log in with your Fedex details.
-
Press the button in the bottom, Obtain Production Key. Answer the following questions as following:
Do you intend to resell? No
Please check the box next to each type of Fedex web service you intend to use: Fedex Web Services for Shipping (includes Rate, Track, etc.)
Please indicate whether you are developing your Fedex integration solution as a Corporate Developer.....: Corporate Developer
- Agree to all terms and fill in your information, when you're done, you'll get more keys/passwords inside the receipt-page. Save these aswell.
- And you should aswell get some more info in the email. Save these.
-
Save the information you have below, the following titles:
- Production Account
- Production Meter number
- Production Developer Key (This one is also called Authentication Key)
- Production Password
Some of the info was inside the receipt, and some of it was in the email you got on point 8 and 9 above. You will need it later on in this tutorial.
How to get the Zebra printer to run on a Mac
- Plug in the printer with USB.
- Go to the Apple icon, select System Preferences... and then select Print & Fax.
- Press on + below the list of printers.
- Mark the Zebra-printer in the list.
- Select, in the drop down menu below: "Select printer model...", a window pops up.
- Select "Zebra EPL2 Label Writer" and press Add.
- Save the printer so it's marked as green and ready.
- Put this file: Centra - Auto Print.scpt inside "Macintosh HD / Library / Scripts / Folder Action Scripts".
- Right-click on the "Download"-directory in your Home directory (if that is the directory downloads from your browser ends up inside) and select "Folder Actions Setup...".
- Tick the checkbox for CentraVMS - Auto Print.scpt in the list.
- Tick all three checkboxes, the one above, the one next to the directory called Downloads and the one next to CentraVMS - Auto Print.scpt
How to get the Zebra printer to run on a PC
- Plugin the printer with USB
- Install the drivers included with the product. Sometimes Windows is able to get the drivers automatically
- As soon as you have the printer installed, download the Centra Auto Print program here: Centra Auto Print. (You might need to install Microsoft .NET Framework. You can do that here: Microsoft .NET Framework)
- This program will look after .EPL-files inside the directory you specify (preferably the directory your browser download stuff too) and print them out with the printer you've selected. It'll then delete the files. You can minimize the program and auto start the program so you always have it enabled.
- Start the program and select directory and printer. Minimize it.
Regardless of your OS, you should now be ready to try the integration. And if everything is setup correctly, when we try to print out a label from Centra, it'll automatically print out in the label. This test label needs to be sent to Fedex for verification. More about this further down inside this tutorial.
How to enable the plugin inside Centra
When all the info above is saved you're ready to activate the plugin. You should create two Shipment Methods since the test credentials is working directly, but the production credentials will need verification from Fedex UK.
- Inside Centra, go to 'System' > 'Stores' in the main menu to the left
- Select the store you want to activate the plugin on. Preferably a Retail-store to begin with
- Scroll down to the plugins, and click '+ Add plugin method'
- Select the 'FedEx' shipping method
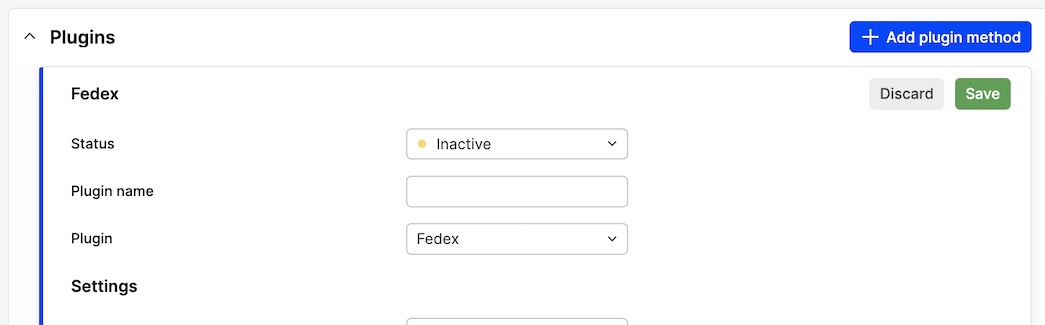
- A fieldset will open. Activate it, name it FedEx and write FedEx inside the Carrier field. Keep the Service field empty as it will automatically be filled for each shipment depending on service selected. In the Shipping Method field, select FedEx. A new fieldset will open up
- Insert all test credentials in the first fields. Change Label Format to EPL. Select if you want to use ETD or not, this is something you decide together with Fedex
- Keep Test-Mode to Yes
- Insert the Shipper-address. This address is where the pickup will be. Insert a person that will be the one in charge for the shipment inside the Person Name field
- Press 'Save'.
You have now created a Test-Shipping module for Fedex inside Centra. Do the same thing with the production credentials. But keep it as Yellow and name it FedEx and set Test-Mode to No. As soon as you get the OK from Fedex UK you should enable this one and disable the FedEx method.
How to use the plugin inside Centra
We'll now go through how you use the plugin in your everyday work. For the verification process, you should use the method called FedEx.
-
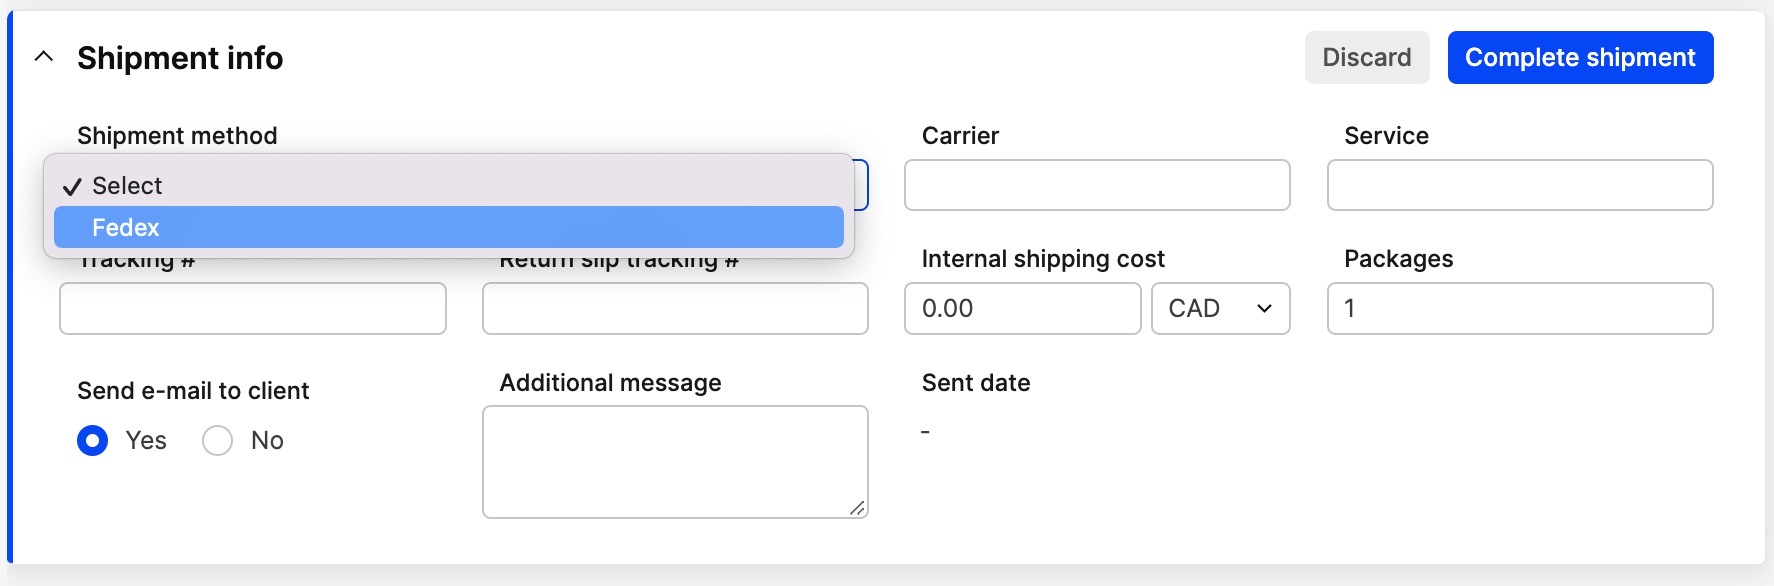
When you have a shipment, go down to the part where you're able to complete the shipment. You'll now see a field there called Shipment Method. Select the method you've created inside this field, a button called + External Shipment' will show up, press it. You will see the following view:
-
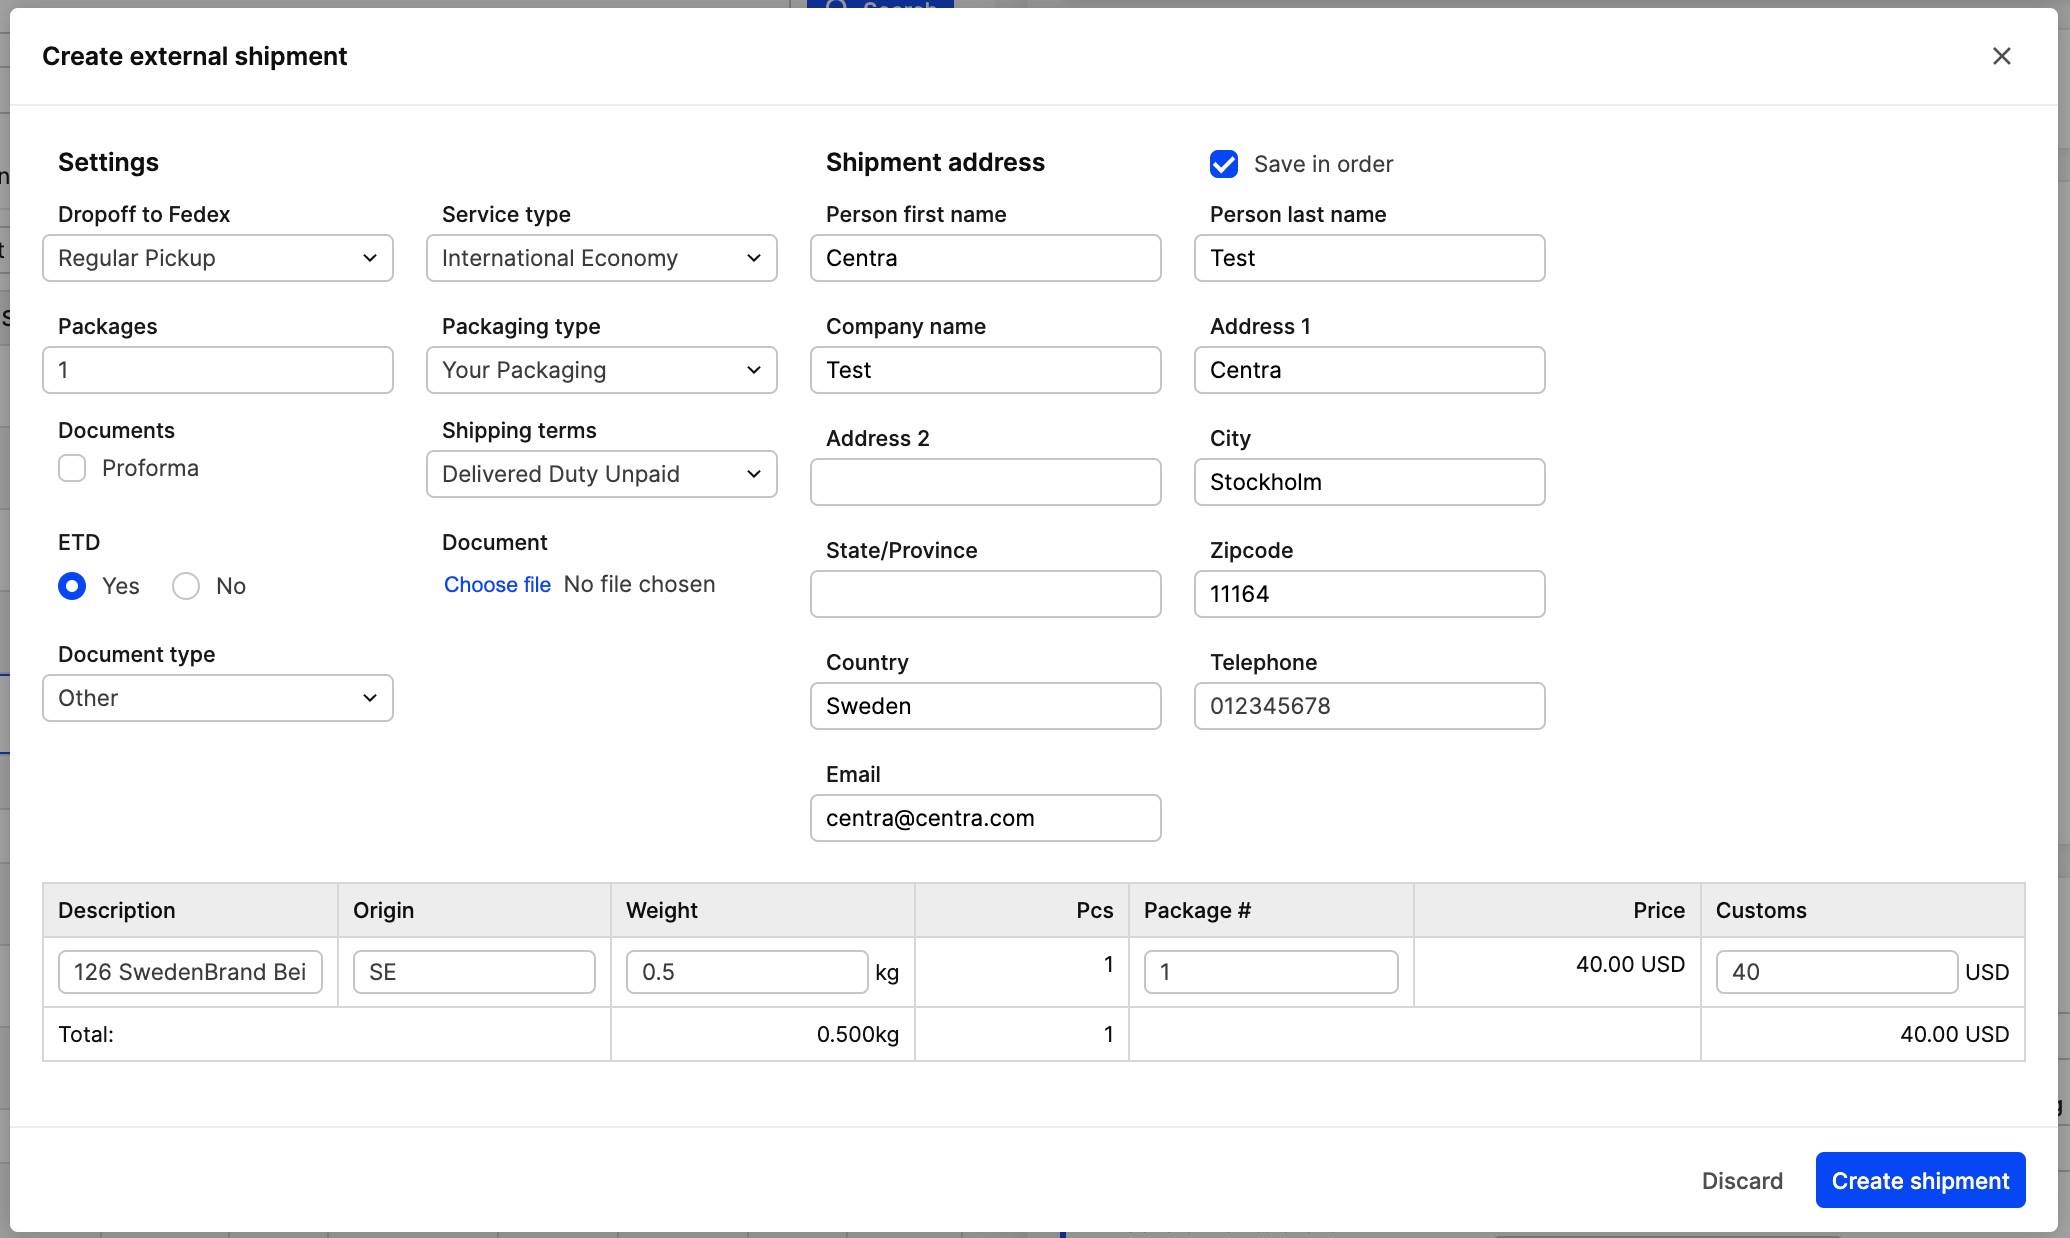
You will see a popup where you're able to change settings for the specific shipment, and see that everything looks ok. For the test now, keep it as it is. When you're done, press 'Create shipment'
-
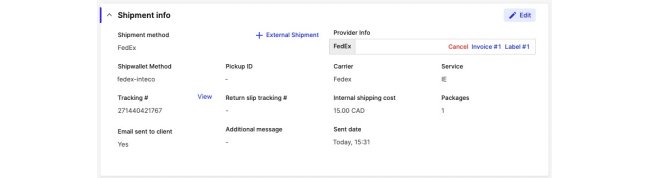
You will now have the label auto downloaded. If ETD is activated, the documents will be sent to the nearest airport automatically. You can also print an Invoice from Fedex by pressing the 'Invoice'-button.
-
Note: The file must be downloaded to the directory you set up earlier for the auto print to work. Please see the troubleshoot section if it doesn't work.
You are now done. Packet Pickup is not a part of the integration so that is something you order separately from the Fedex page. If you get errors it often says what's wrong. If not, it probably will say "General Error", then the Fedex API is down, and you'll have to talk with your contact at Fedex. -
You can always cancel a pickup by pressing 'Cancel'-button.
Fedex verification process
To print out labels before you've got your labels verified by Fedex you should have used the FedEx method above with Test-Mode set as Yes as this method always will print out labels for you. You should also use the Label type EPL as it's the only one working together with a Zebra printer. News! Please read this if you are in the nordic countries, addresses are different for this process: Fedex Verification Process
-
If you successfully got the label printed out then you need to send this label together with all the Production Credentials to:
EMEA Web Services Certification
FedEx House
Bond Gate
Nuneaton CV1 4AL
United Kingdom
- Await an answer from us or from Fedex. As soon as you get this, you should try out your Production Credentials-shipment method and see that you're able to print out labels with this one. Then you're ready to go!
Troubleshoot, if the print out of the EPL doesn't work
-
I get an error when pressing CREATE in the Shipment-popup
Please see if you can see what error you get. Maybe the products you have inside the order is missing weight or Country of Origin? This is required as per above.
-
I get "Shipment Created Successfully" and the file is downloaded to my computer, but it doesn't print.
Go inside the directory where the file is located. Is it still there? If not, the printer queue have it. Please turn off and turn on your Zebra printer. Sometimes the printer loses its connection and needs to be restarted manually. If this doesn't work, maybe the printer has another name than the standard. Follow this guide to find out:
- Open terminal (Search after "terminal" in the Spotlight on your desktop)
- Write:
lpstat -a - Press Enter, you will now see a list of printers. Copy the name of the Zebra printer you should use. You need the complete name, for example; Zebra_LP2844 or something alike.
- Double click on the attached SCPT-file. You will see the name of the printer inside it. Change the name to the name selected in point 3 above. Save. Try again by downloading the EPL from Centra again.
If the EPL is still there, the Folder Script is not working properly. Try moving the file outside the directory and move it inside again. Wait a few seconds. If it still doesn't work, go through the points regarding "How to get the Zebra printer to run on an XXX" depending on your OS.