Products batch actions
About this article
You can use the Product Batch Actions to make changes to multiple products and variants at the same time. From the Products page in the Centra admin, you can select the products you want to update, select the properties you want to change, and apply those changes.
How to use Products batch actions
Product Batch Actions allow you to make bulk changes to products, variants, media, and more. To use them:
-
Select the products you want to modify by checking the boxes on the left-hand side of the listing.
-
Select a property from the dropdown menu, which includes options like Edit Product Attributes, Edit Variant Attributes, Change Variant Status, and more.
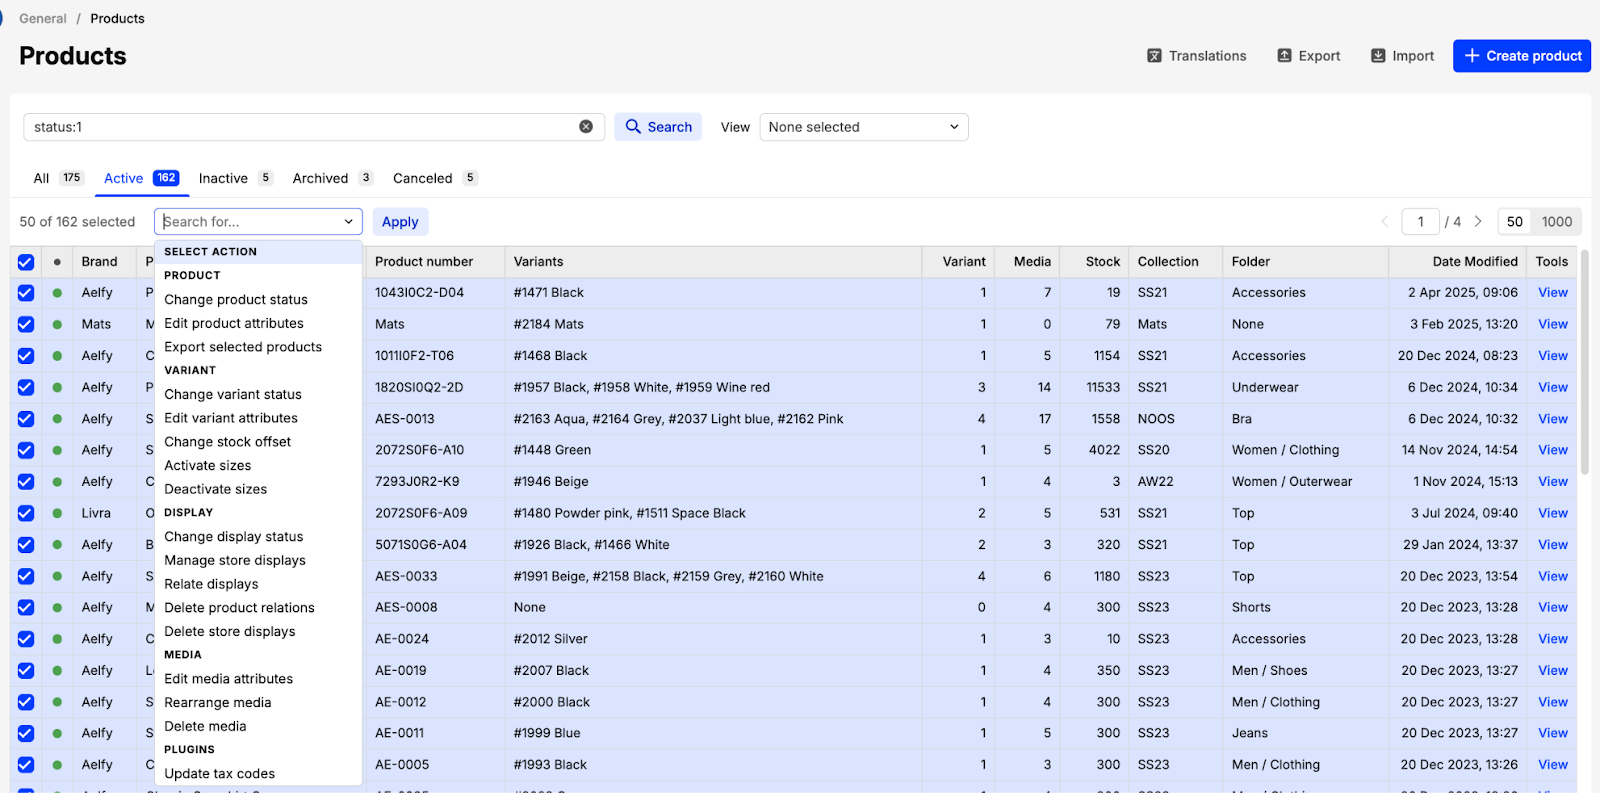
-
Click ‘Apply’ to proceed. A pop-up window will appear with additional settings based on the action selected.
-
Save the changes by clicking the corresponding button.
Please note the save button may be labeled Save, Change, Activate, Confirm, Delete, or Submit, depending on the action.
Products batch actions options
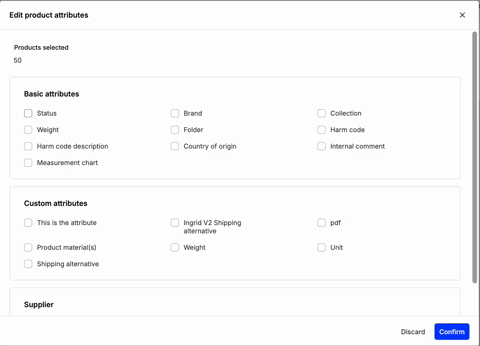
Edit Product Attributes
Update multiple product attributes, including Basic and Custom attributes, as well as Supplier details. To edit, select the attributes you want to modify by checking the corresponding boxes that will unlock the relevant fields for input.
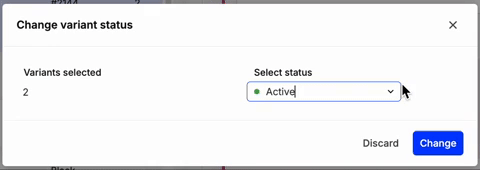
Change variant status
Change the status of the selected product’s variants. Available options include: ‘Active’, ‘Inactive’ and ‘Canceled’.
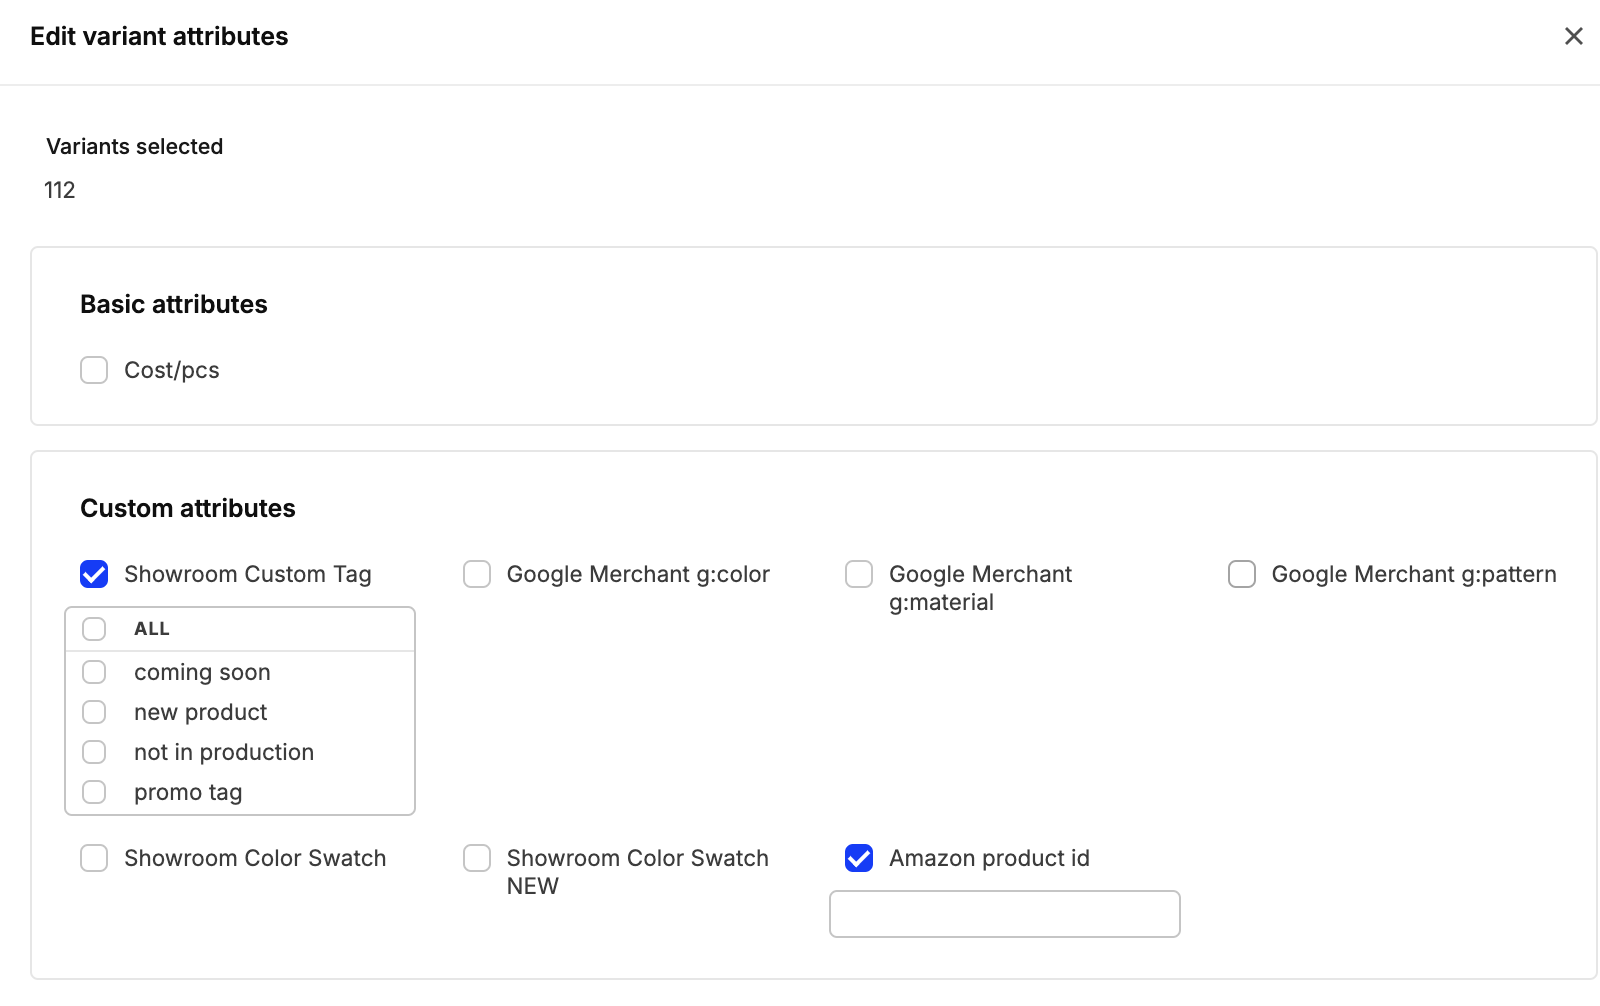
Edit Variant Attributes
The Edit Variant Attributes action lets you modify all variant-related attributes, divided into Basic Attributes and Custom Attributes. It follows the same pattern as the Edit product Attributes feature.
Please note that any value you set will apply to all variants of the selected product.
By default, attributes are hidden behind checkboxes. Selecting a checkbox reveals the corresponding input field, which varies based on the attribute type, such as text fields, dropdowns, or multi-select options.
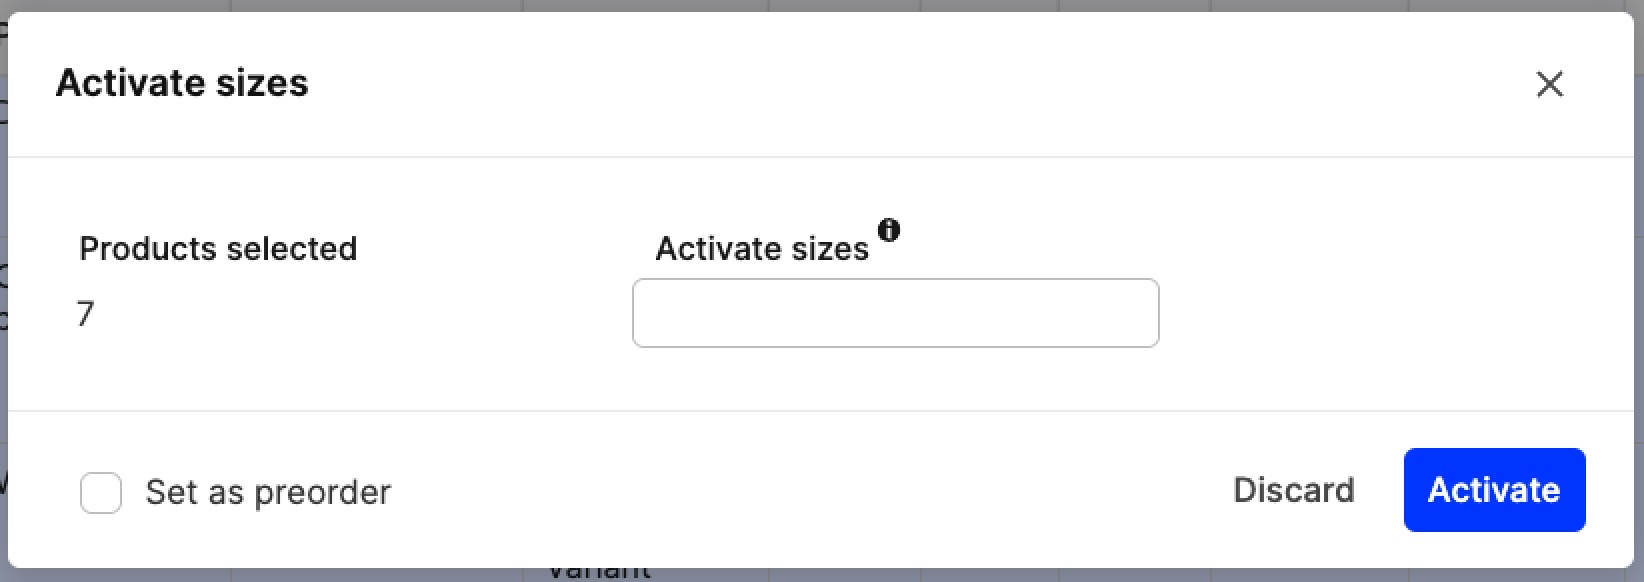
Activate size
This feature allows you to activate the sizes of the selected products. On the left-hand side, you can see the number of products you have selected. In the ‘Activate sizes’ field, you can enter the sizes you would like to activate, and separate them with a semicolon (;). You can also tick the ‘Set as preorder’ box if you would like to set the selected products to have unlimited stock. You can read more about preorder here.
Find out more about Size charts and Sizes here.

Manage store displays
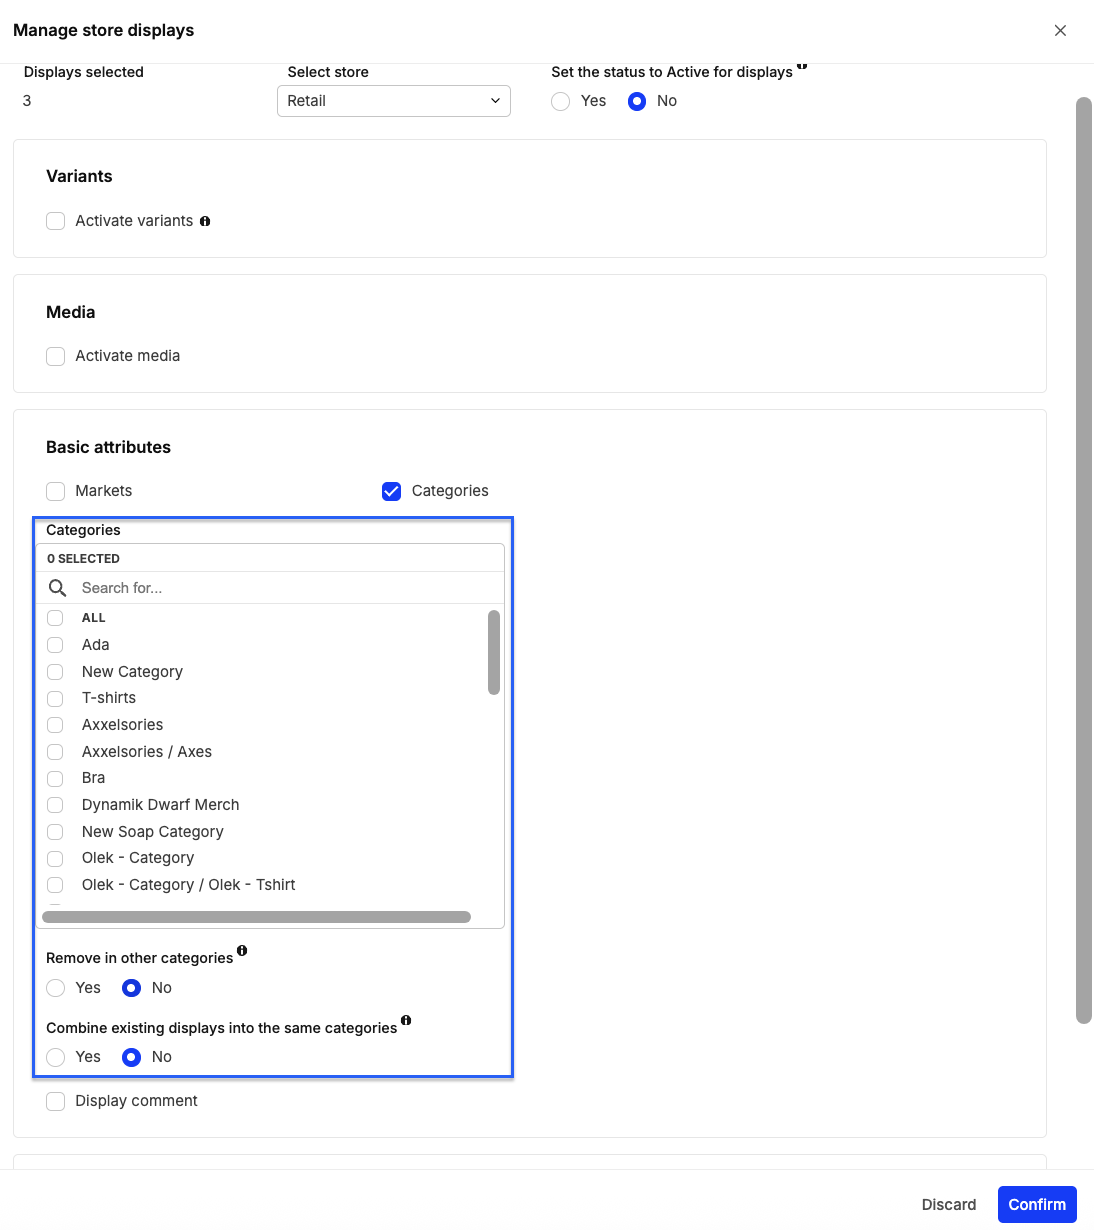
The Manage Store Displays bulk action lets you quickly update how selected products and variants appear across different stores. This includes their visibility, availability, and store-specific attributes. When you select this action, a pop-up window will open with four columns:
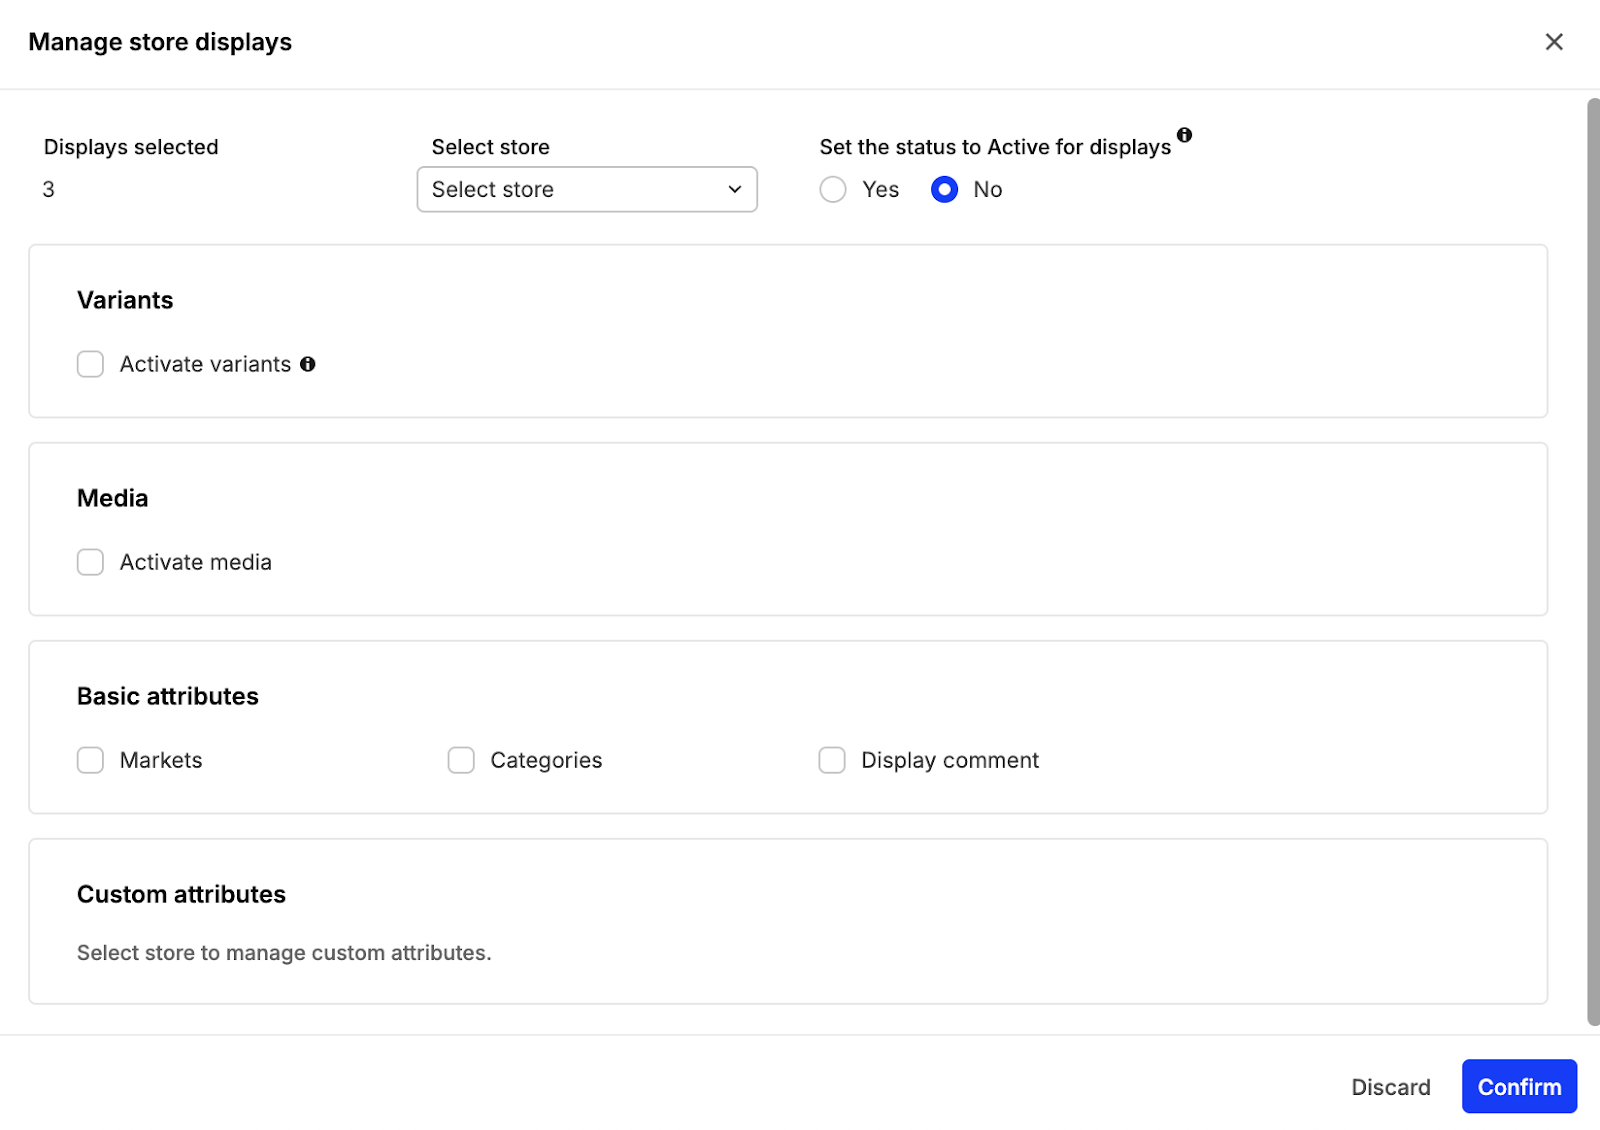
- Variant: Select which variants to display.
- Media: Select store-specific media if needed.
- Basic Attributes: Update common settings like Market, Categories, visibility, and status.
- Custom Attributes: Modify store-specific custom fields (if available).
Key Features
- Store Selection, choose a store to see its related settings, such as:
- Markets
- Categories
- Custom Attributes These will remain empty until a store is selected.
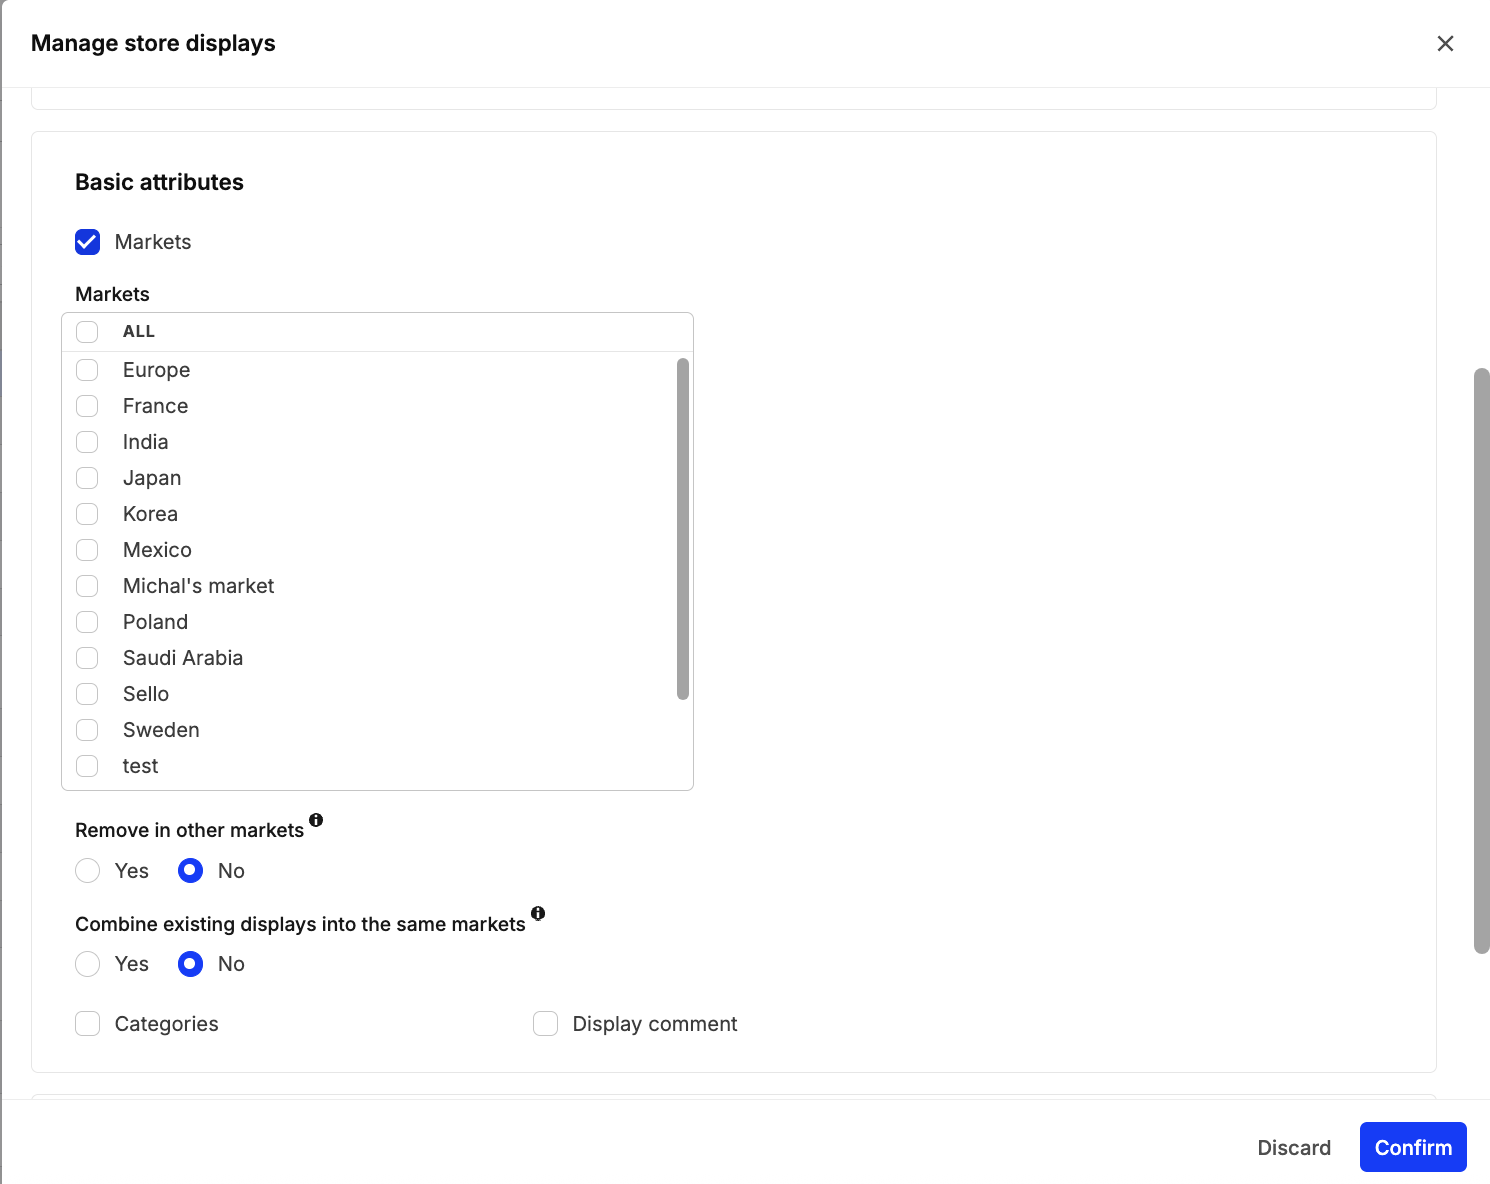
- Market Specific Settings: In this section, you can manage visibility and availability of the product display per market.
Additionally, you’ll also have the option to:
- Remove the display in other Markets: helps keep product visibility consistent and ensures that the product is only shown in the specific markets you’ve selected.
- Combine existing displays into the same markets: When set to 'Yes', the displays you select will keep their current markets and also get the markets from the other displays they are combined with, plus any new ones you pick.
-
Wholesale Specific Options: If you select a Wholesale store, extra fields will appear under the Basic attributes section:
- Minimum Order Amount
- Order Denominator
Changes made through bulk actions will apply only to the selected products/variants and the chosen store. Always double-check the correct store is selected before making changes.
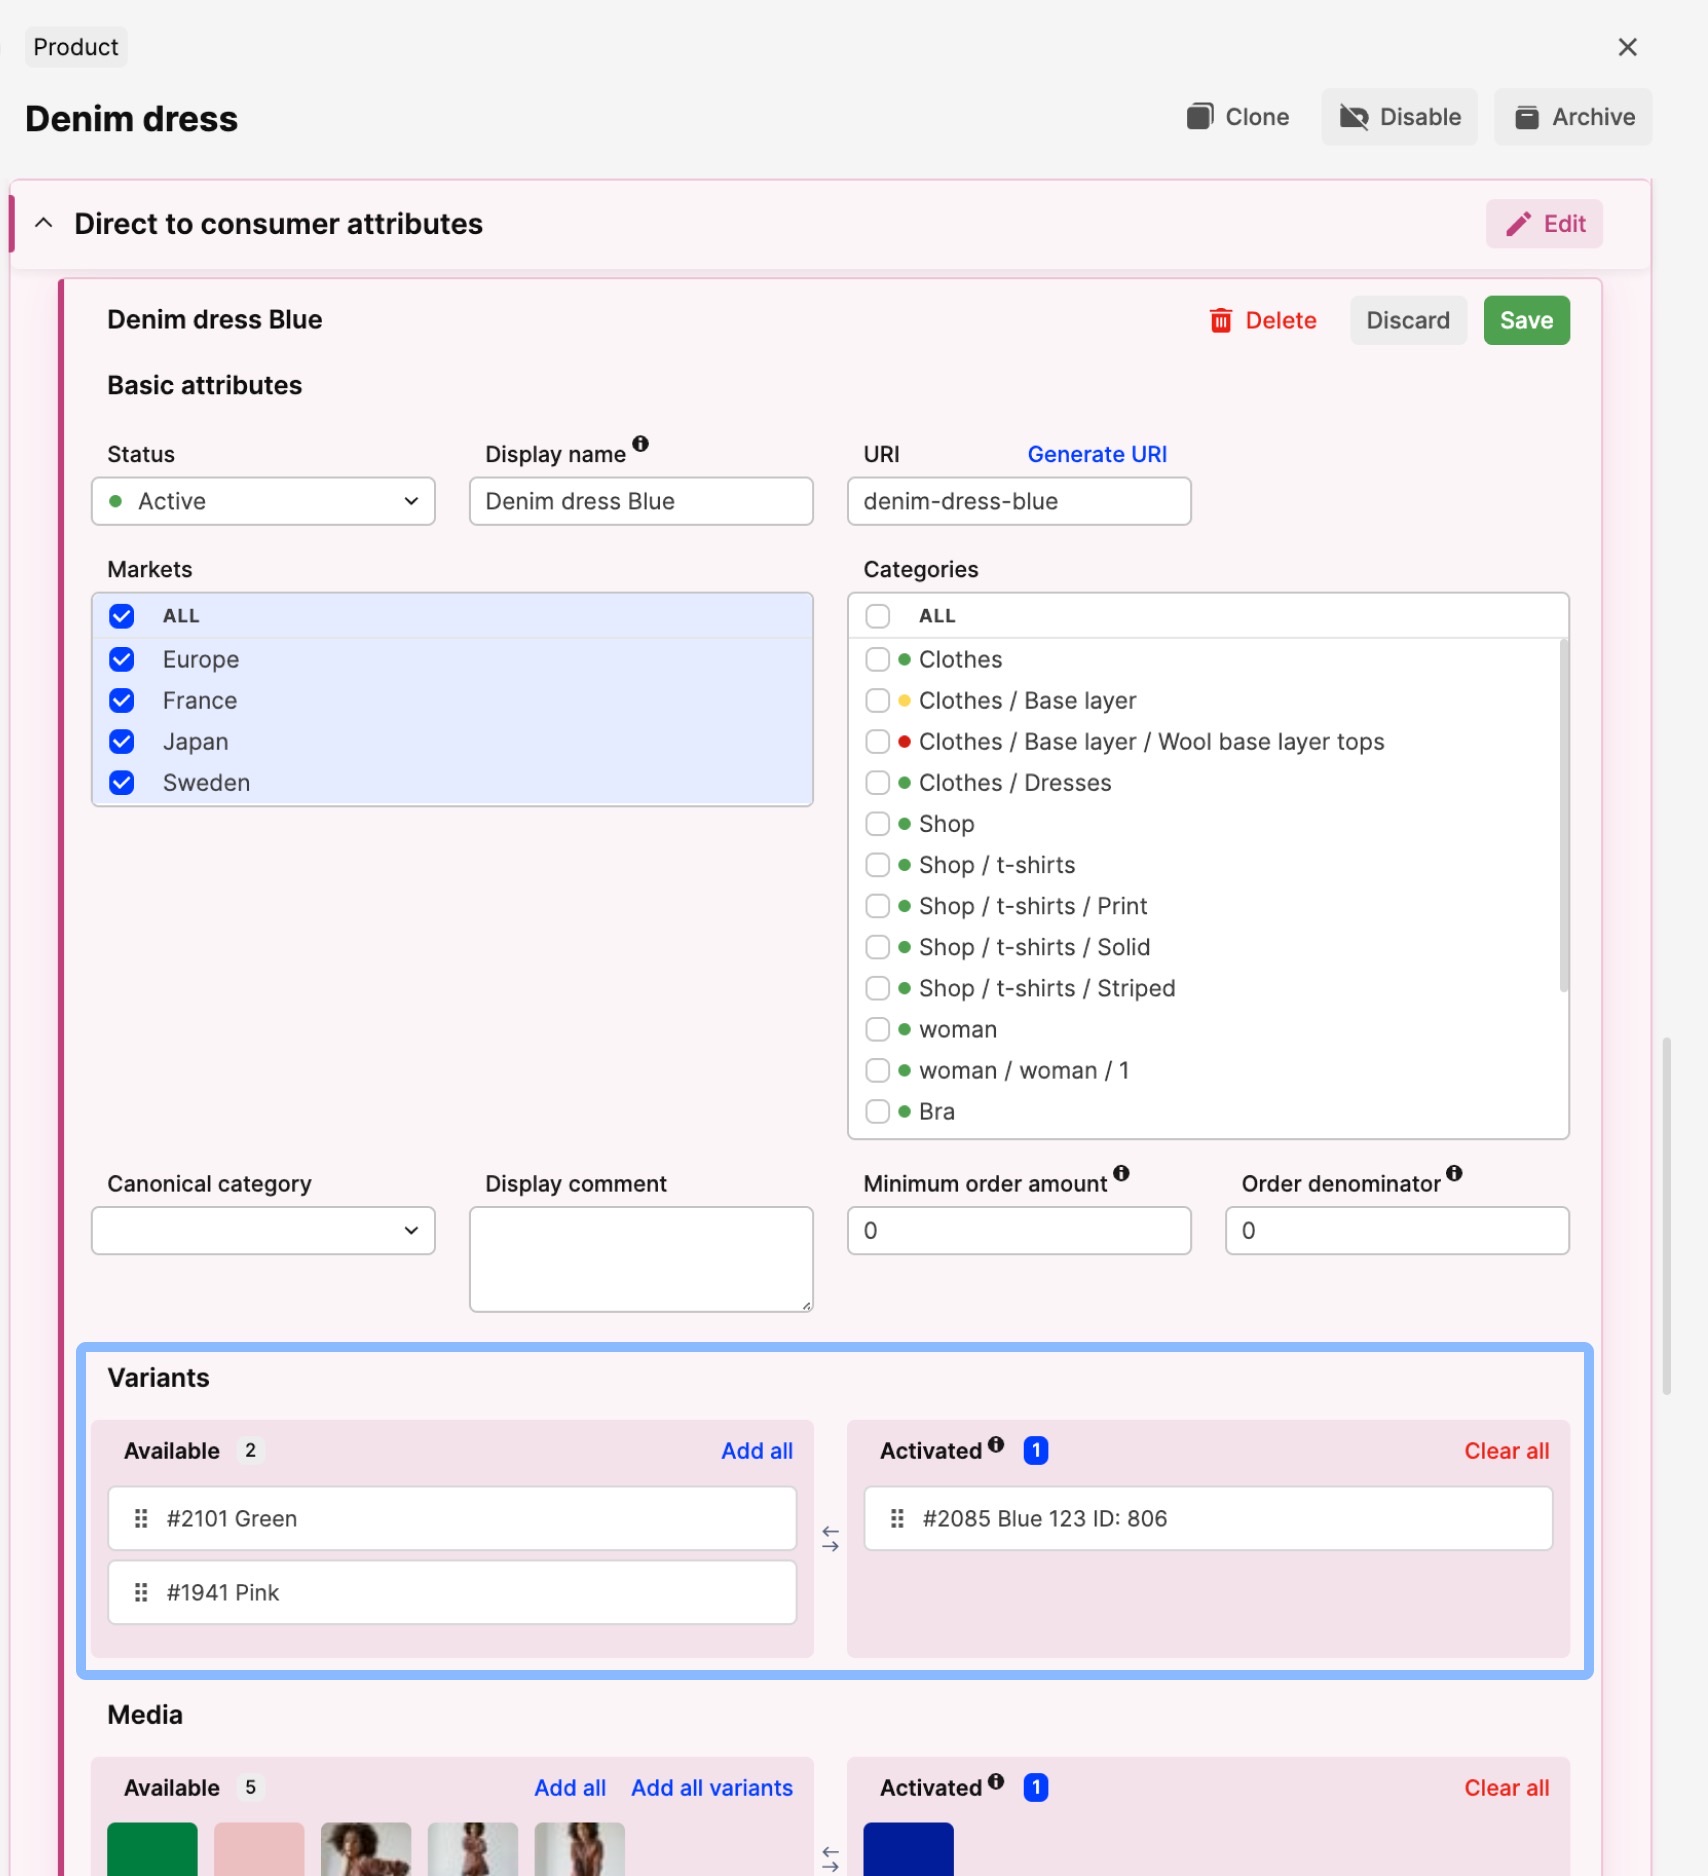
Variants
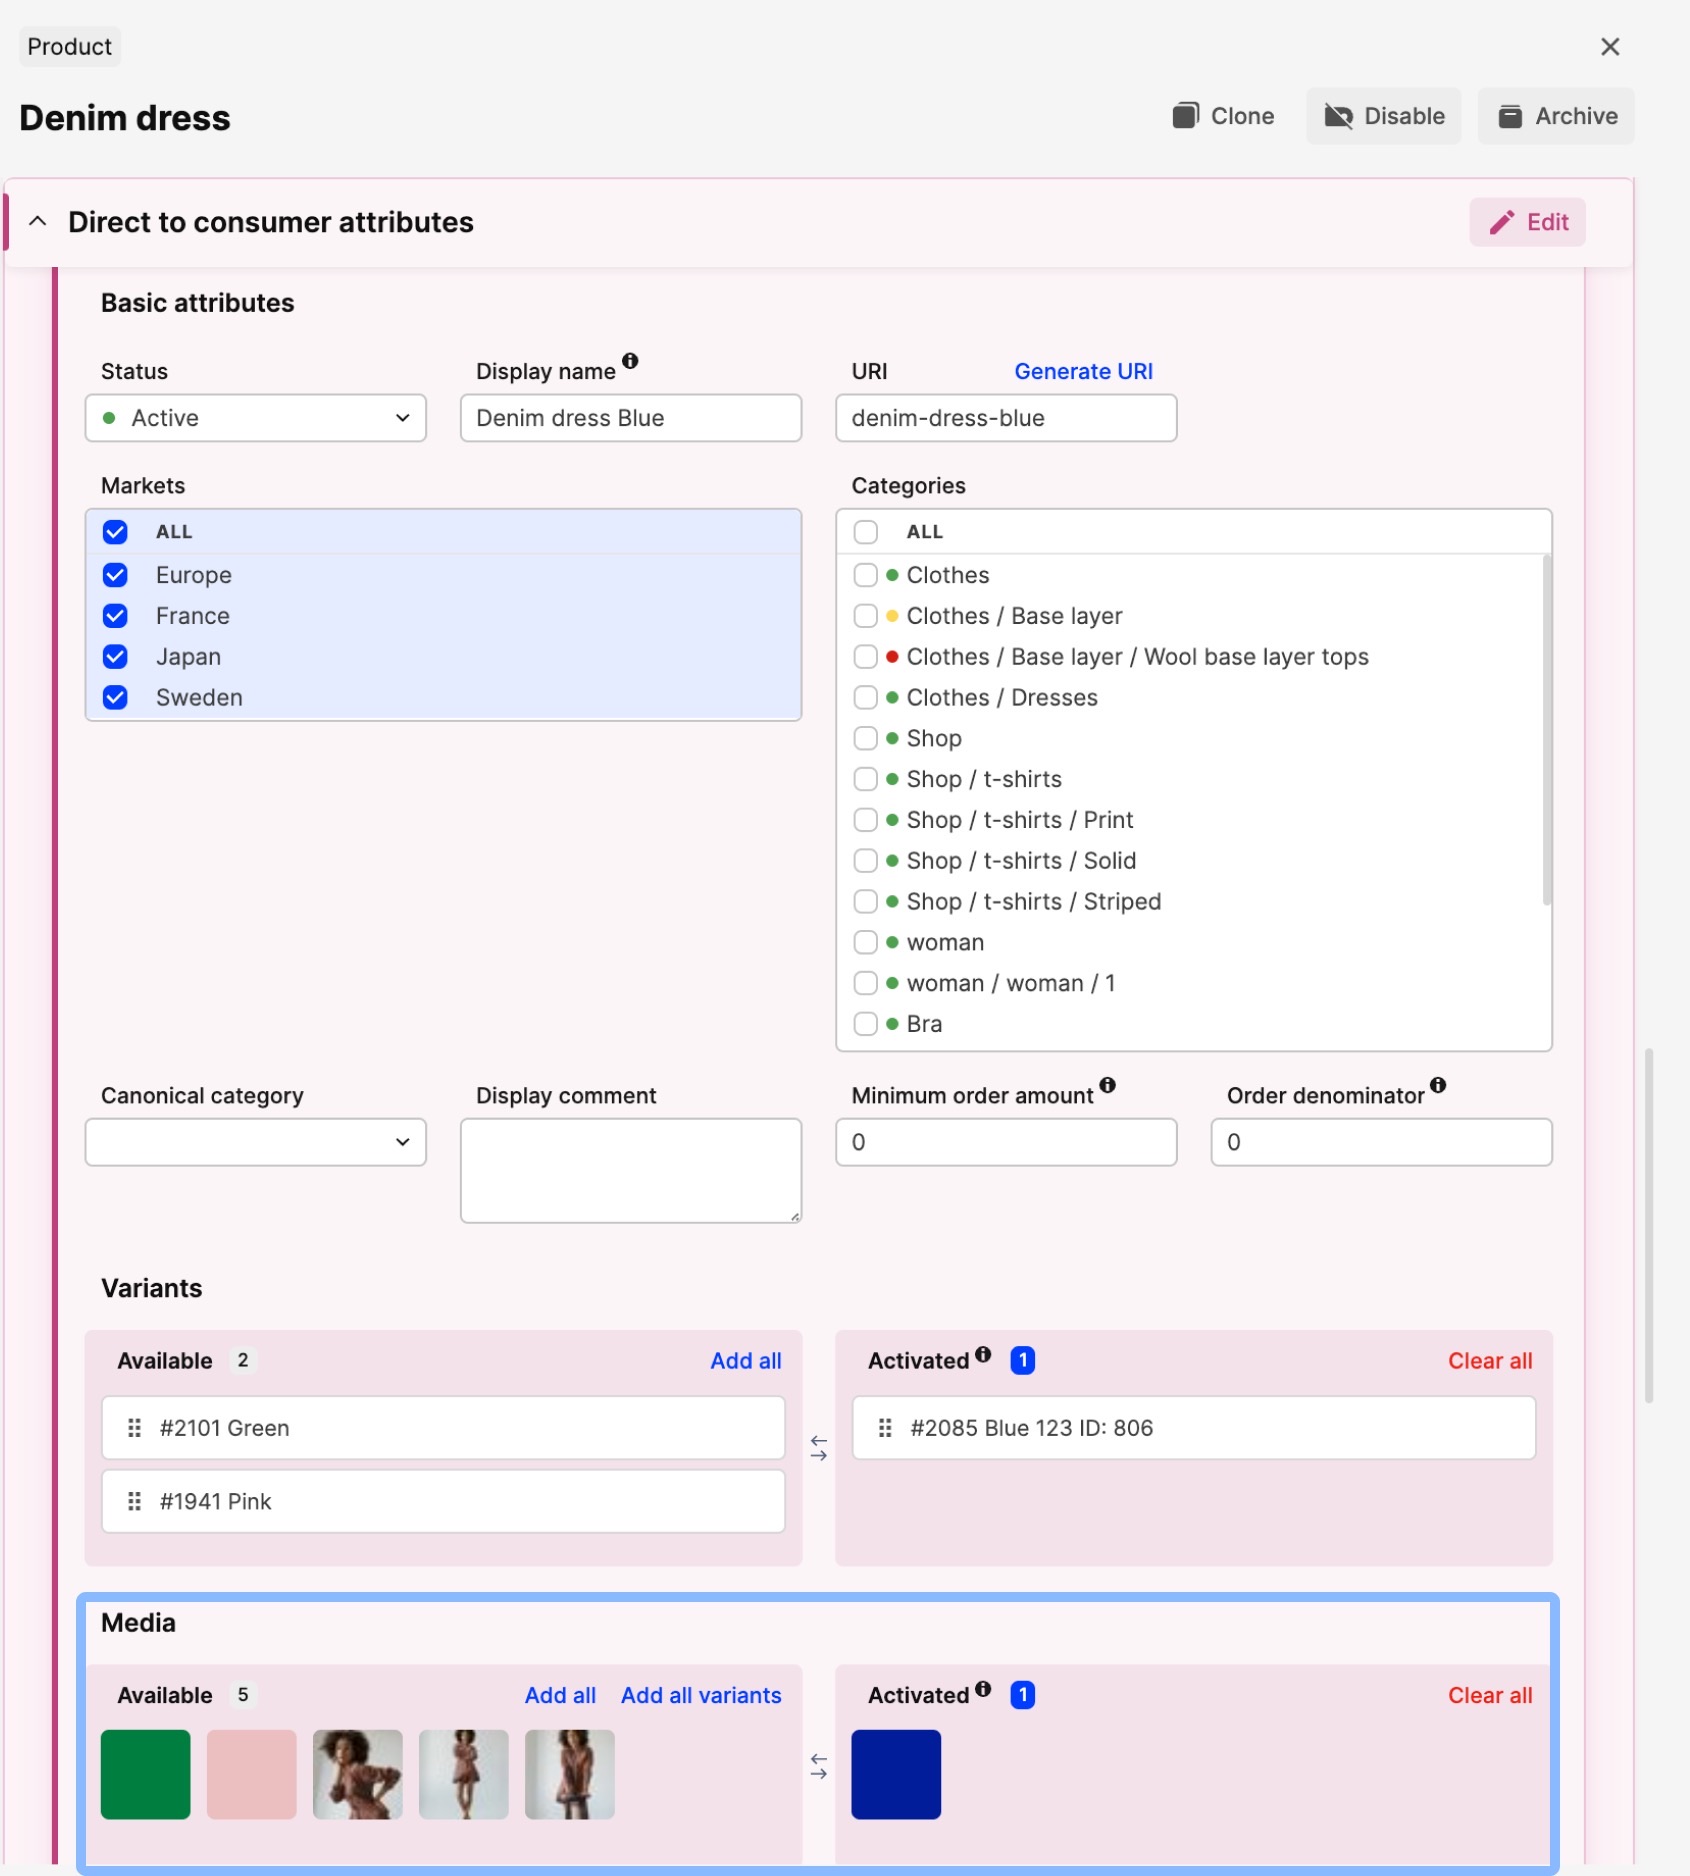
- Activate variants: Within a display, there is a section where you can activate variants. Drag and drop between available variants and activated variants, as seen below:
Tick this setting to activate all available variants in the displays of the selected store.
- Make display for each variant: This setting becomes available only when you tick ‘Activate variants’. It is relevant if you have more than one variant in the selected products. If that’s the case, then you can decide whether a display should have all variants activated, or if each variant should be activated in 1 display.
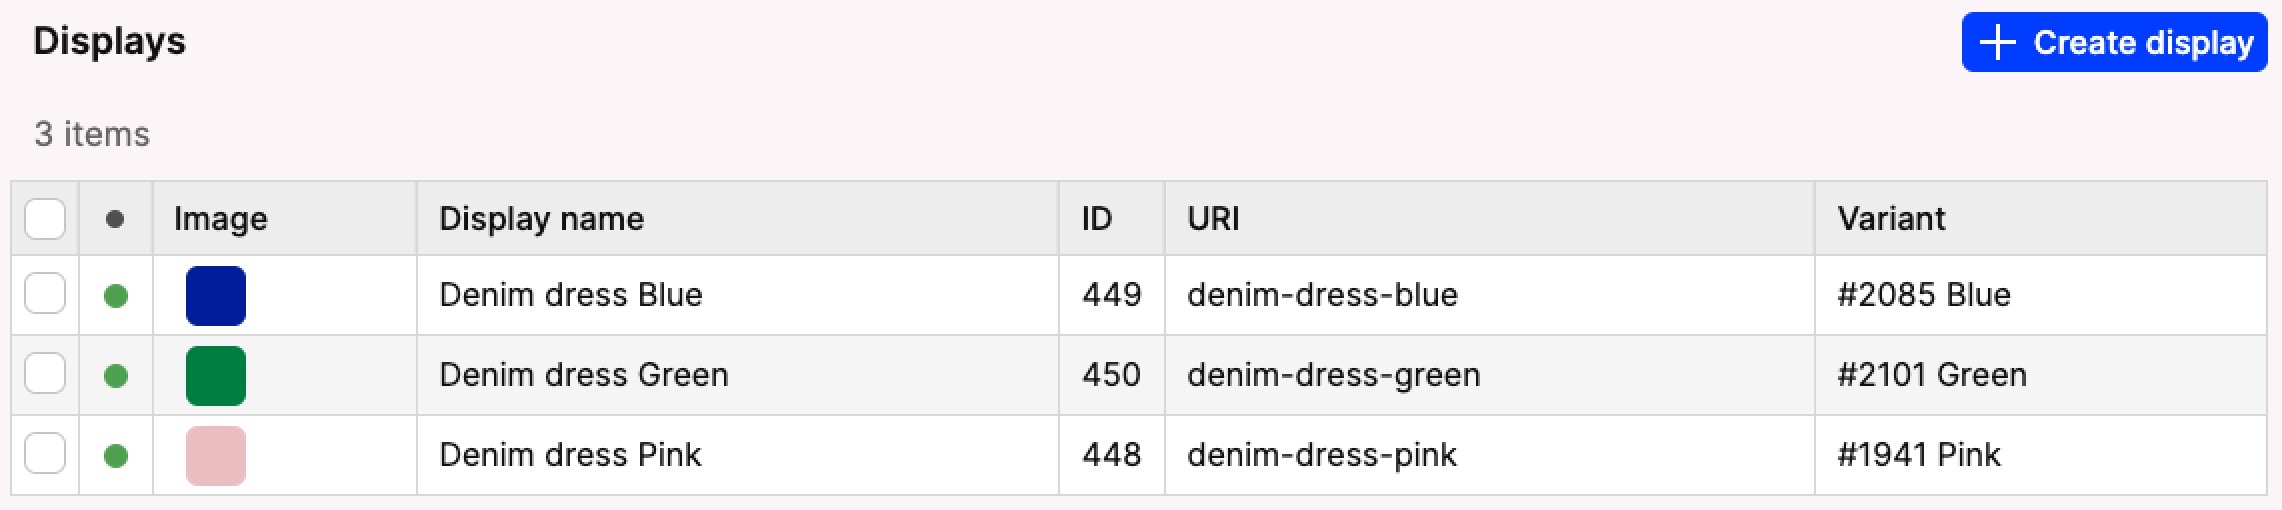
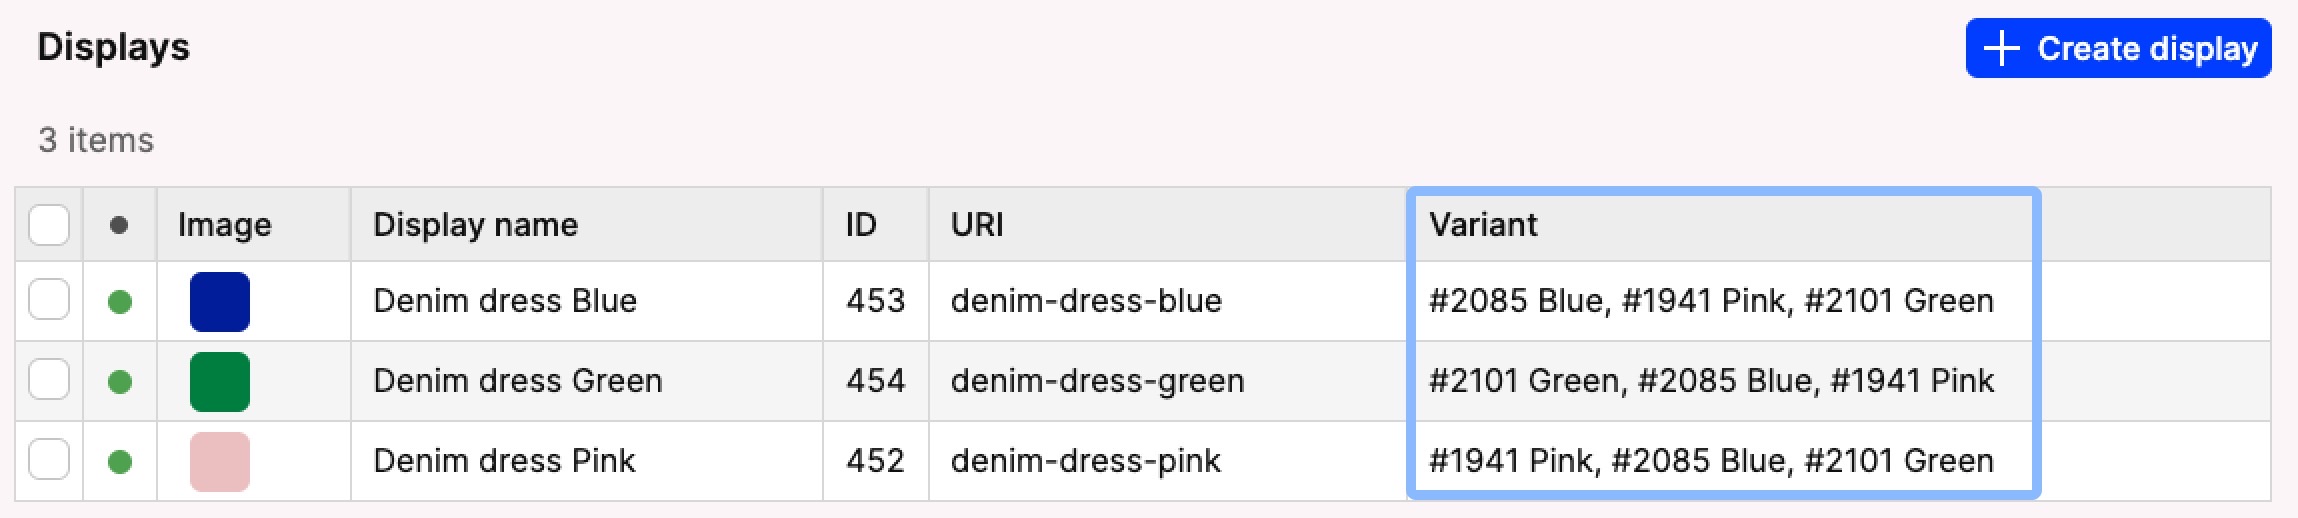
Example: You have three variants in the product - Pink, Blue and Green. When you tick ‘Make display for each variant’, you obtain three displays, and each one of them has only one of those variants activated. Therefore, you have a display for Pink, another for Blue, and another for Green. If you don’t tick this box, all variants are activated within one display. Both examples are showcased below respectively:

When ‘Make display for each variant’ is ticked, the following options also become available:
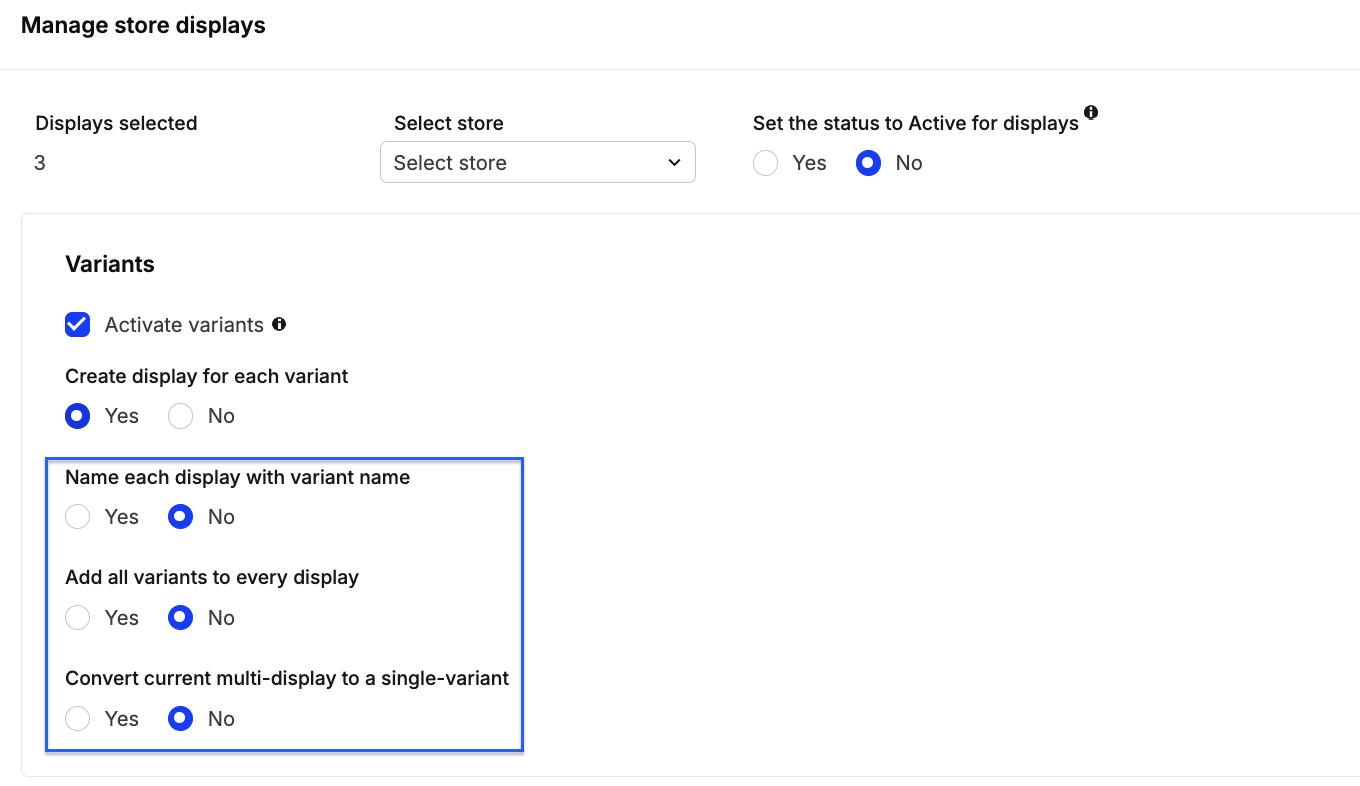
- Name each display with variant name: By ticking this, you ensure that the display name is the same as the variant name on each newly created display.
- Add all variants to every display: This ensures that all available variants are added to the newly created displays.
Example: You have three variants: Pink, Blue, and Green. Three displays are created, since three variants exist. Each display includes all three of these variants in it:
- Convert current multi-display to a single-variant: This setting can be used when performing a migration from multi-display to single displays as seen below:

Display Status
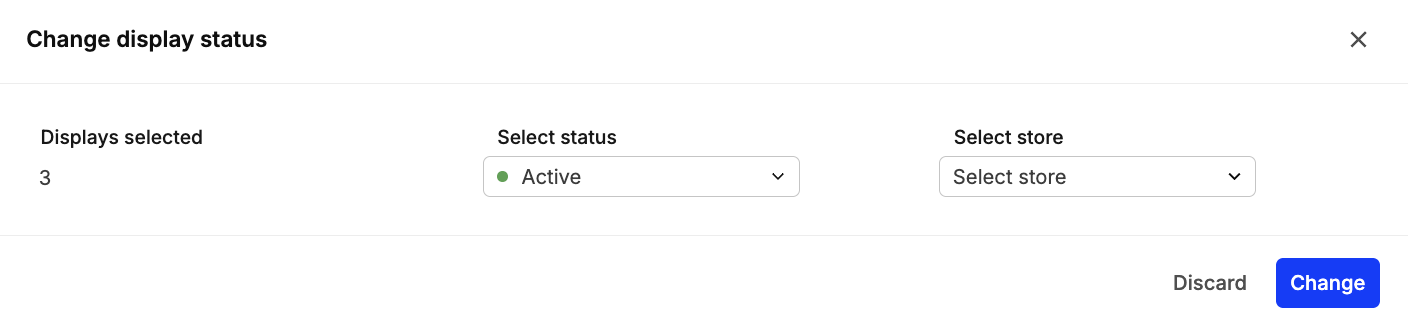
‘Change Display Status’: . Tick the box and choose between ‘Active’, ‘Preview’, and Canceled’. Read more about the display status here.
Categories
- Remove in other categories: Its function is to remove all other categories that might have been added previously on the selected display, so that only the selected categories are saved.
- Combine existing displays into the same categories: Here you can choose whether any existing displays should include the same categories as the ones selected in the other category-related settings.
Media
- Activate media: Within the display settings, there is a section where you can select available media and activate them as seen below:
This is what this setting regulates in bulk for all selected products.
- Only media connected to variants: Once media files are uploaded to a product, you can connect them to variants. By ticking this setting, you ensure that only media connected to variants are activated. The unconnected media remain in the available media side.
- Deactivate previous media: If any media were previously activated in the selected displays, they are deactivated when you tick this box.
Delete store displays
On the left, you can see how many products have been selected under ‘Products selected’. On the right you can select a store where the displays will be removed.
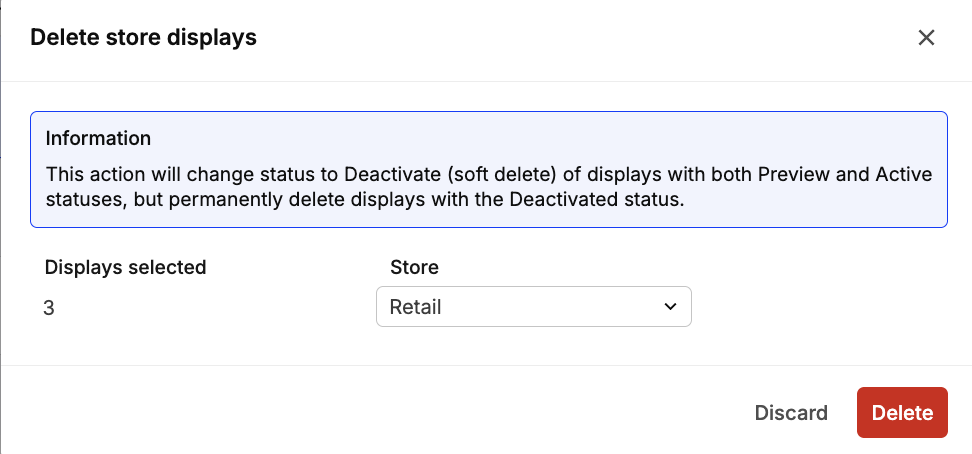
If you want to delete the displays completely from Centra, perform this action twice. The first time the display status changes to ‘Deactivated’ (Red), and the second time it is removed completely.
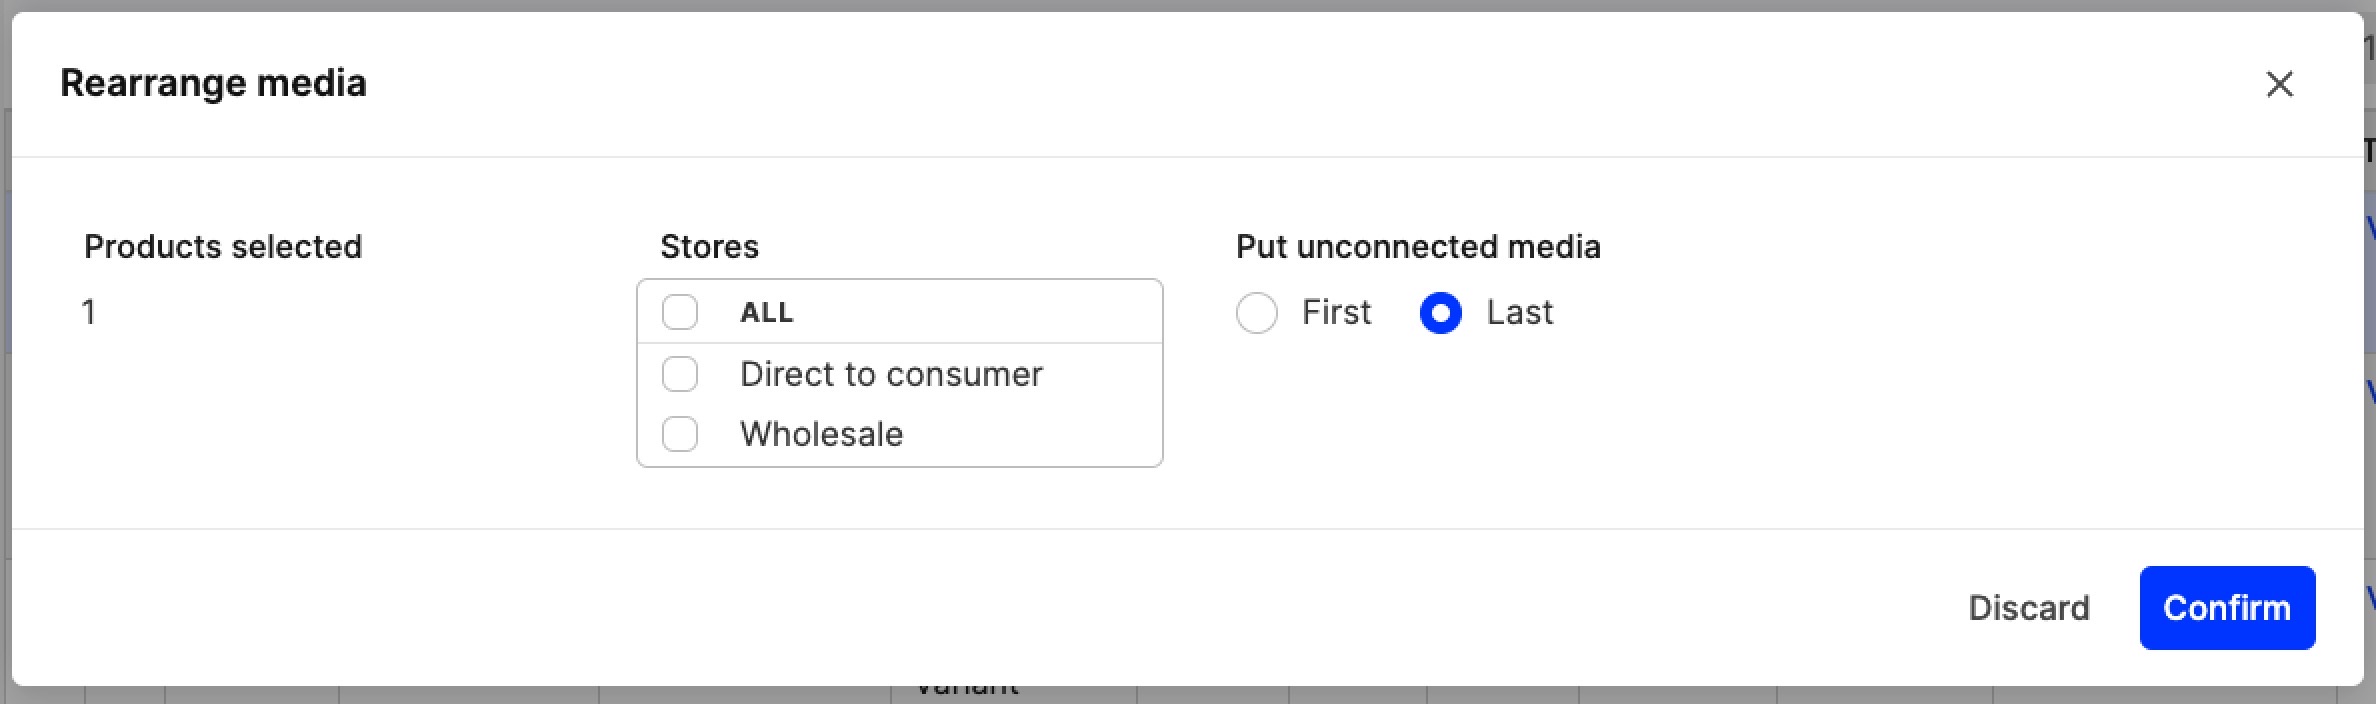
Rearrange media
On the left of this pop-up, you can see how many products you have selected through the tick boxes in the Products listing. In the ‘Stores’ selector, you can choose which store displays you’d like to be affected. You can choose one or more stores, or all of them. The last option is ‘Put unconnected media’, where you can select either ‘First’ or ‘Last’. This controls how unconnected media should be listed. For example, if you have one connected picture and one unconnected, choosing ‘First’ puts the unconnected picture on the top followed by the connected picture. If you choose ‘Last’, the opposite happens.
Delete media
Media uploaded to the selected products are deleted. This applies to all variants of the selected products. It also means that any media activated in displays are removed as well. In the pop-up, you can see how many products are selected.
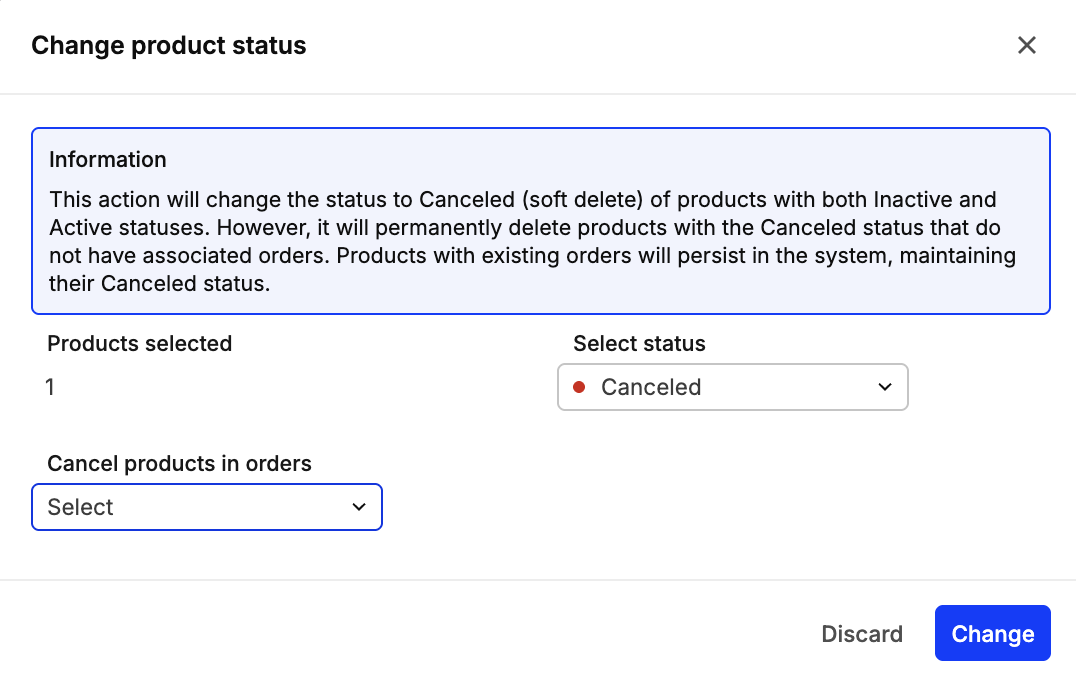
Cancel products
Available in the 'Change Product Status' option, this action changes the status of the selected products to ‘Canceled’ and renders the product unavailable for sales. In the pop-up you can see the amount of products selected in the Products listing. The next setting, called ‘Cancel product in orders’, controls which orders are affected by the product cancelation based on order status. The options include:
- Pending - This cancels the selected products only in orders with status ‘Pending’
- Pending, Confirmed - This cancels the selected products in orders with status ‘Pending’ or ‘Confirmed’
- Pending, Confirmed and Processing (will not cancel in shipments) - This cancels the selected products in orders with status ‘Pending’, ‘Confirmed’ or ‘Processing’. Orders with status ‘Processing’ that have the selected products added to a shipment do not get the product canceled. An example for this is an order with product A and B. Product A is added to a shipment, but product B is not. Since at least one shipment is created on the order, its status is ‘Processing’. If you have product A selected in this batch action, it is not canceled in this order. However, if product B is selected, it is canceled. You can read more about order statuses here.
Change stock offset
This setting allows you to set the stock offset, which is a quantity of stock that becomes unavailable for sales. You can read more about it here.
Archive products
Available in the 'Change Product Status' option you can change the status of the selected products to ‘Archived’. You can read more about this product status here. In the pop-up, you can see how many products are selected.
Relate displays
When used, this setting relates all displays of the selected products to each other. This happens on store level, so if you select Retail and Wholesale, Retail displays will relate to Retail displays only, and similarly Wholesale to Wholesale. On the left side of the pop-up, you can select which store displays should be affected. On the right, you can choose between the different relation types. The main relation types are standard, variant, and size, however, custom relation types can be added too. You can read more about relations and relation types here.
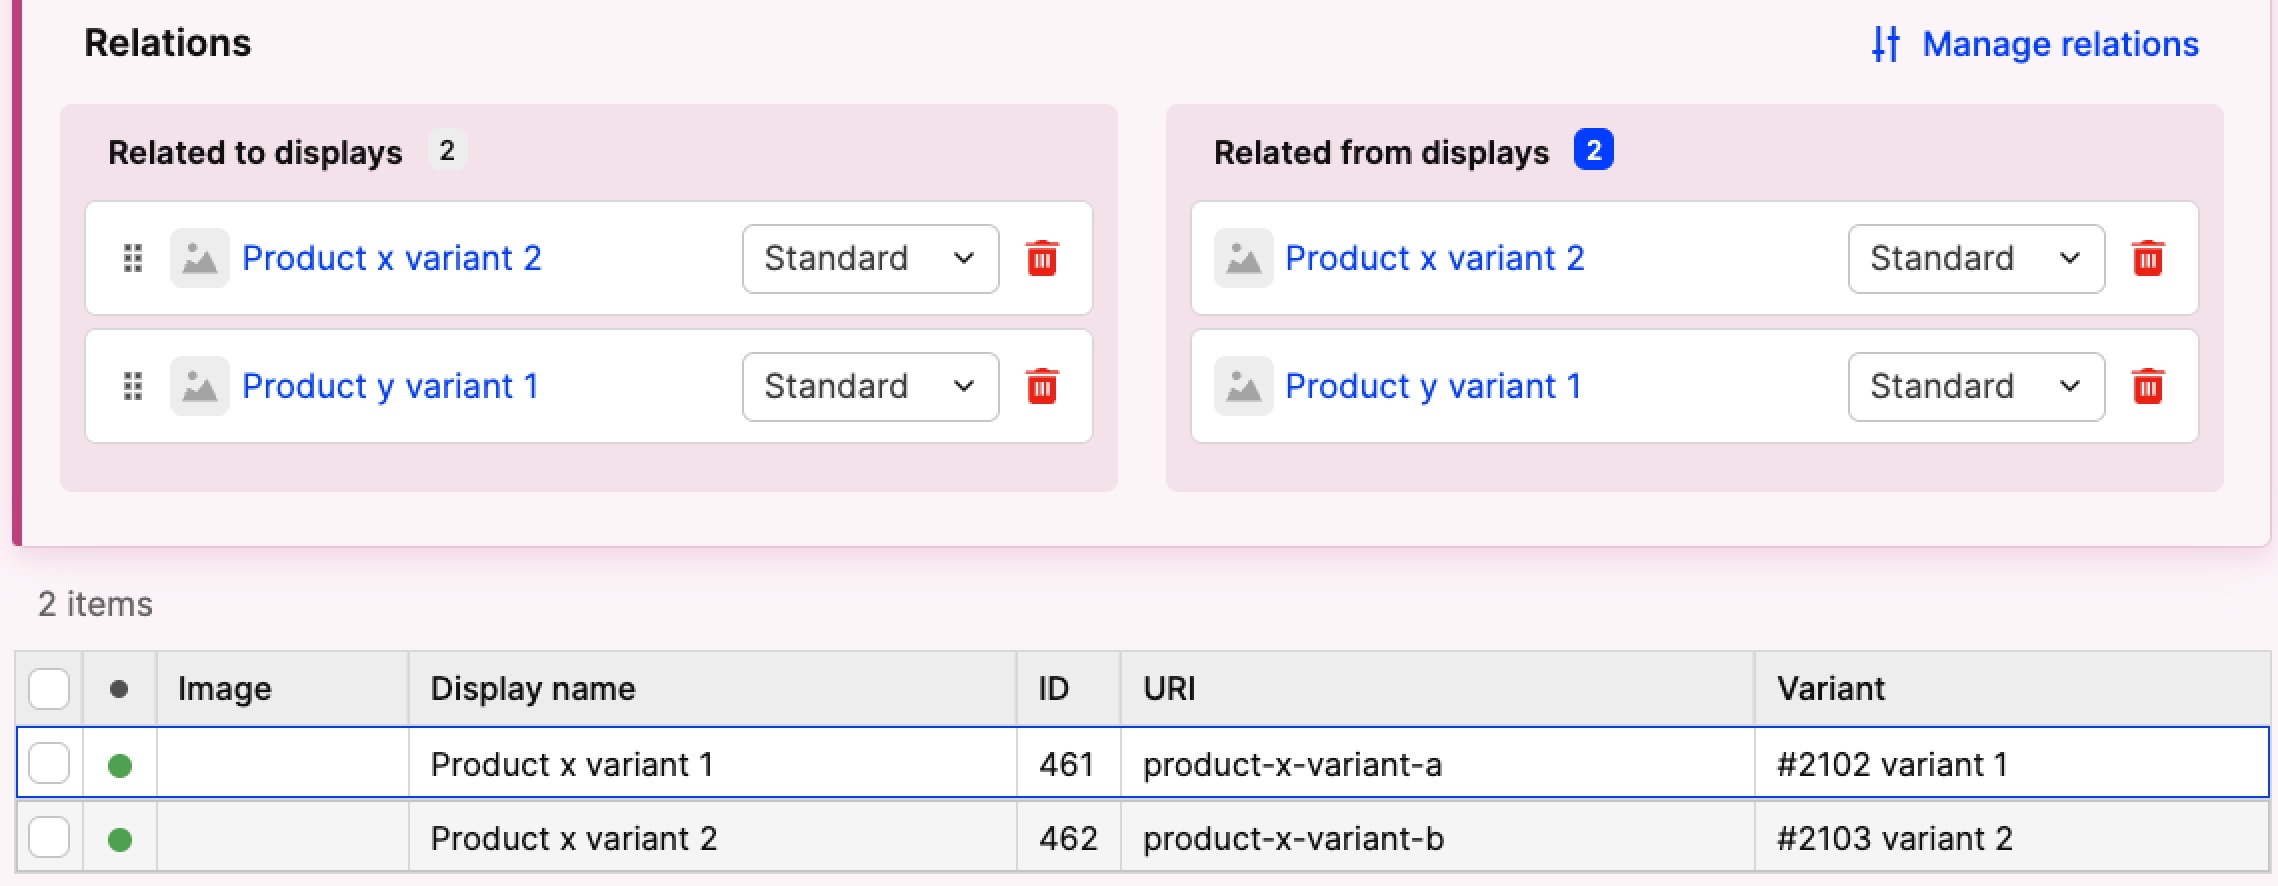
Example: Product X and Y are selected in the Product listing. Product X has two variants and one display per variant in Retail. Product Y has one variant and one display in Retail. When using this setting, in the ‘Relations’ section of product X, you see product Y. And vise versa, in the ‘Relations’ section of product y, you see the two displays of product X, as demonstrated below:
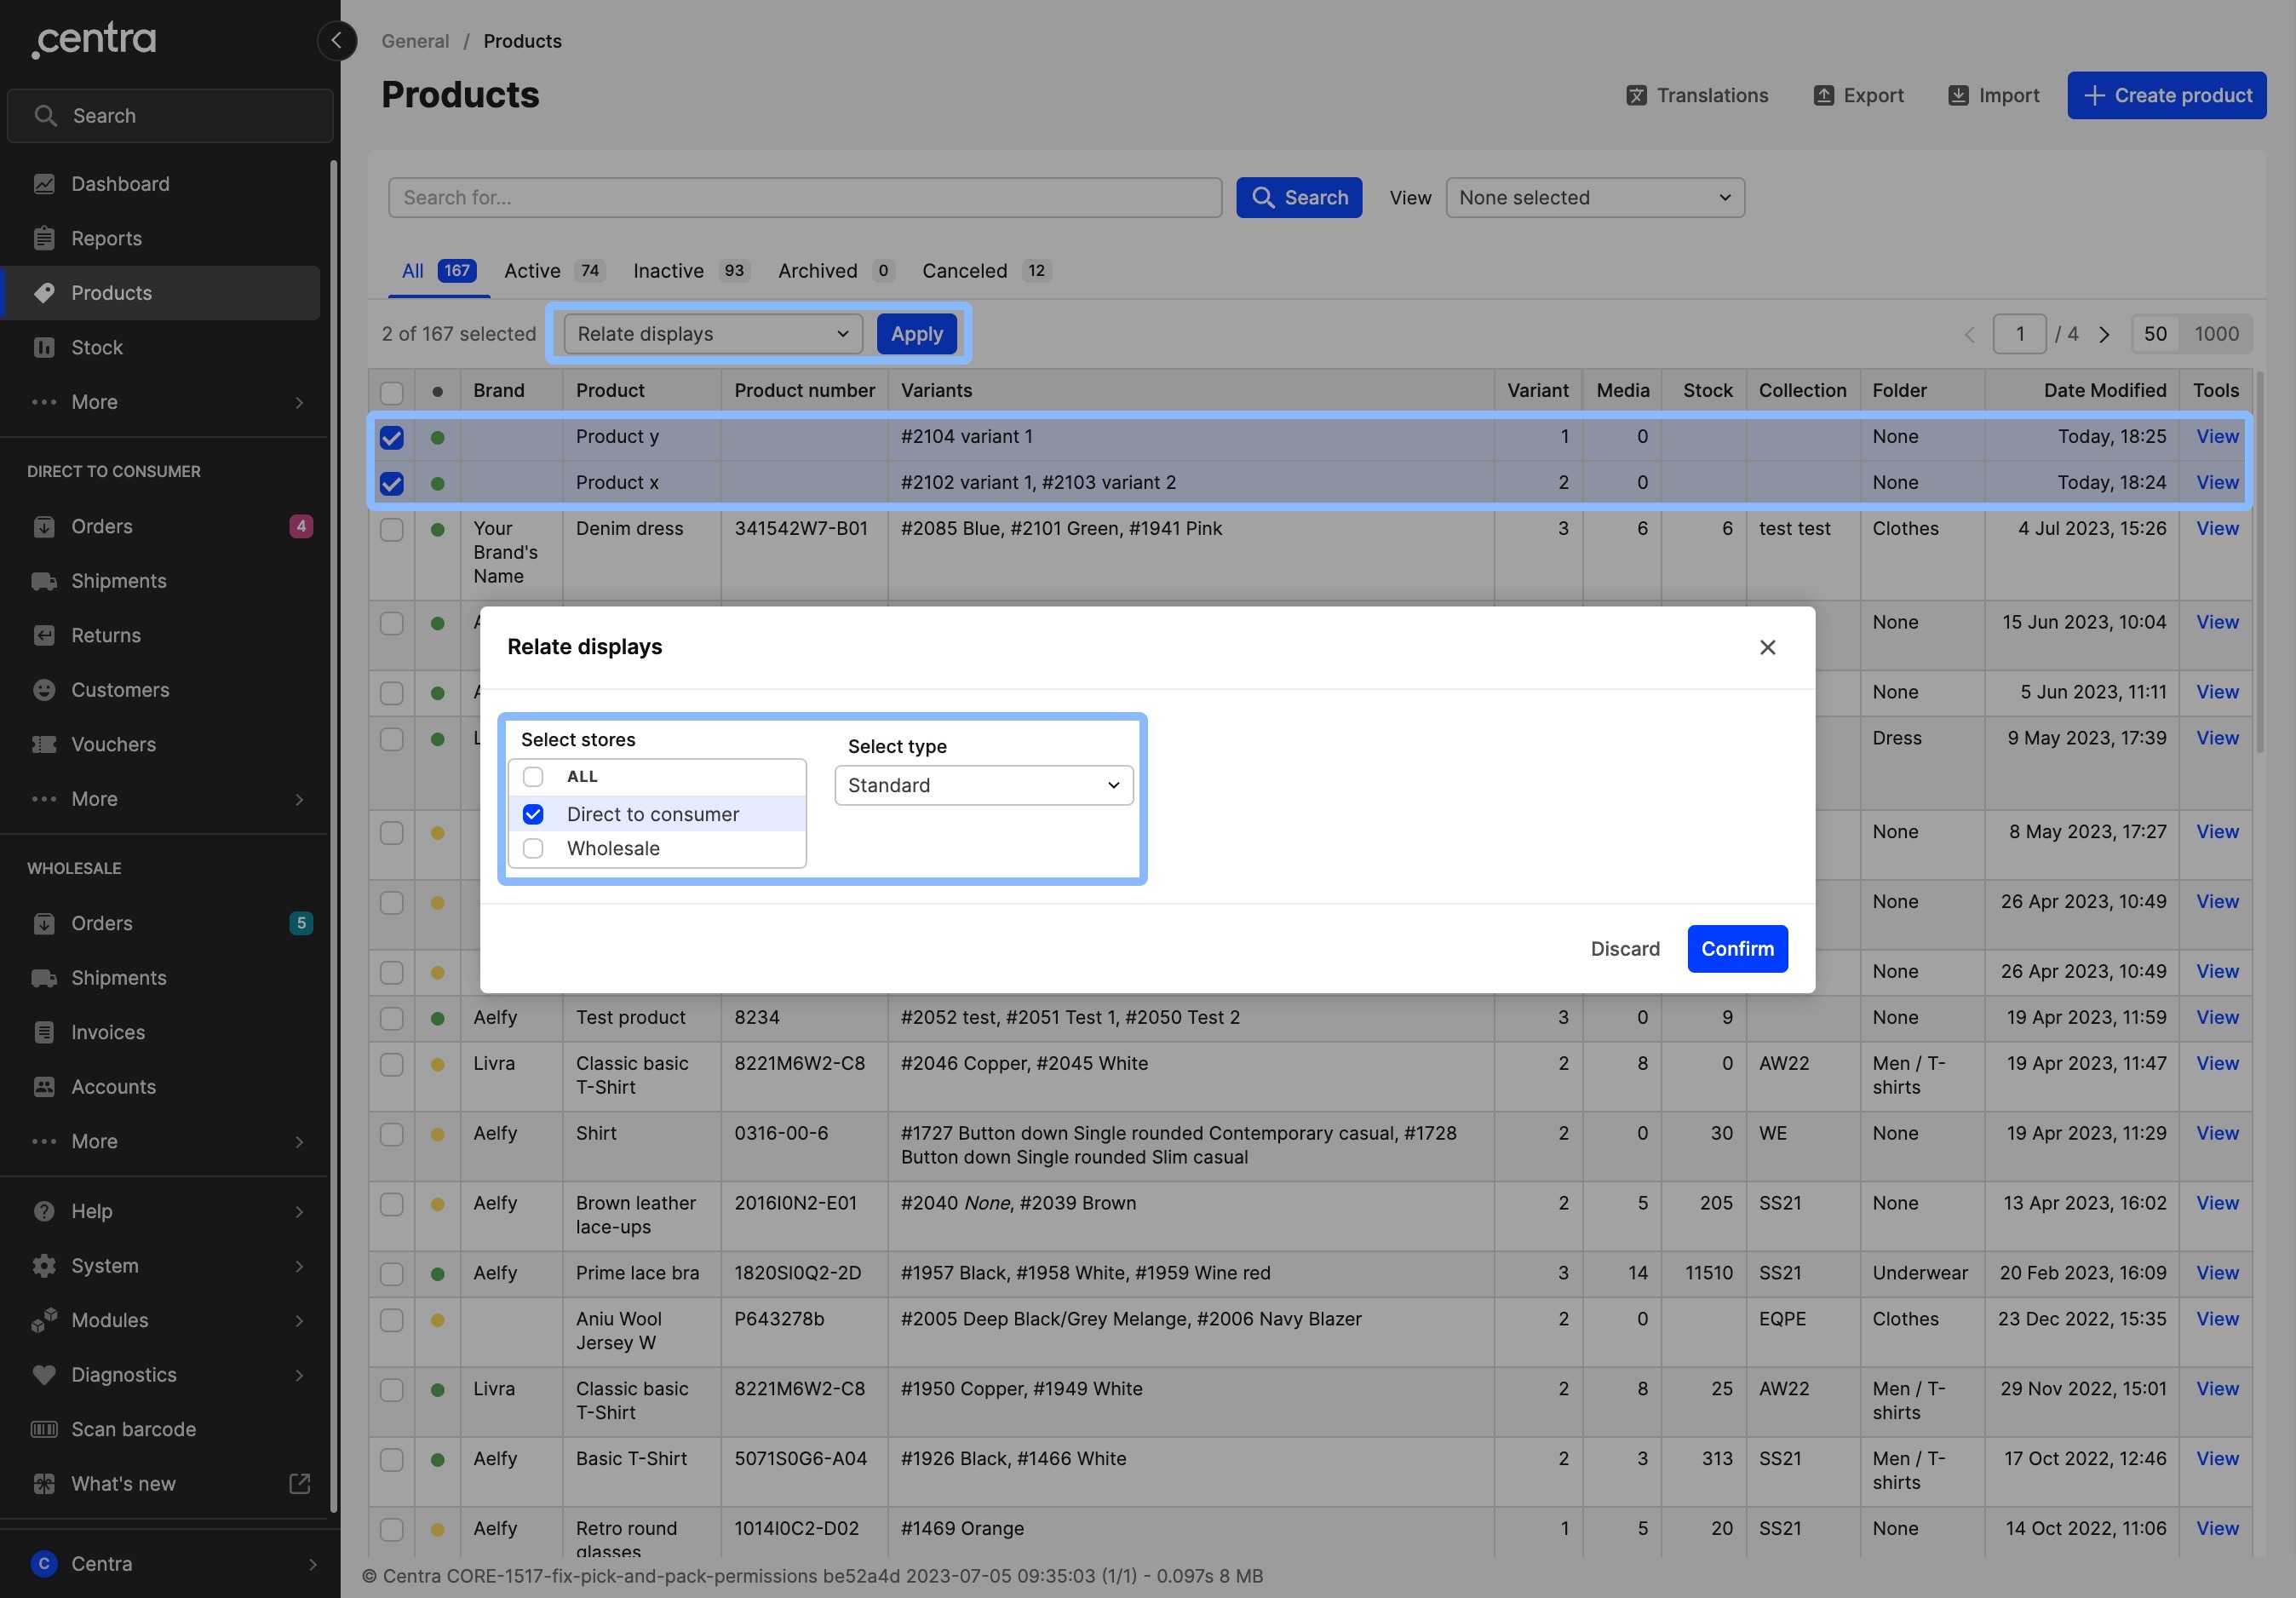
Note: If you have multiple displays on a product and don’t want to relate all of them to each other and to the displays of other selected products, you cannot use this batch action. In such cases, manual changes are required.
Delete product relations
Here you can delete product relations in bulk. You can use the ‘Select stores’ field to choose which store displays should be affected. Then, ‘Select relation type’ allows you to target specific relation types, i.e. all types, ‘Standard’, ‘Variant’ or ‘Size’. Lastly, in ‘Select direction’ you can choose between three options, which are discussed in more detail below:
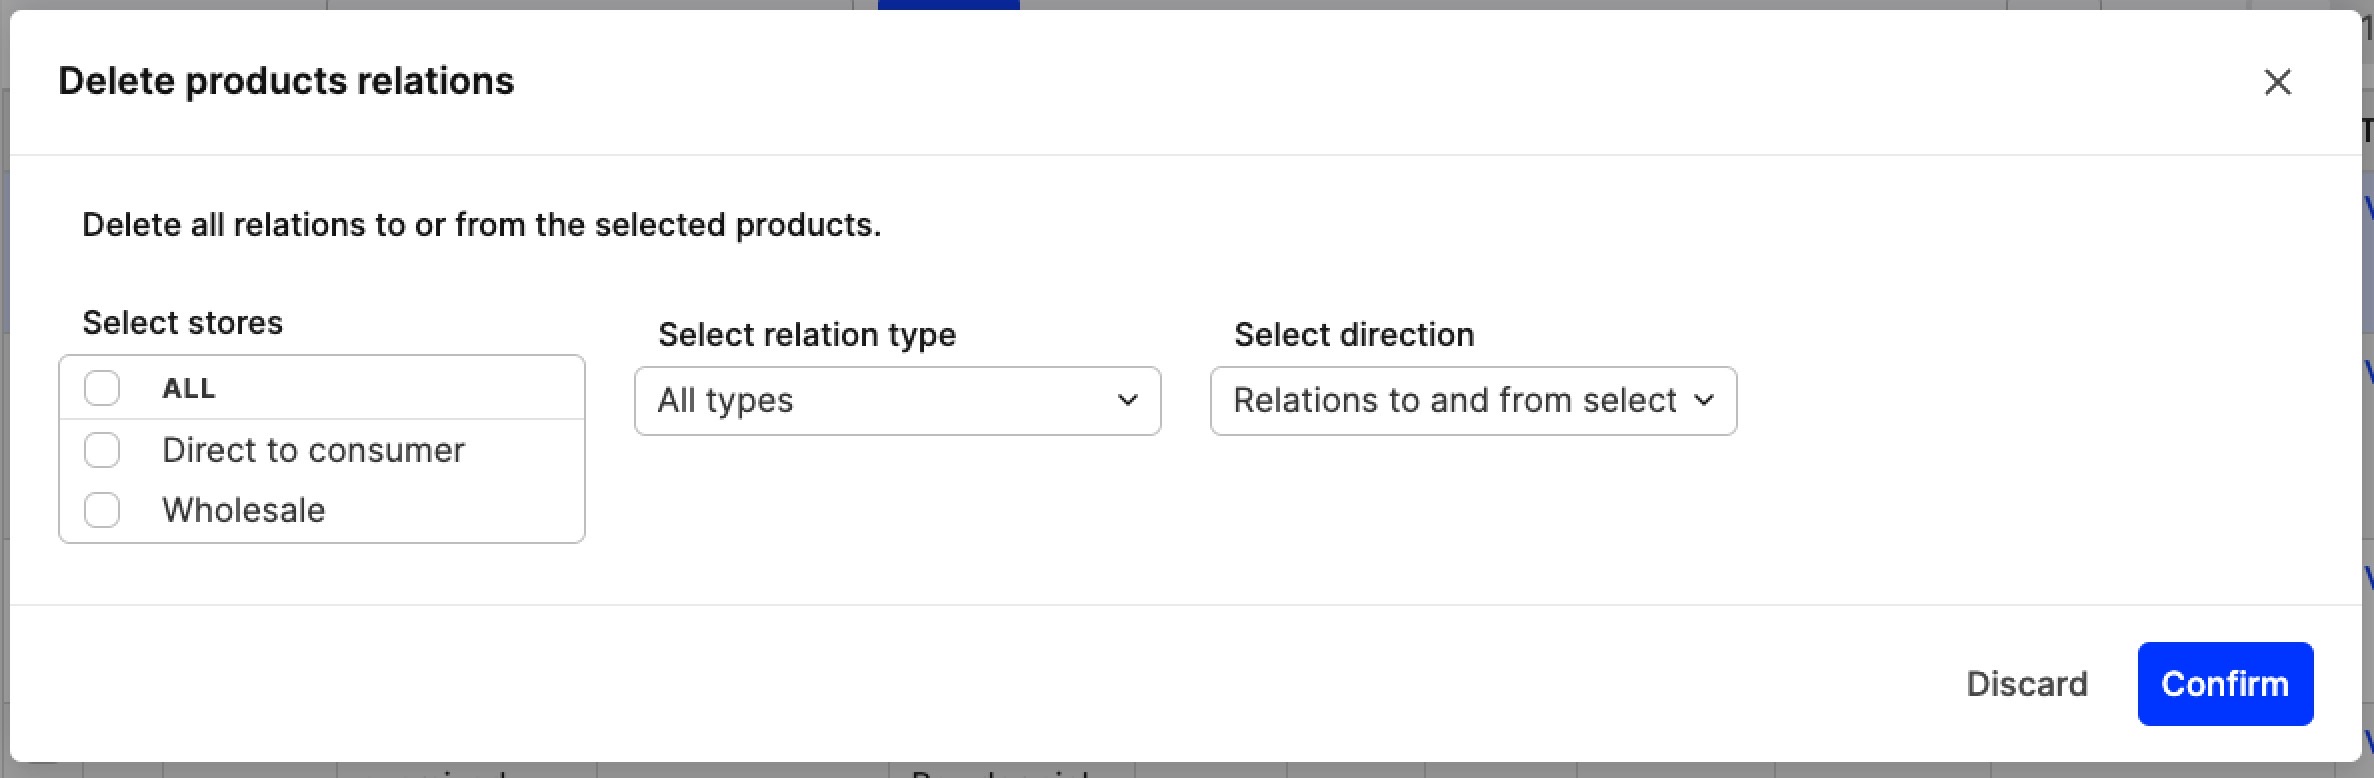
- Relations to and from selected products: This deletes relations found in both columns found under the Relations section on the display, called ‘Related to displays’ and ‘Related from displays’.
- Relations to other displays only: This deletes only relations found under the ‘Related to displays’ column in the Relations section.
- Relations from other displays only: This deletes only relations found under the ‘Related from displays’ column in the Relations section.
Export selected products
This action allows you to export only specific products instead of the whole product catalog. More details on how to use this can be found here.
Update tax codes
This can be used to update tax codes from external tax engines in bulk. Find out more here.
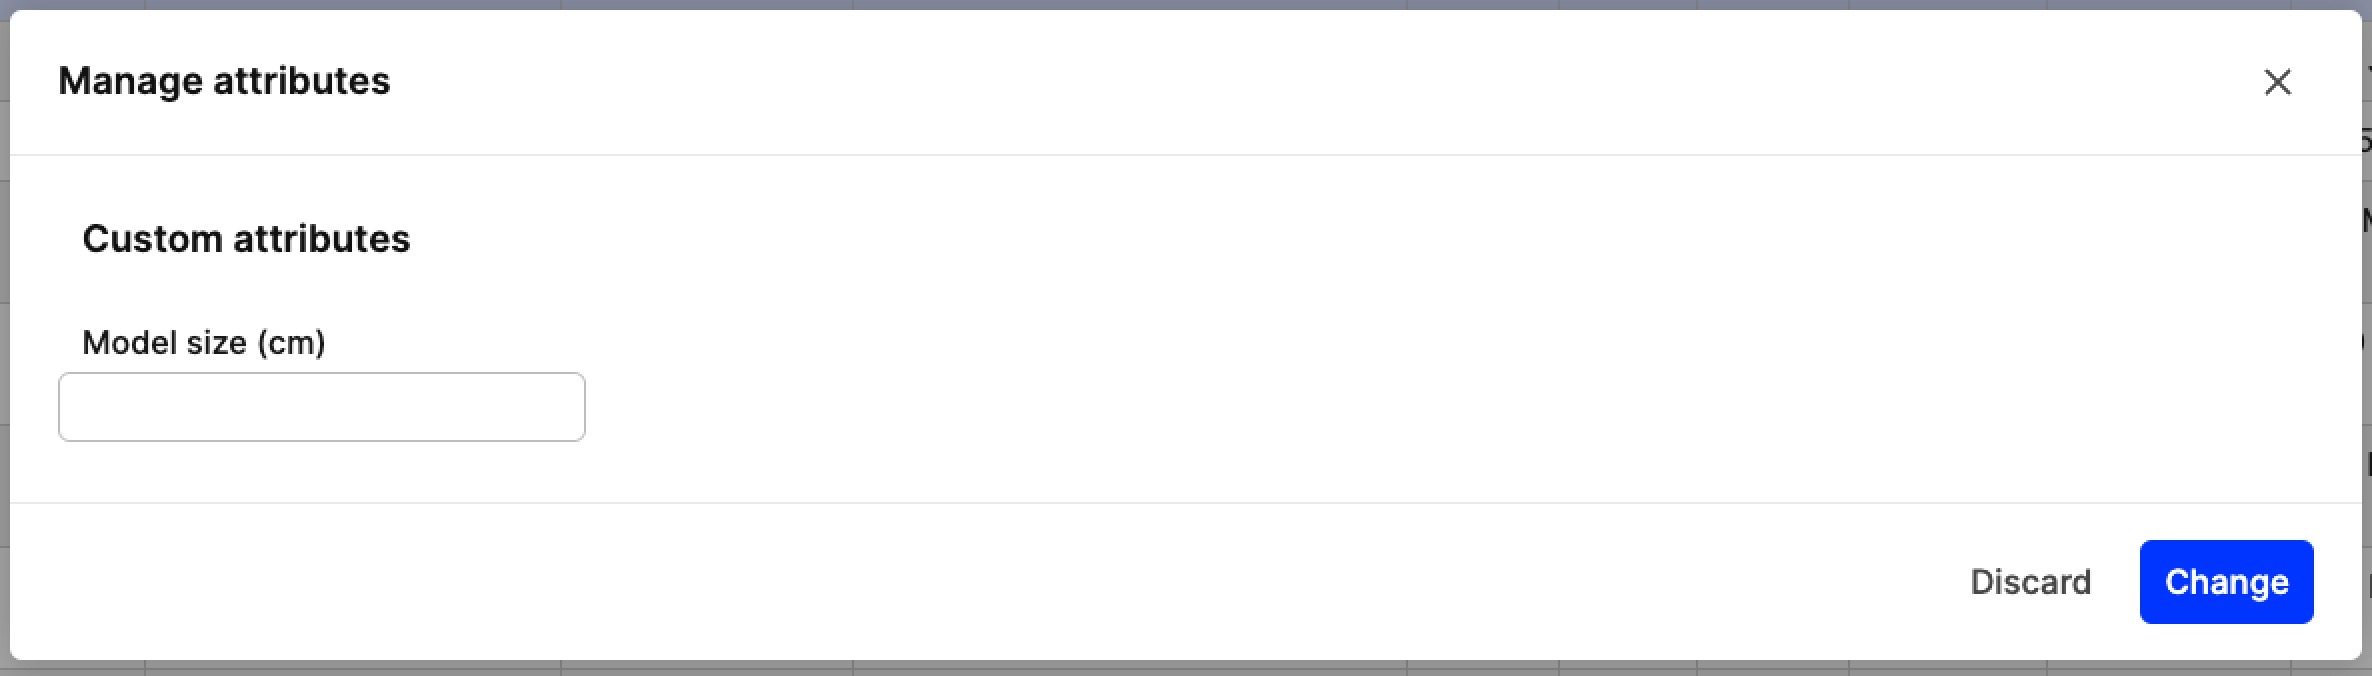
Manage media attributes
It is possible to add custom attributes on media to showcase, for example, the size information of the model in the picture. This action can help you change these media attributes in bulk. The same pop-up appears as on product level, where all media attributes are available to edit as seen below. Read more about media attributes here.