Stock history
About this article
This view includes information regarding changes made to the stock levels of the selected variant. You can see which warehouse was affected, who made the change (Admin column), and when, if a comment was inserted, the cost/pcs value as well as the rate of the selected currency. If you wish to edit the purchase price of this product, just enter the new price in the 'Cost/pcs' field. Cost/pcs can be edited retrospectively on each delivery accepted.
How to access the Stock history pop-up
The Stock history pop-up can be accessed in two different ways:
Stock history on product level
- Click on 'Products' in the menu
- Select a product of your choice
- Within the 'General' section, scroll to Variants and click on 'History' under the Tools section of the desired variant
- The Stock history pop-up will appear
Stock history on Stock page
- Go to 'Stock' in the menu
- Find the product of your choice, click on 'History' under Tools
- The Stock history will appear
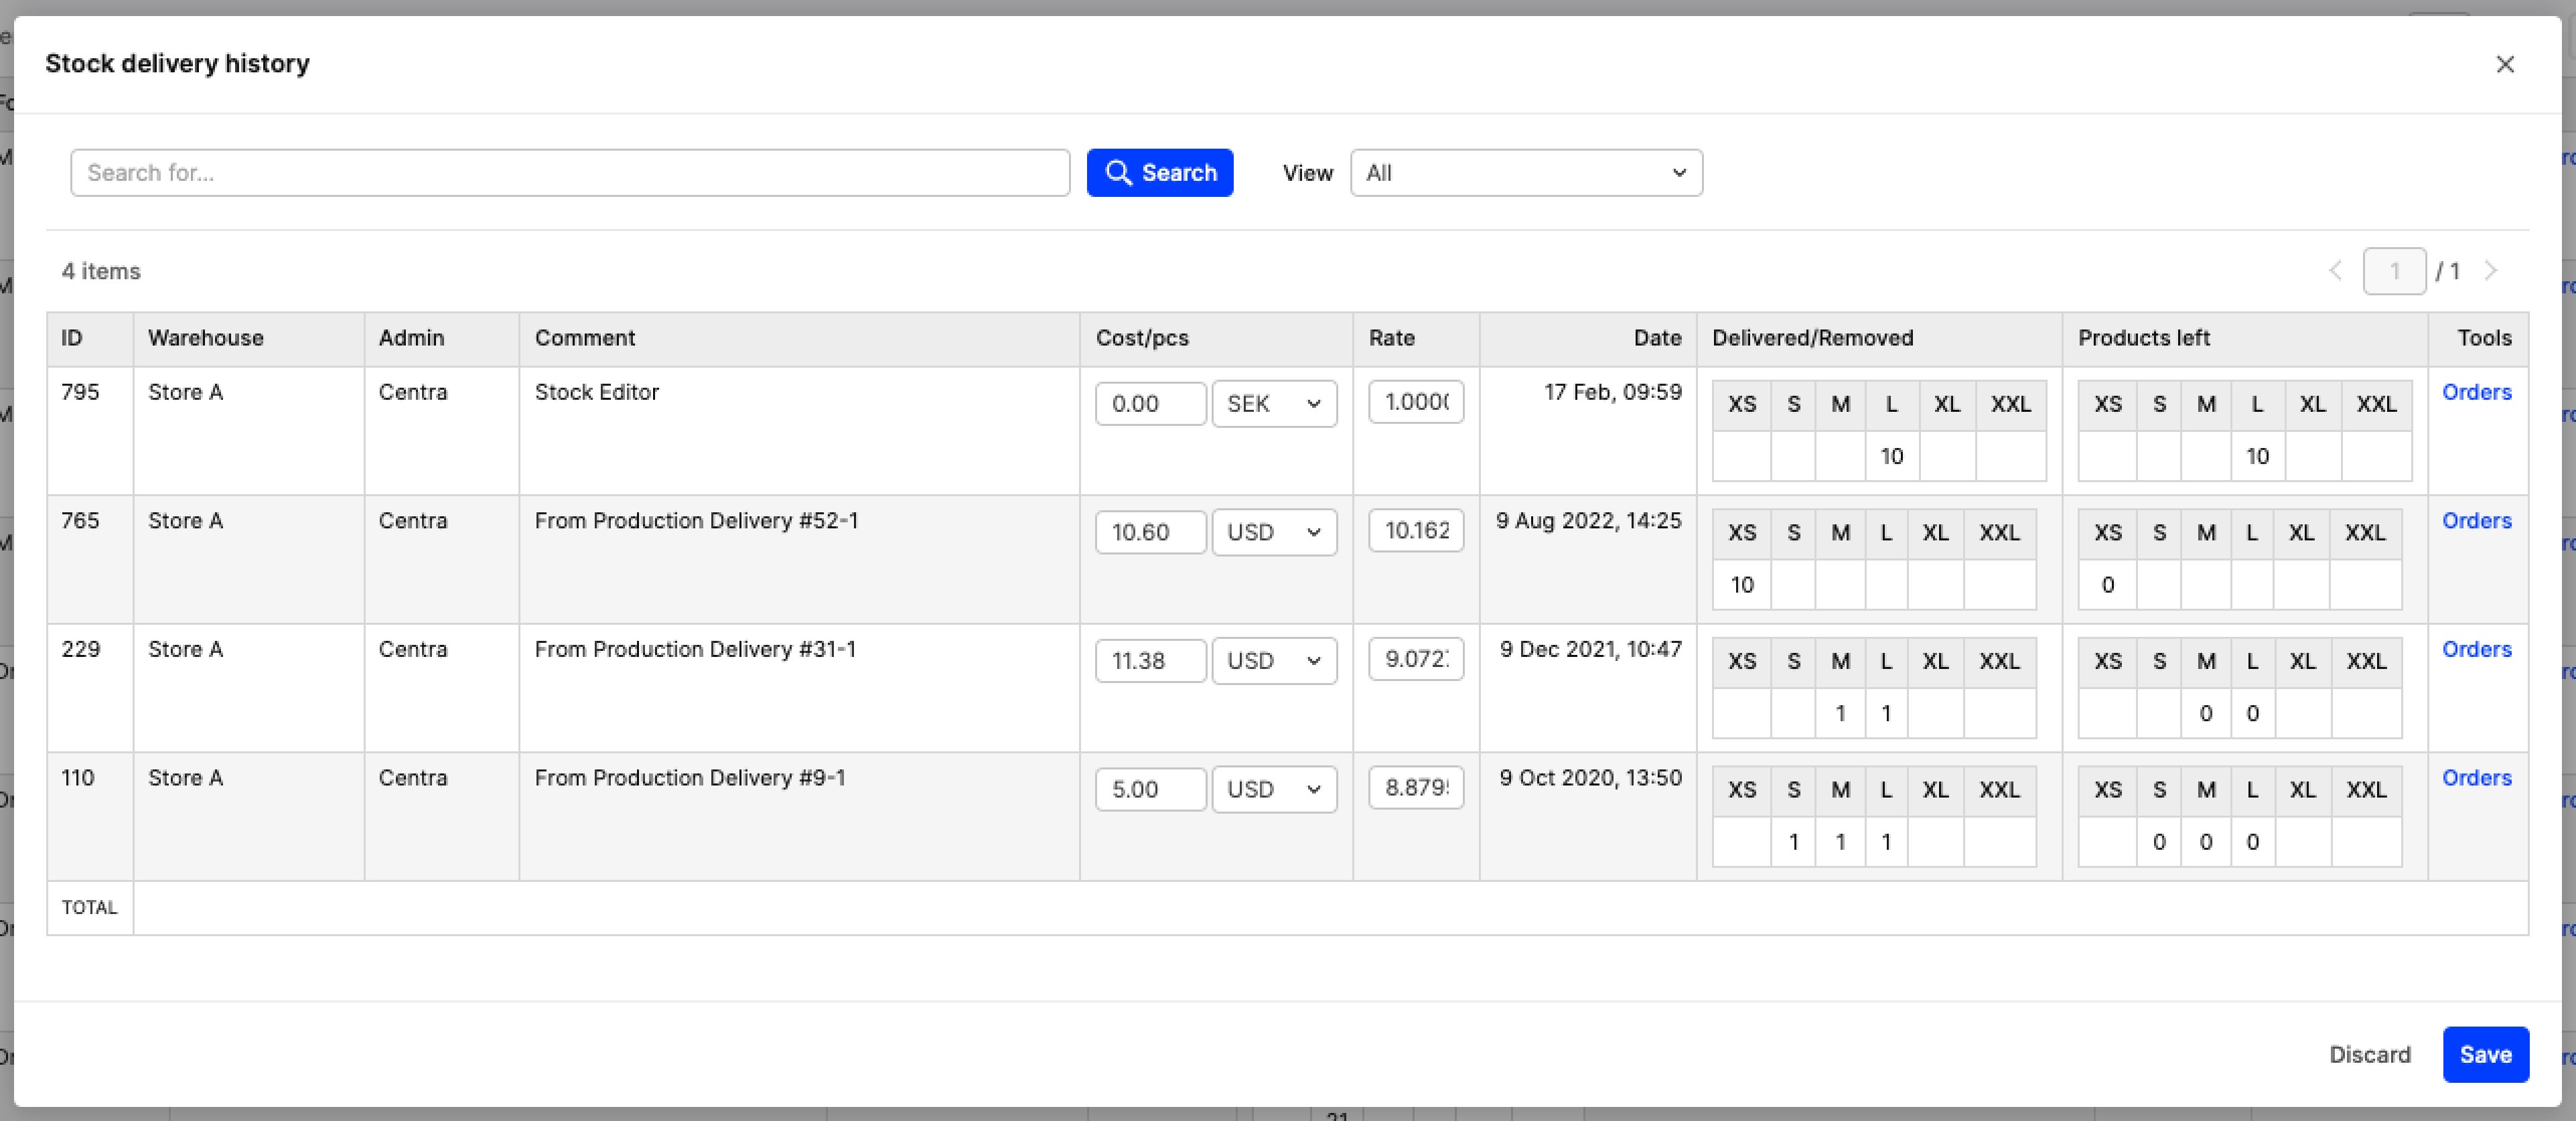
In both of the above cases you will reach the below view, where all orders that include this particular variant are displayed:
Layout of Stock history pop-up
This pop-up can be separated into the following parts: Search bar (1), View selector (2), Item indicator (3), Page selector (4), and History table (5):
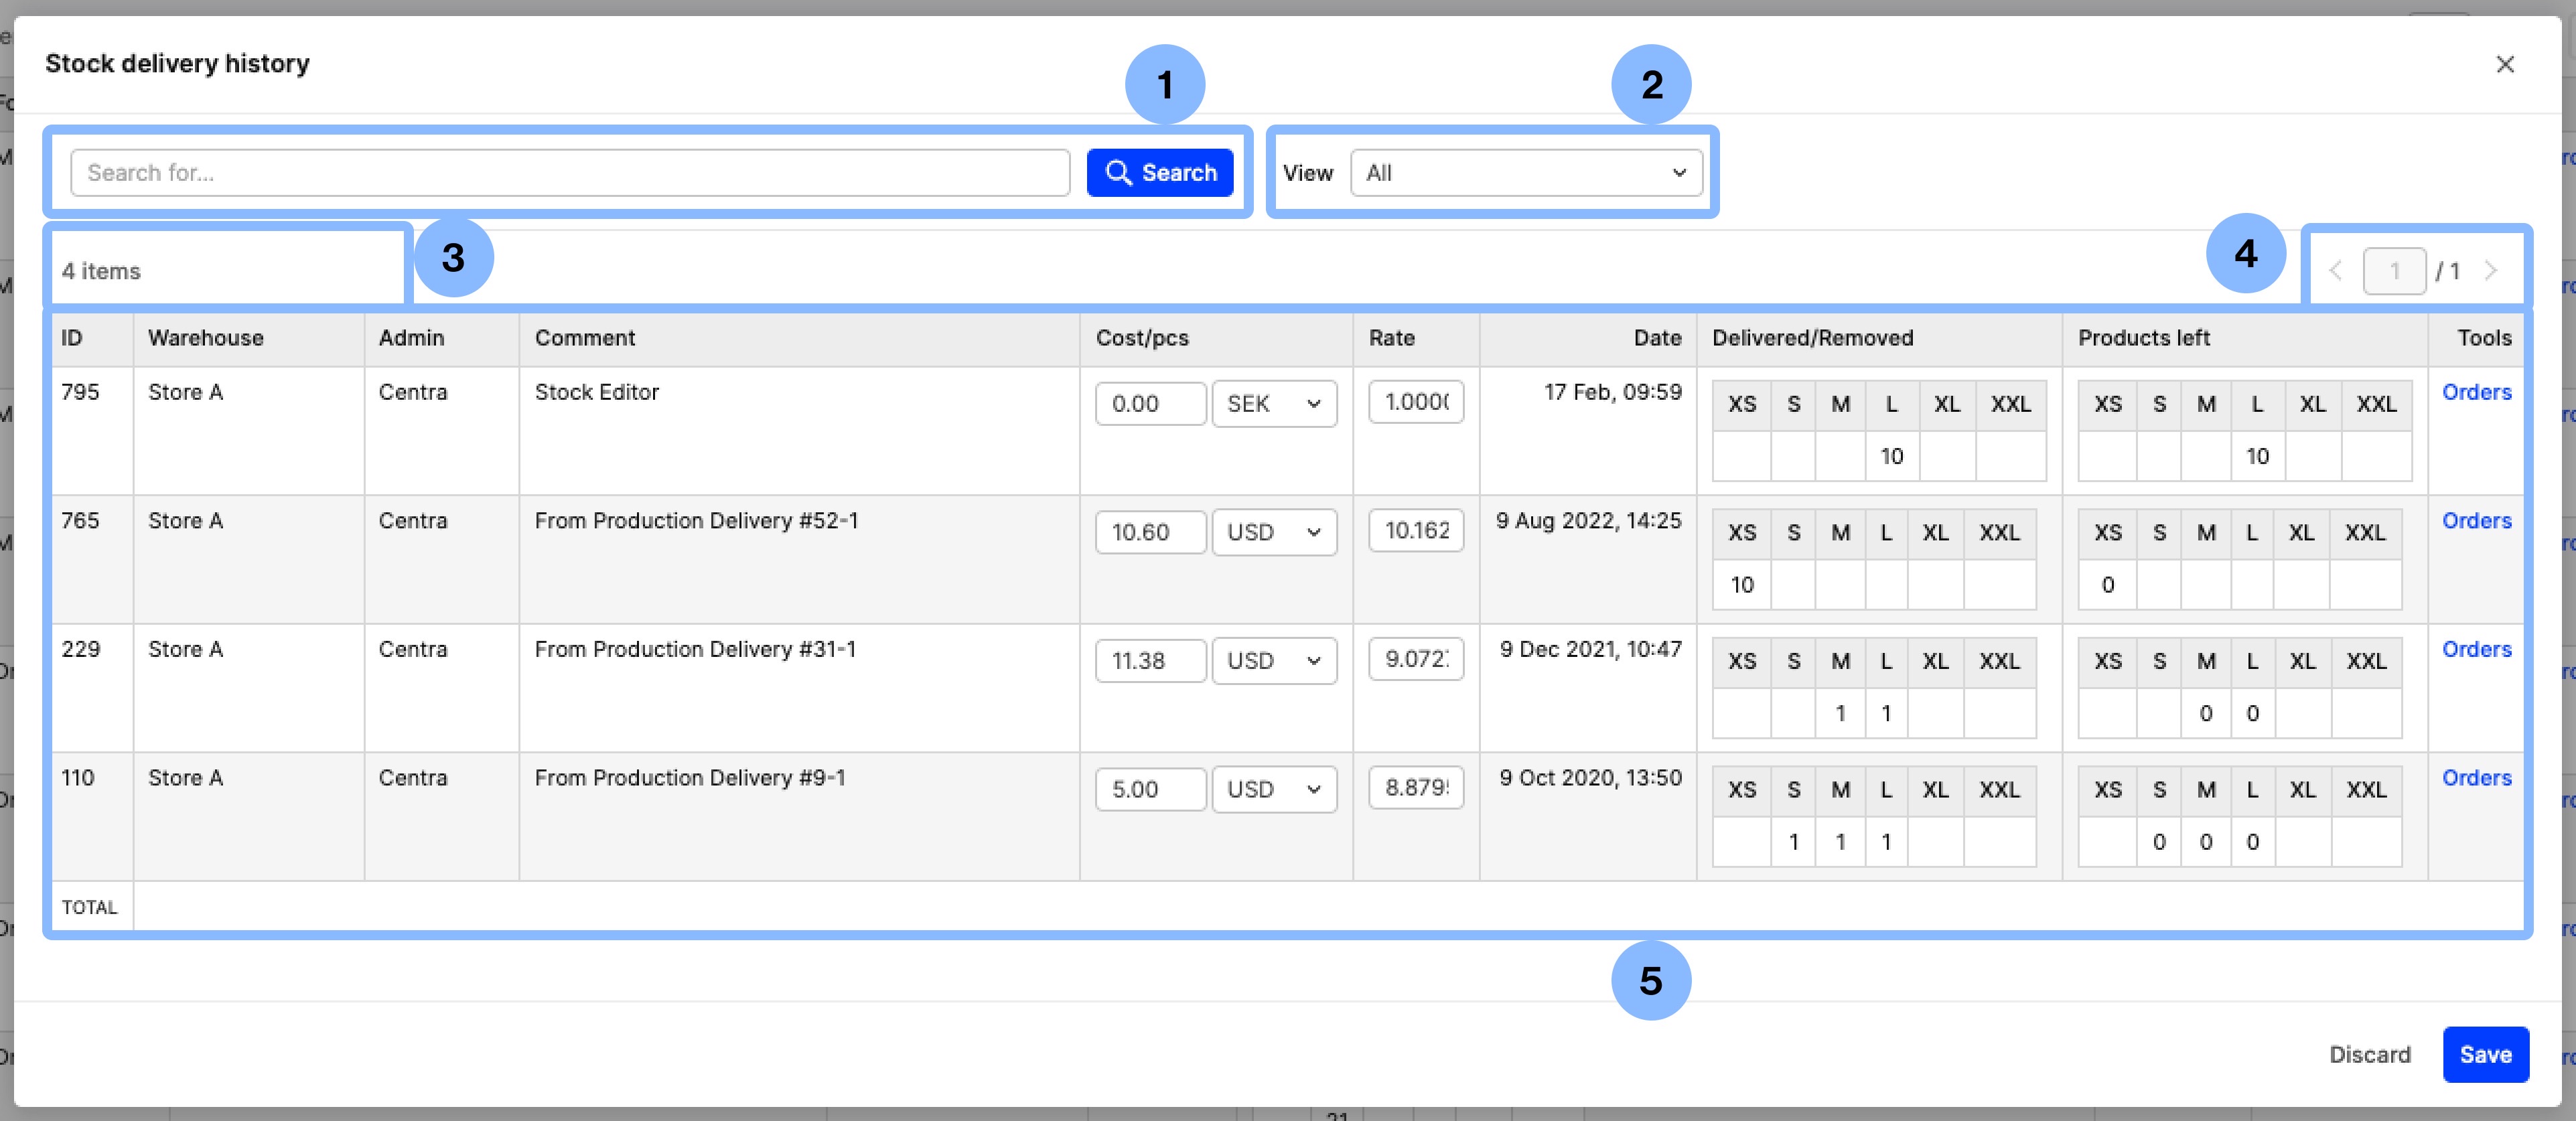
- Search bar – You can use this to search for particular data
- View selector – The drop-down menu includes a list of all warehouses. You can use this to filter stock changes done for a specific warehouse
- Item indicator – This shows how many items, or basically rows are seen in this pop-up. In other words, you can see the number of stock changes performed, since each row equals one change
- Page selector – When the number of items is large, the results in the pop-up will be shown in pages. You can move through pages by using the arrows or inserting a number in the respective field
- History table – Here you can see all stock changes. The following headers are also clickable: ID, Warehouse, Admin, Comment, Date. By clicking these headers you can sort the data, and if you wish to sort multiple columns at the same time, hold Shift whilst selecting the headers. Each row (or item) in this table represents a stock change. Let’s go through each header to see what info they include:
- ID: This ID is specific to this pop-up. You can use it to search a specific stock change (i.e. ID:401)
- Warehouse: Here you can see which warehouse was affected in each stock change
- Admin: This showcases which user performed the change. In cases where APIs are used to update the stock, this field is blank and you can see more information in the 'Comment' section instead
- Comment: Here you can see automatic and/or manually added comments that describe the stock change
- Cost/pcs: This showcases the cost/pcs amount as well as its currency, both of which are editable. [This article]() explains in more detail where this data is taken from in different scenarios
- Rate: When a currency other than the base currency is used, you can see the rate applied when the stock change was done. This is a great data point considering that currency rates fluctuate, and when you look back at historical data, having this information available directly in the pop-up makes everything easier
- Date: The time and date when the stock change was performed is shown here Delivered/Removed: Here you can see the amount of stock added or removed. A minus means that stock was removed, and no minus means that stock was added
- Products left: There are cases where stock is added and then allocated to orders. When this happens, this column shows how many products are left, or in other words are still available for sale
- Tools: In most cases, this field is empty. However, in others, you can see an option called ‘Orders’. When you click on this, another pop-up appears displaying orders that were affected by the stock change
Types of Stock history entries
The Stock history pop-up registers a lot of different stock changes. Below is a list of the most frequent ones along with the comment that appears in the respective column:
| No. | Stock history entry type | Steps in Centra | Comment |
|---|---|---|---|
| 1. | Insert stock through Stock page | Stock > Select a product > Insert stock | Stock Editor |
| 2. | Remove stock through Stock page | Stock > Select a product > Remove stock | Stock Editor Remove |
| 3. | Insert stock through Stock editor | Products > Select product > In Variants section, click 'Stock' under Tools > Insert stock OR Stock > Click 'Edit stock' under Tools of a selected product > Insert stock | Stock Editor |
| 4. | Remove stock through Stock editor | Products > Select product > In Variants section, click 'Stock' under Tools > Remove stock OR Stock > Click 'Edit stock' under Tools of a selected product > Remove stock | Stock Editor Remove |
| 5. | Insert stock through Stock import | Products > Import > Import type:stock > Insert stock | Stock import in |
| 6. | Remove stock through Stock import | Products > Import > Import type:stock > Remove stock | Stock import out |
| 7. | Warehouse transfer | Products > Select product > In Variants section, click 'Stock' under Tools > Warehouse transfer > Rearrange stock OR Stock > Click 'Edit stock' under Tools of a selected product > Warehouse transfer > Rearrange stock | Transfer In OR Transfer Out |
| 8. | Return | DTC or WHS > Shipments > Select a shipment > 'Return products' > Review details > Create return | order #xxx |
| 9. | Send items to a different warehouse upon product cancelation/unallocation/return | DTC or WHS > Orders > Select an order > In the Ordered products section, click 'Cancel products' > Select amount/product > In 'Action', choose 'Send items to a different warehouse' and the warehouse > Cancel products. DTC or WHS > Orders > Select an order > In the Ordered products section, click 'Unallocate' > Select amount/product > In 'Action', choose 'Send items to a different warehouse' and the warehouse > Unallocate. DTC or WHS > Shipments > Select a shipment > In the Shipped products section, click 'Return products' > Select amount/product > In 'Action', choose 'Send items to a different warehouse' and the warehouse > Create return |
From order #xxx |
| 10. | Remove items from stock upon product cancelation/unallocation/return | DTC or WHS > Orders > Select an order > In the Ordered products section, click 'Cancel products' > Select amount/product > In 'Action', choose 'Remove items from stock' and the warehouse > Cancel products. DTC or WHS > Orders > Select an order > In the Ordered products section, click 'Unallocate' > Select amount/product > In 'Action', choose 'Remove items from stock' and the warehouse > Unallocate. DTC or WHS > Shipments > Select a shipment > In the Shipped products section, click 'Return products' > Select amount/product > In 'Action', choose 'Remove items from stock' and the warehouse > Create return |
Removed from order #xxx |
| 11. | Warehouse Cleanup | System > Warehouses > Select a warehouse > Clean up > Choose Collection (optional) > Save | Warehouse Cleanup |
| 12. | Archive Warehouse with Stock transfer | System > Warehouses > Select a warehouse > Archive > Transfer > Select another warehouse > Archive | Warehouse transfer from 'Warehouse x' & Warehouse transfer to 'Warehouse x' |
| 13. | Accept incoming stock through Supplier delivery | Modules > Suppliers > Supplier deliveries > Select a delivery > Review details > Accept > Review details > Accept delivery | From Production Delivery #xx-x |
| 14. | Accept incoming stock through Consignation warehouse | WHS > Shipments > Select a shipment (with Ship to warehouse:Yes) > Accept shipment > Select warehouse > Submit | Warehouse delivery from shipment no: xxxxx-x |
| No. | Stock history entry type | Comment |
|---|---|---|
| 1. | Insert stock through API | Stock From API In |
| 2. | Remove stock through API | Stock From API Out |
| 3. | Insert stock through SOAP API | Sync add |
| 4. | Remove stock through SOAP API | Sync remove |
| 5. | Return product | Removed from order #xxx, Return created by API |
How to use the Stock history pop-up
Review stock changes
This is the primary use of this pop-up. As shown in the previous section, there are a number of stock changes registered in the Stock history pop-up. Therefore, if you have questions about why a specific amount of stock is left in your warehouse, or you suspect discrepancies, you can use this pop-up to analyze the changes made.
Change the cost/pcs or rate
The columns 'Cost/pcs' and 'Rate' include editable information. Note that this is available when stock is inserted into Centra in one of the ways detailed above. You can either change the amount or currency of the cost/pcs, or the rate.
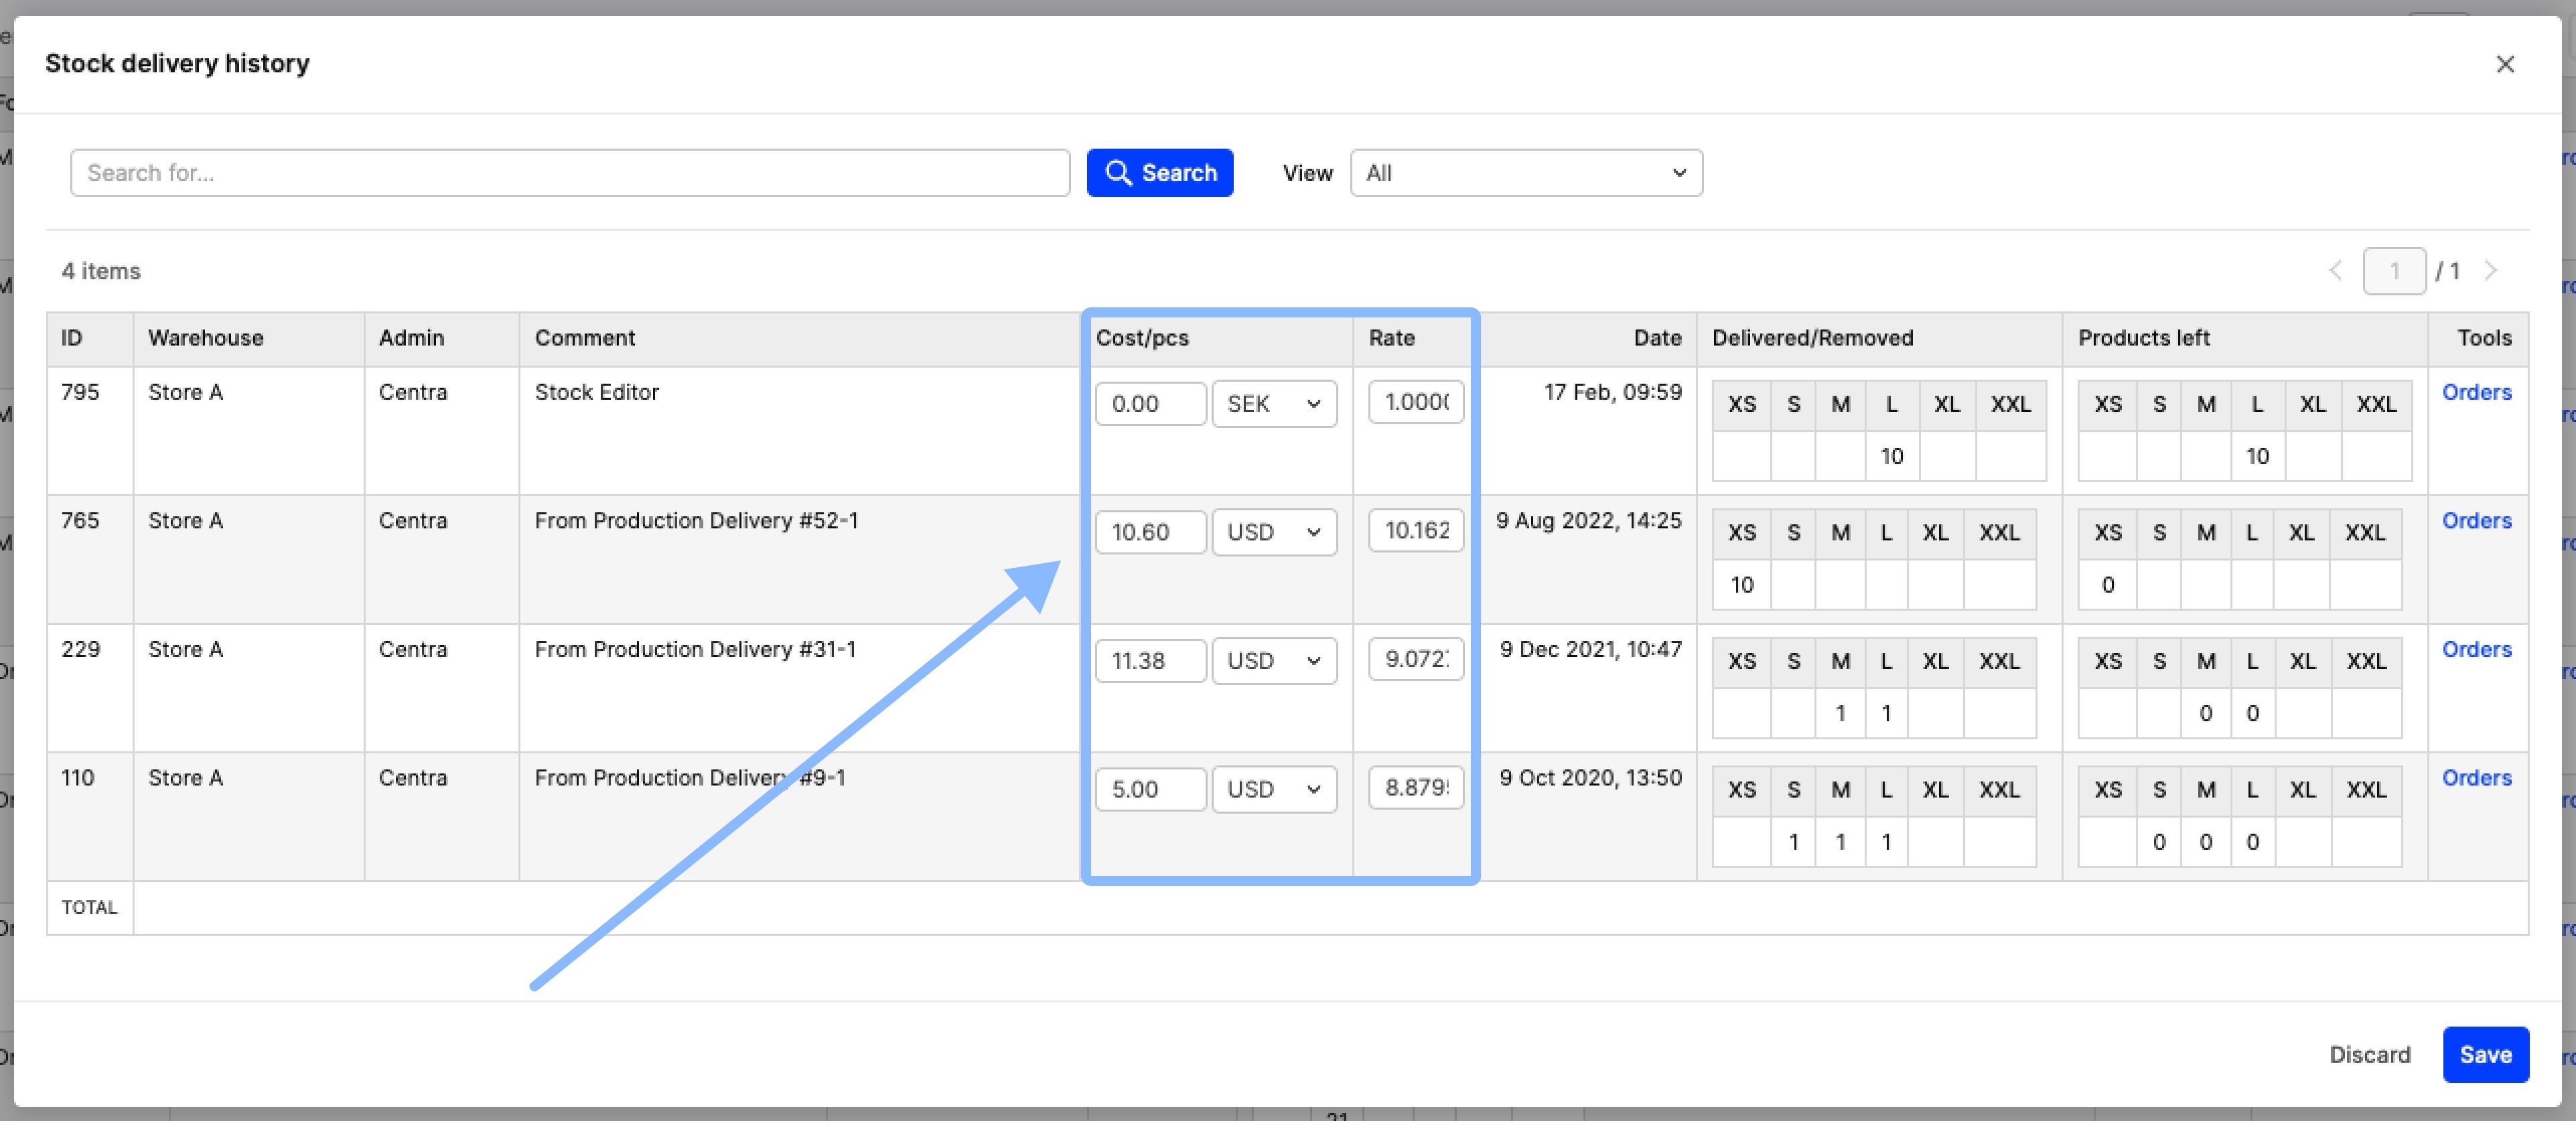
For example, let’s say that you made an import and added the wrong cost/pcs amount. You can find the respective entry and edit the amount. Depending on the scenario, this data might come from different parts of Centra, which are described in [this article]().
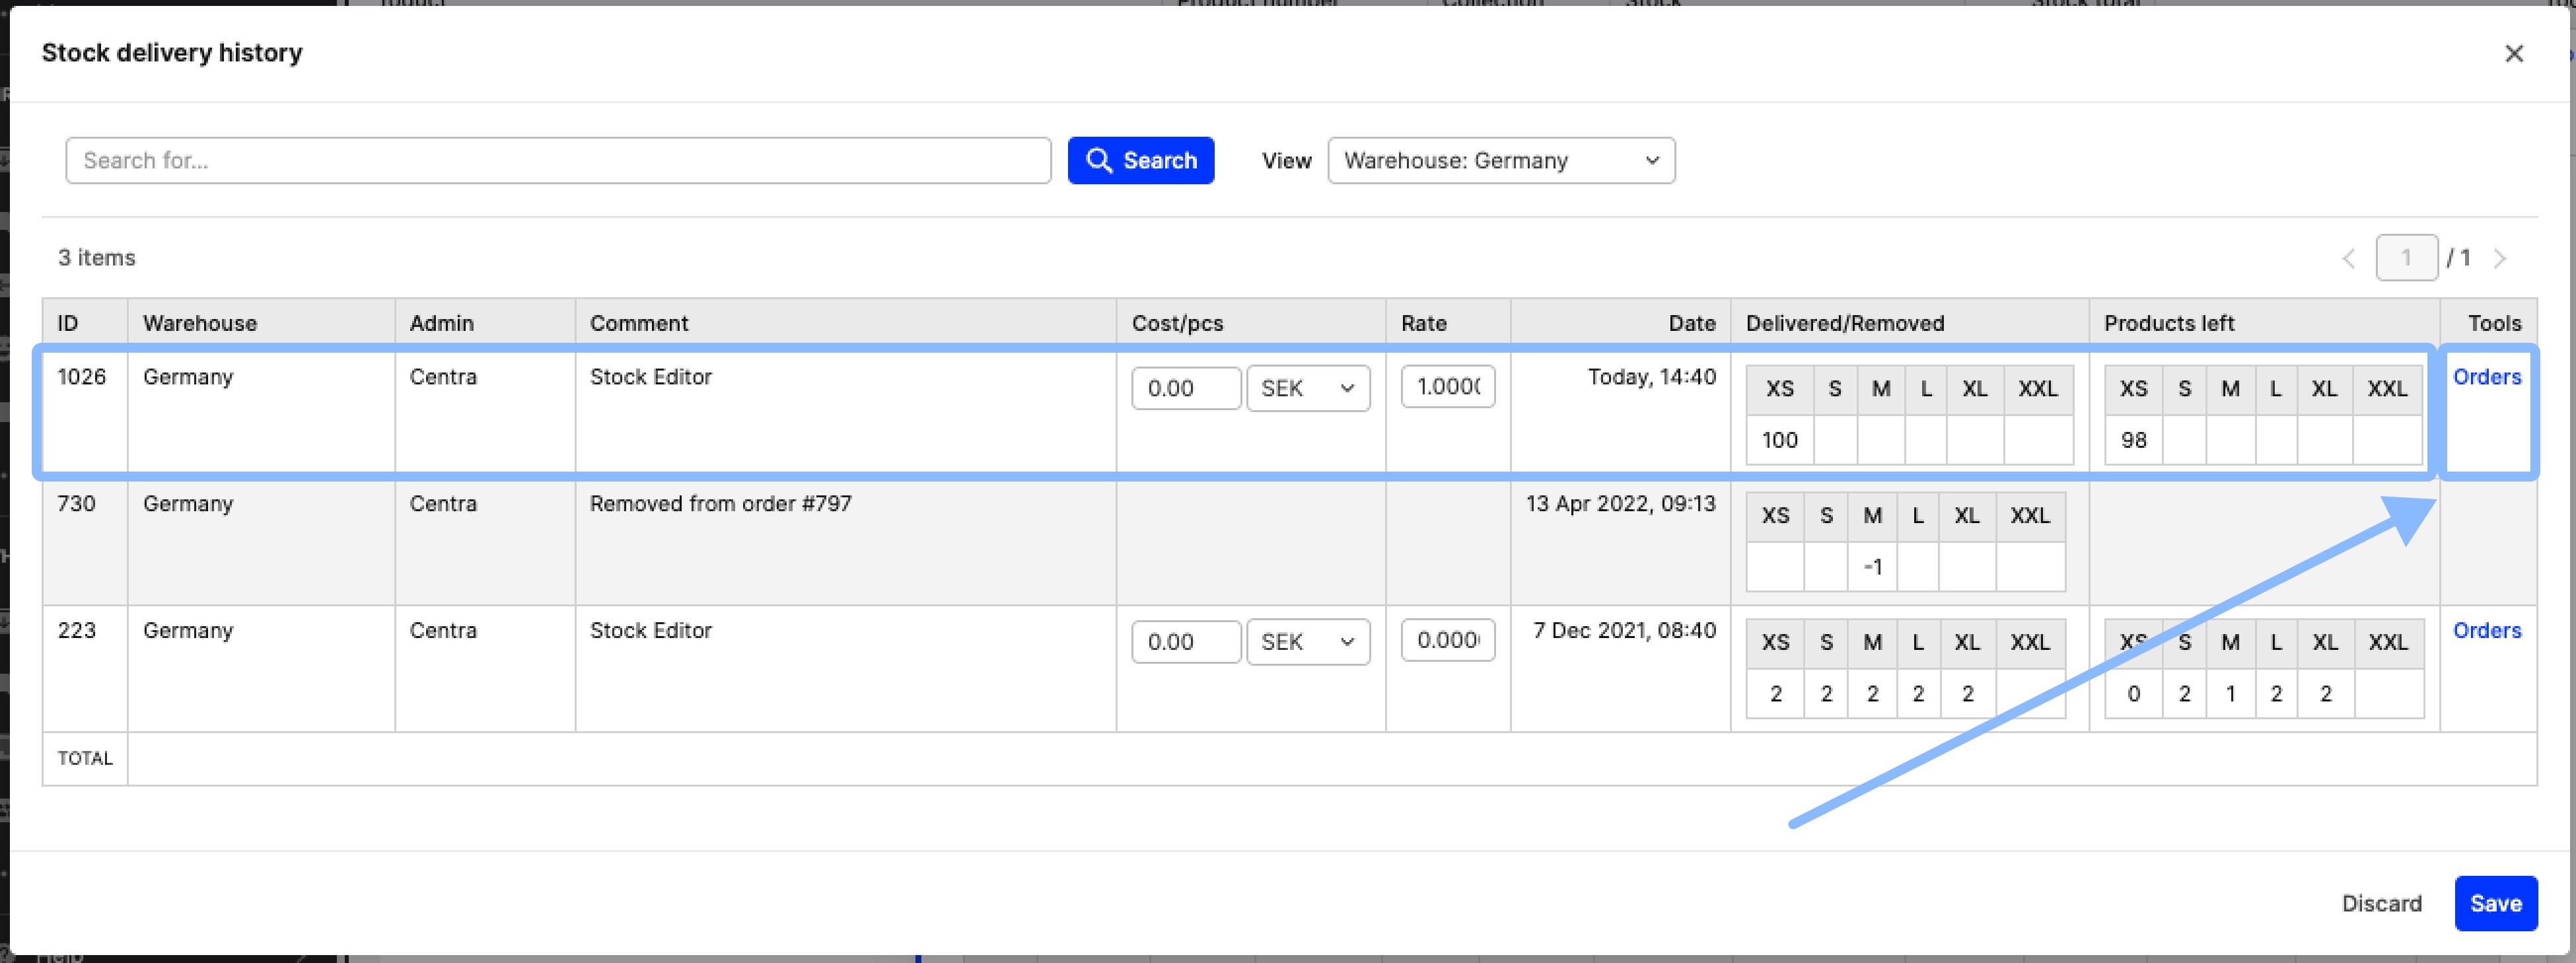
See which orders were affected
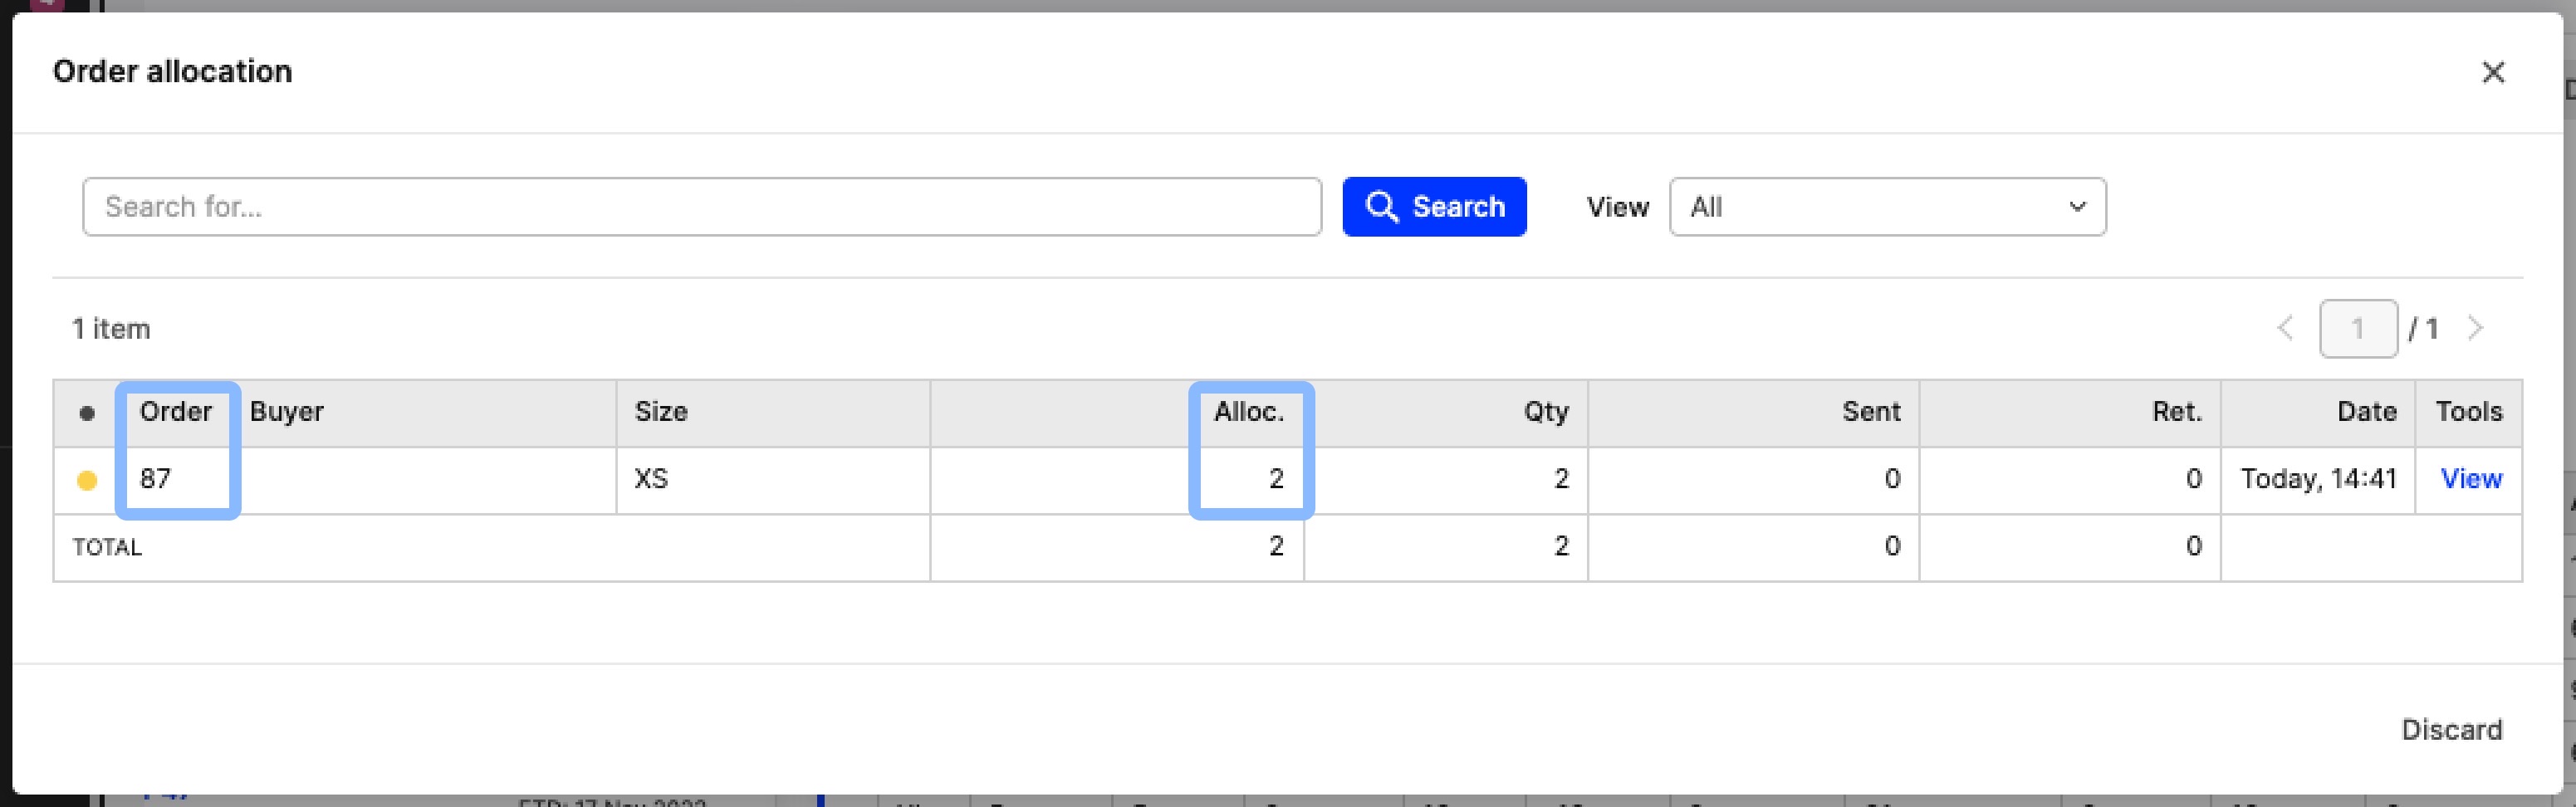
In cases where stock changes affect orders, the 'Orders' option appears under Tools. This could happen in situations where products are allocated to orders. For example, below we see that item 1026 was inserted 100 products of size XS through a stock import. In the Products left column we see that 98 were left. If we click on 'Orders', we see that some of those imported products were allocated to orders.
Two pieces were allocated on order 87 as seen below: