User Details Panel
About this article
In this article, we discuss all sections found in the Users Detail panel. You can also find out how to create a user and understand what each setting does.
Overview of Users Detail panel
To see details about a specific user, click anywhere in the row or on ‘View’ under ‘Tools’ in the Users Listing. On the user, you can see the following parts: Users Top bar (1), Users summary (2), and Users sections (3):
Let’s discuss each part in more detail below:
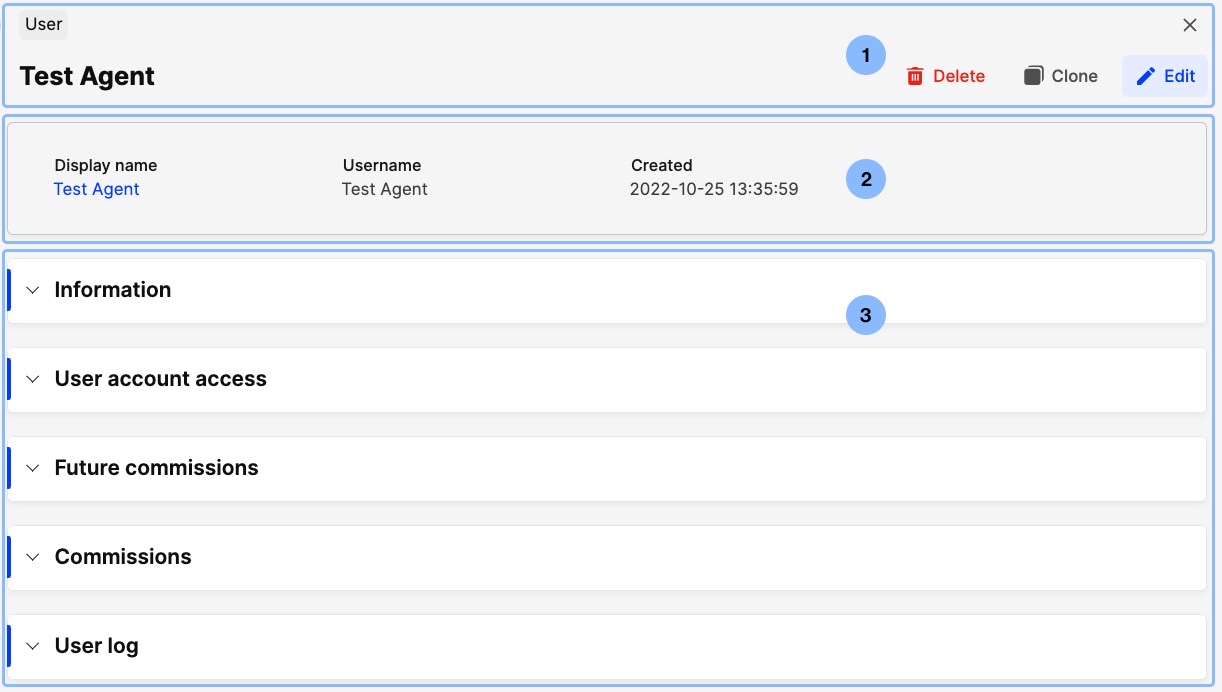
Users Top bar
On the left-hand side you can find the User tag. On the right, you can see the following buttons:
- Delete - This can be used to delete the selected user. When the user status is set to Active or Inactive, the first time 'Delete' is clicked, the status changes to ‘Disabled’. The second time, the user is removed from Centra. This action is irreversible.
- Clone - If you wish to create a user with similar settings, use the ‘Clone’ feature. Remember that the main email will not be copied over, since this needs to be a unique entry for each user.
- Edit - Click on this button to change the user data. Follow the blue marker on the side of the user sections to see which ones are editable.
Users summary
The Users summary includes the most important data points of a user. These include: Display name, Username, and Created (date).
Users sections
The following sections are available in the Users Details panel: Information, User account access, Future commissions, Commissions, User log. Below we go through each of them separately:
Future commissions and Commissions are Wholesale specific sections. This means that if you are only using DTC stores in your Centra, these sections won’t appear.
Information
In the ‘Information’ section you can set the following within each subsection:
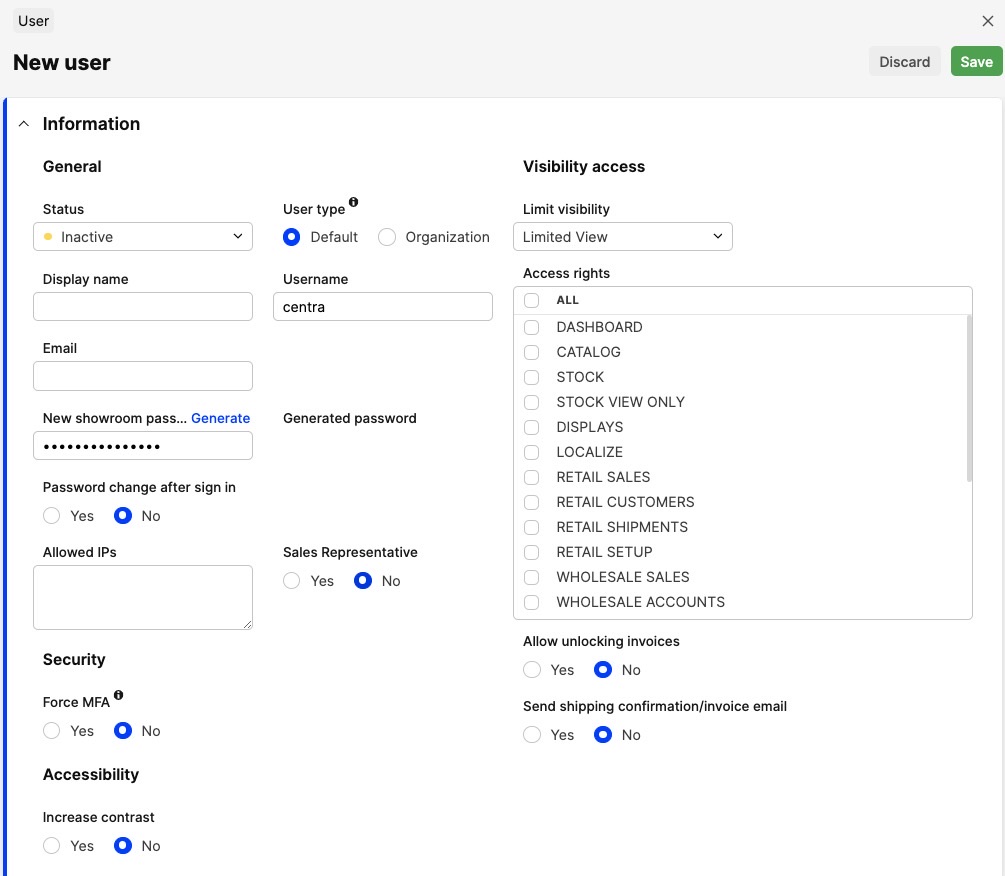
General:
- Status - Here you can set the status of your user. The options include Active, Inactive, and Disabled. Set to ‘Active’ to allow the user to login and use Centra.
- User type - Here you can choose between Default or Organization. Default is a regular user, whereas Organization can be used by integrations that need access to your Centra instance. Read more about Organization here.
- Display name - The name of the user. This will be displayed across Centra when this user performs an action that is included in a history log (i.e. Order history, Email history).
- Username - A legacy setting used as a fallback option that can be used instead of the email address when a user is trying to login. Only used if SSO is disabled.
- Email - This is the email address used to log in to Centra with. It's mandatory and needs to be unique
- New showroom password - Here you can set the password that can be used to login to the Showroom for this user. You can either insert your own password or click on ‘Generate’ to get a suggestion, which can be found under the ‘Generated password’ field.
- Generated password - Once ‘Generate’ is clicked, the suggested password appears here.
- Password change after sign in - If set to ‘Yes’, the user is forced to change their Password after sign in. This is great to use when the password is shared with the new user upon user creation and a temporary password is set that should be changed for security purposes. Note that this is only available for the Showroom password.
If you only use DTC in your Centra, these three password settings are not available, since the Showroom is not used.
- Allowed IPs - If you wish to restrict access only to certain IPs, add them here.
- Sales Representative - If set to ‘Yes’, the user is classified as a Sales rep. This means that when B2B orders are placed on behalf of the accounts that the user is a Sales rep for, they can receive a commission for this sale. More information about the Sales rep functionality can be found here.
Security:
- Force MFA - If set to ‘Yes’, it forces the user to login through MFA. You can read more about MFA in this article.
- Reset MFA - Click on ‘Reset’ to start the reset process. The following pop-up appears:
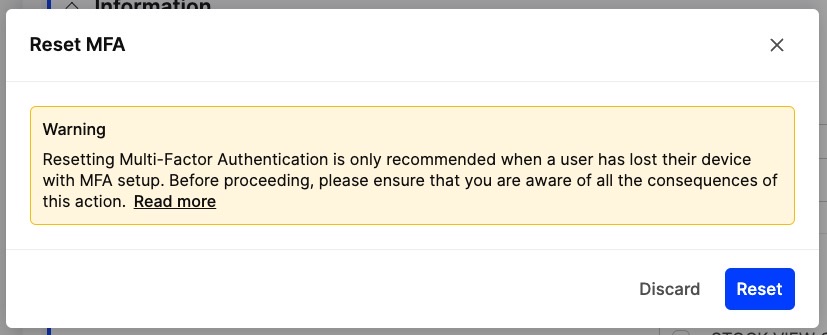
Click ‘Reset’ to approve the action in the pop-up and reset the MFA for this user.
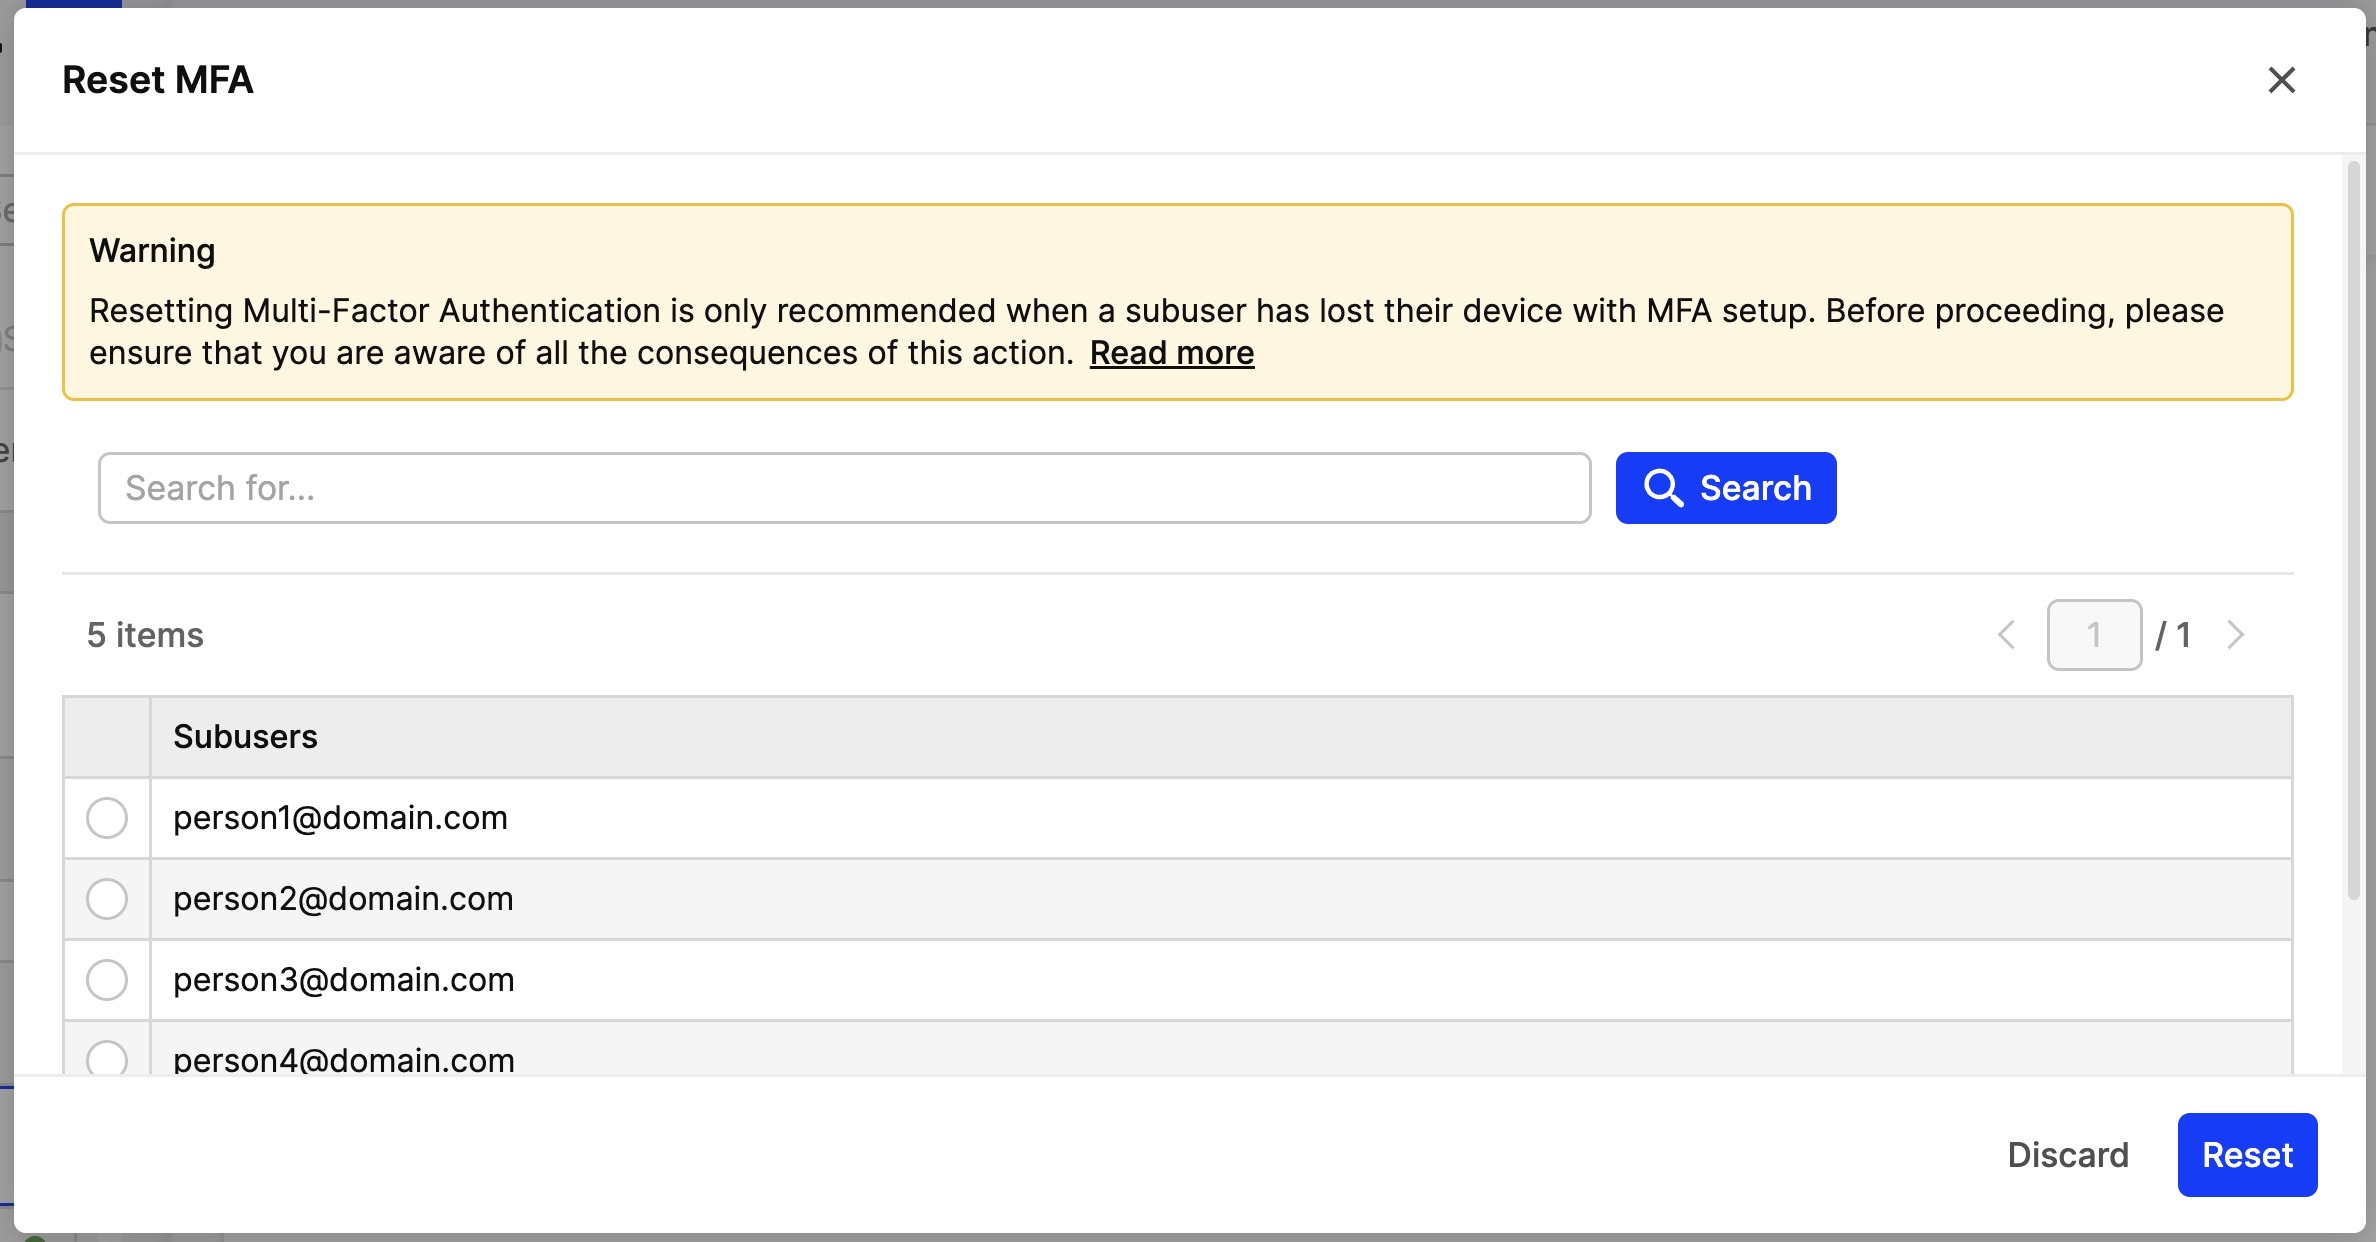
If the ‘User type’ is set to ‘Organization’ and ‘Access by’ is set to ‘Domain’ the same pop-up as above appears. However, when ‘Access by’ is set to ‘Emails’, the pop-up will include a list of all email addresses added in the Subusers section. This allows you to choose which specific subuser’s MFA to reset. Read more about this here.
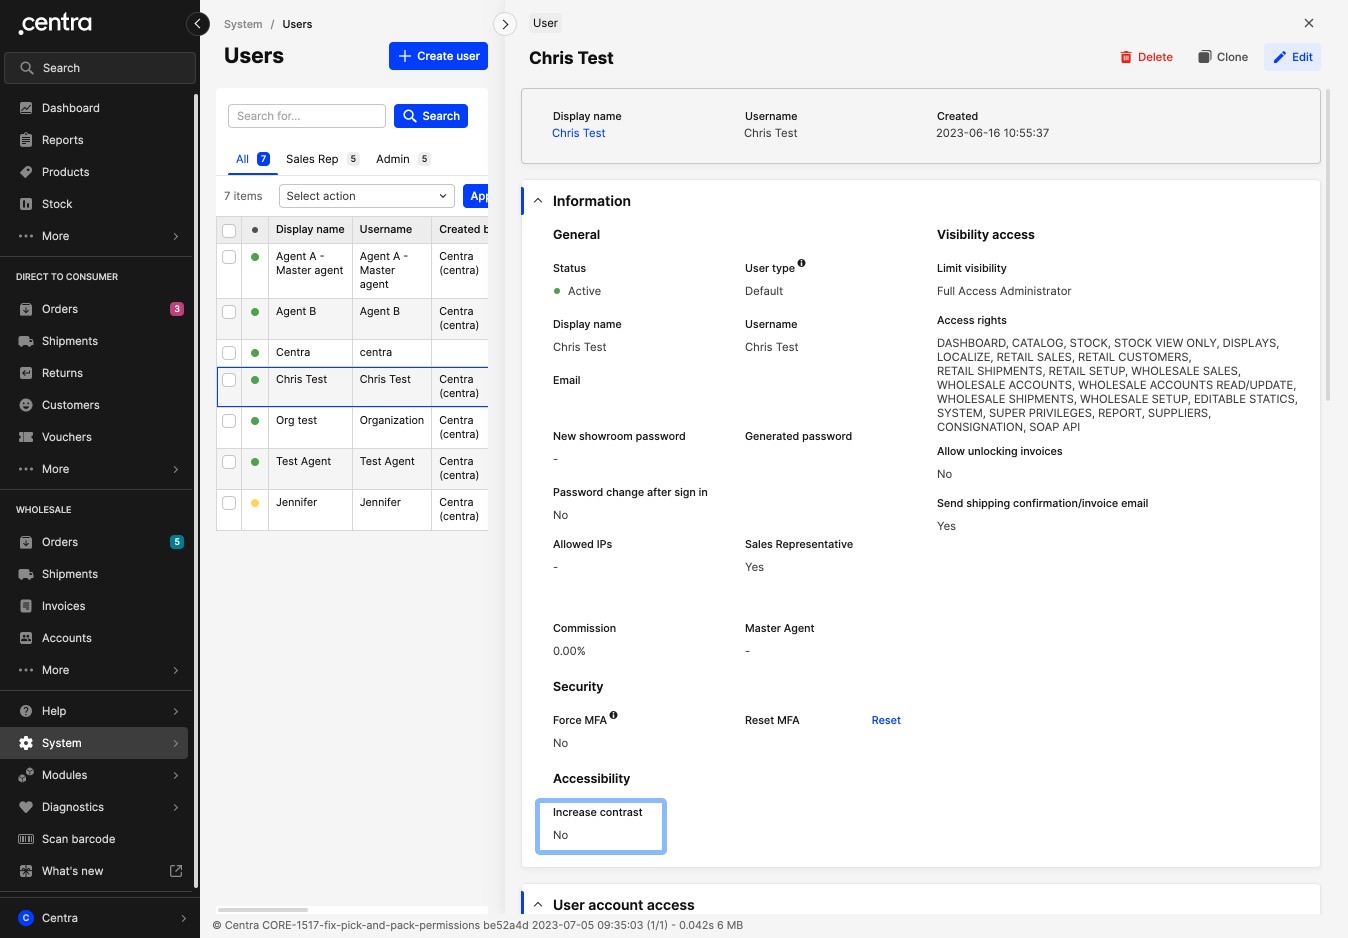
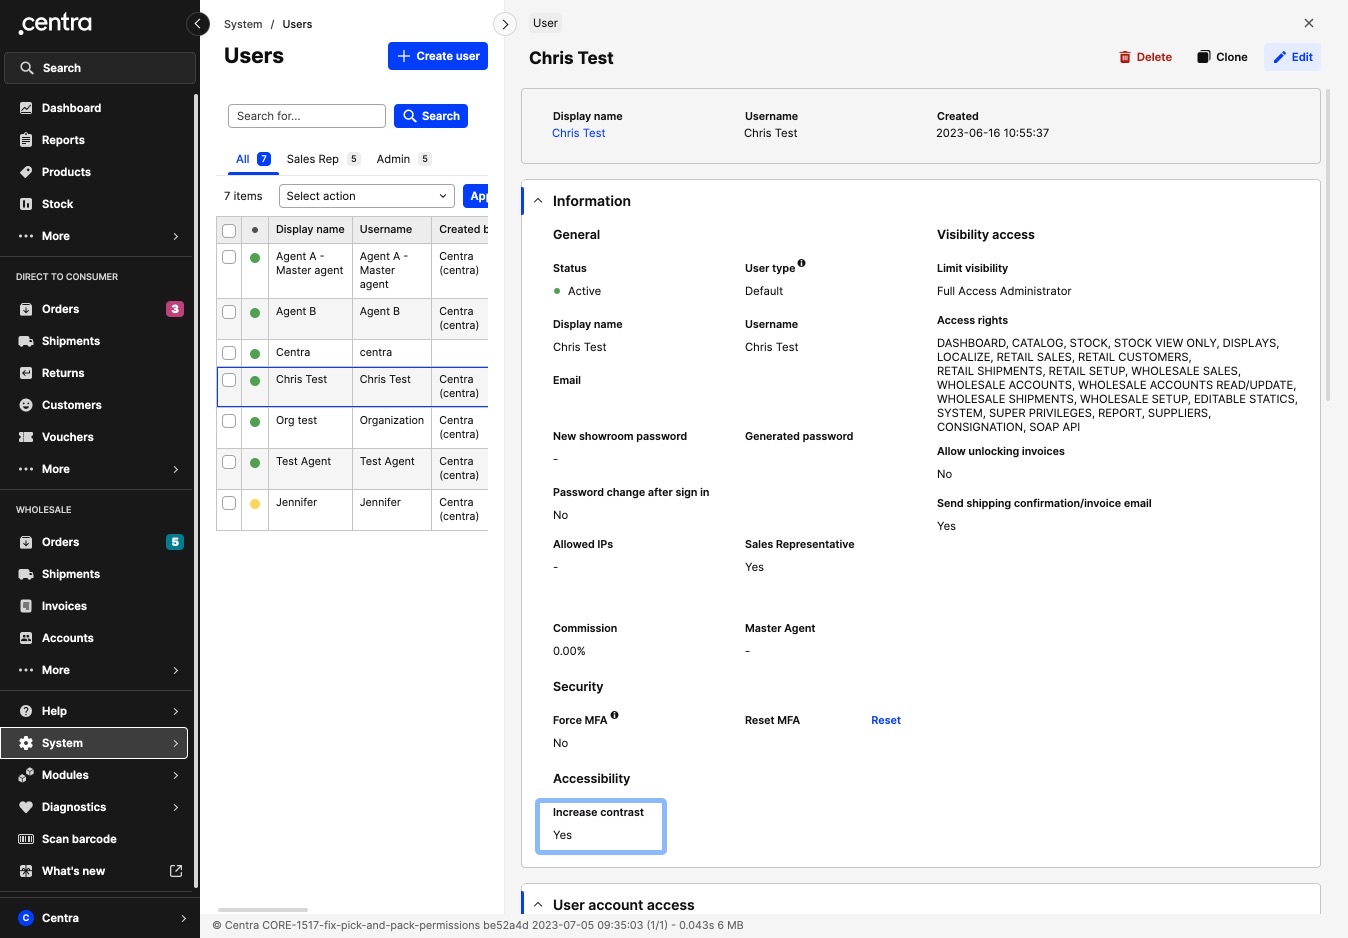
Accessibility:
- Increase contrast - This changes the contrast of the colors to make Centra more accessible to users. Below are two screenshots showing the changes - one where the setting is ‘No’ (default) and another where the setting is ‘Yes’:
Visibility access:
- Limit visibility - Here you can choose between the following five User presets: Partner Administrator, Full Access Administrator (FAA), Limited View, Agent, Pick & Pack Service Provider. Each preset has preselected options in the Access rights section. Also, the settings found under the Access rights section change according to the selected preset.
- Access rights - A list of all the different Centra pages is found here. Partner Administrator and FAA users have all options selected by default. Limited View users have none selected, giving you the freedom to choose the pages this user can access. As for Agent and Pick & Pack Service Provider users, only a few parts are selected, which you can see below:
- Agent - Wholesale Sales, Wholesale Accounts, Wholesale Shipments.
- Pick & Pack Service Provider - Stock, Retail Shipments, Wholesale Shipments.
These can be changed as needed if you wish to give users access to more or less pages.
- Allow unlocking invoices - If set to ‘Yes’, this user will be able to lock invoices. Available for the following users: FAA, Partner administrator, Limited View, Pick & Pack Service Provider.
- Send shipping confirmation/invoice email - If set to ‘Yes’, this user will receive invoice emails. This works for users that have the Sales rep set to ‘Yes’. Note that the shipping confirmation part is a legacy setting - for this to work please use the store setting ‘Send shipment confirmation emails to’ by setting this to an option that includes the Sales rep (i.e. Sales rep or Both buyer and sales rep).
Some User presets have a few extra settings in the ‘Visibility access’ section. Each article corresponding to a User preset includes information about these settings.
User account access
In the ‘User account access’ section you can set the following:
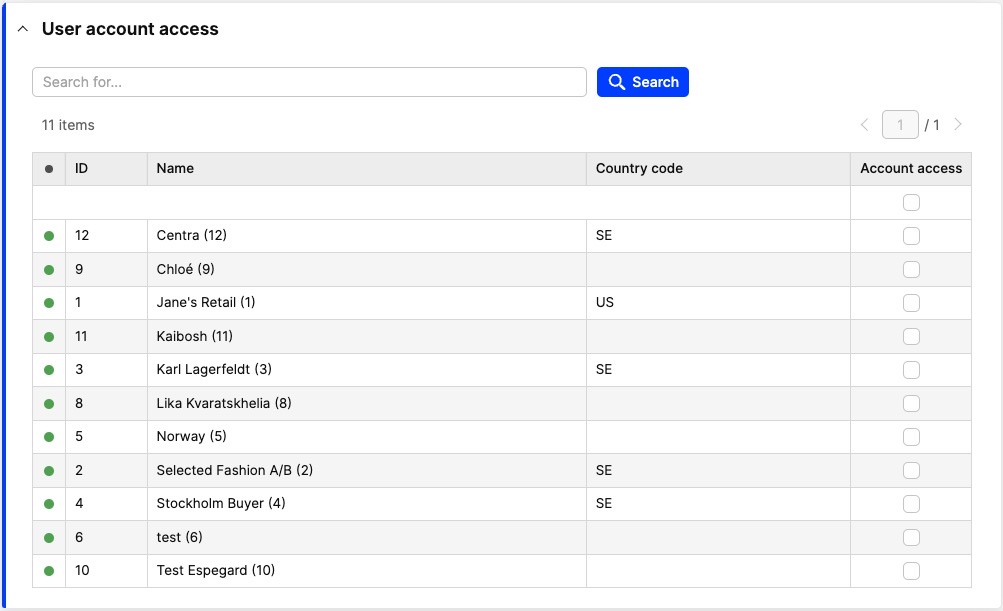
- Account access - Select the tickbox of the Accounts that the user should have access to. The search bar can be used to search for specific accounts or countries, or sorting by column (Status, ID, Name, Country code, Account Access, Sales Rep, Commission)
You need to have access to at least one account in order to be able to log in to the Showroom as a User.
- Sales rep - When the ‘Sales representative’ setting in the General section is set to ‘Yes’, additional columns appear. Read more about this here.
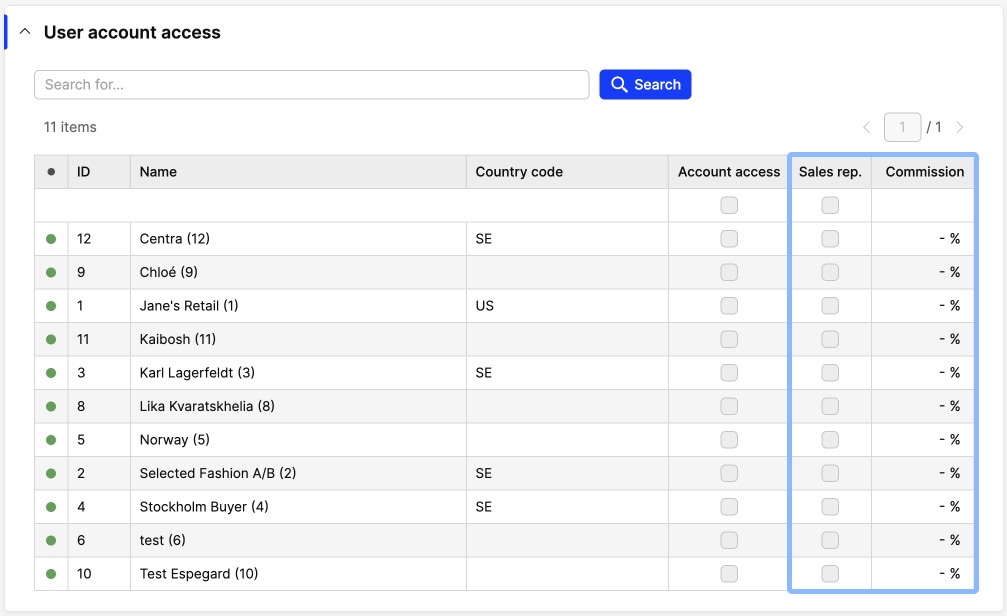
It is important to note that you can only have one user listed as a Sales rep per account. If a user is already set up as a Sales rep on an account and then a new user is created that is a Sales rep for the same account, the sales rep access on the original user is removed. Additionally, if a user is cloned, the Sales rep selections in this section are also cloned into the new user. This means that the original user is no longer the Sales rep for these accounts.
Future commissions
In this section you can see a list of all orders where this user is a Sales rep on and has a commission percentage, but no invoice has been created yet. You can see the Commission amounts per Account and Order for orders that have no invoice generated. It can be used to estimate Future commissions.
You can use the Tabs to filter the following order statuses: All, Pending, Confirmed, Processing, Completed, Archived. The search bar can also be used to filter specific orders. The following data can be seen per column: Order status, Order (ID), Account/Customer, Collection, Commission.
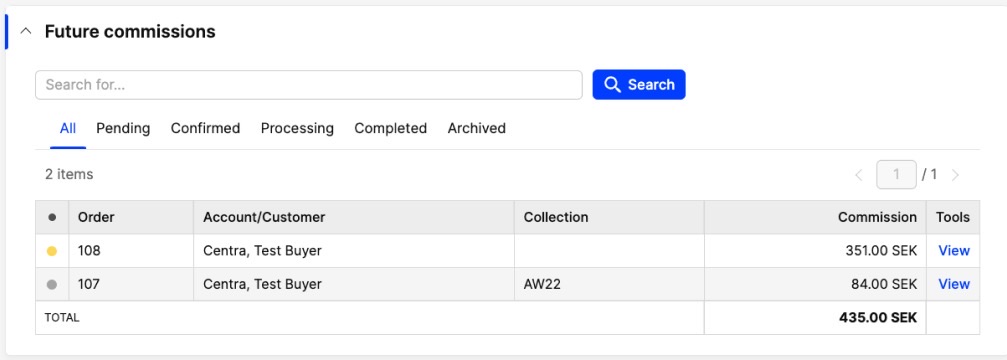
Once an invoice is created, the order is no longer visible in this section, but is moved to the ‘Commissions’ section instead.
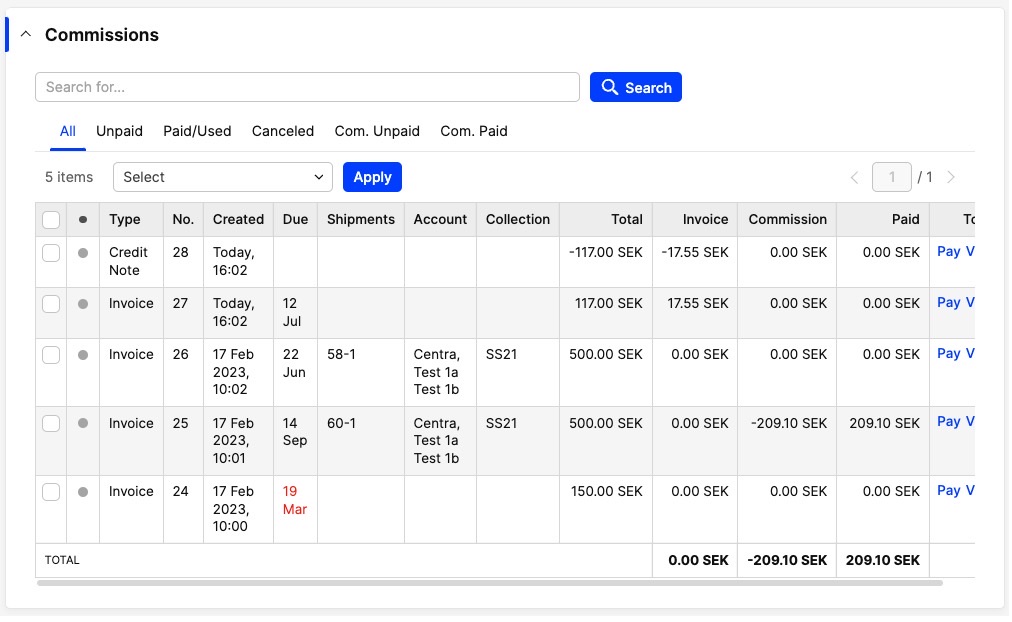
Commissions
In this section you will find all invoices, prepayment invoices, and credit notes from orders where this user is a Sales rep on and has a commission percentage. You can see the Commission amounts per invoice type (i.e. invoice, prepayment invoice, credit note). It can be used to estimate commissions.
You can use the Tabs to filter the following: All, Unpaid, Paid/Used, Canceled, Com.Unpaid, Com.Paid. The search bar can also be used to filter specific invoices. The following data can be seen per column: Invoice status, No. (ID of document), Created (date), Due (date), Shipments (ID), Account, Collection, Total, Invoice, Commission, Paid. In the ‘Tools’ section you can click ‘View’ and be redirected to the invoice itself, or click on ‘Pay’ to indicate that the commission has been paid to the Sales rep. This action will move the total payment from the ‘Commission’ column to the ‘Paid’ column.
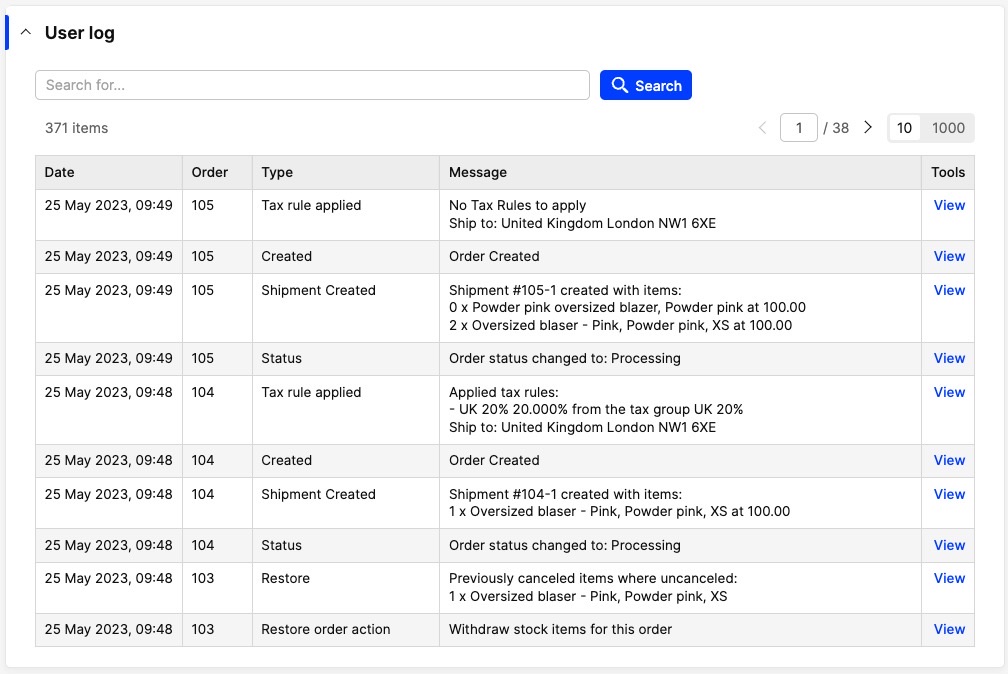
User log
A list of registered historical changes performed by this User can be seen in this section. The following data is stored within each column: Date, Order (ID), Type, Message
The search bar can be used to search for specific data points from each column. Some examples of the types of actions include: Order Created, Tax applied, Shipment Created, Shipping cost changed, Allocate/Unallocate, Items added to order, and Items canceled in order.
How to create a new user
- Click on ‘Create user’ and you are redirected to this view:

- Configure the settings as needed (detailed in the Information section above)
- For B2B, review which Accounts the User should have access to. Read more here
- Click ‘Save’.