Import products in bulk
About this article
Learn how to import products in your Centra using an Excel file. You may also use the import file to update existing products in your catalog. To import an Excel file to add or update products, follow the instructions below.
Prerequisites
To be able to import products directly into Centra, you need to create the following prerequisites:
- Size Charts that will be used to display inventory
- A Folder structure to categorize sales internally. This prerequisite is optional but will be useful, as you will be able to see sales statistics based on your folder structure and your catalog will be easier to sort
- Measurement Charts to display product measurements. This prerequisite is optional but will be useful in the product description
Catalog import how-to: Quick guide for Product import
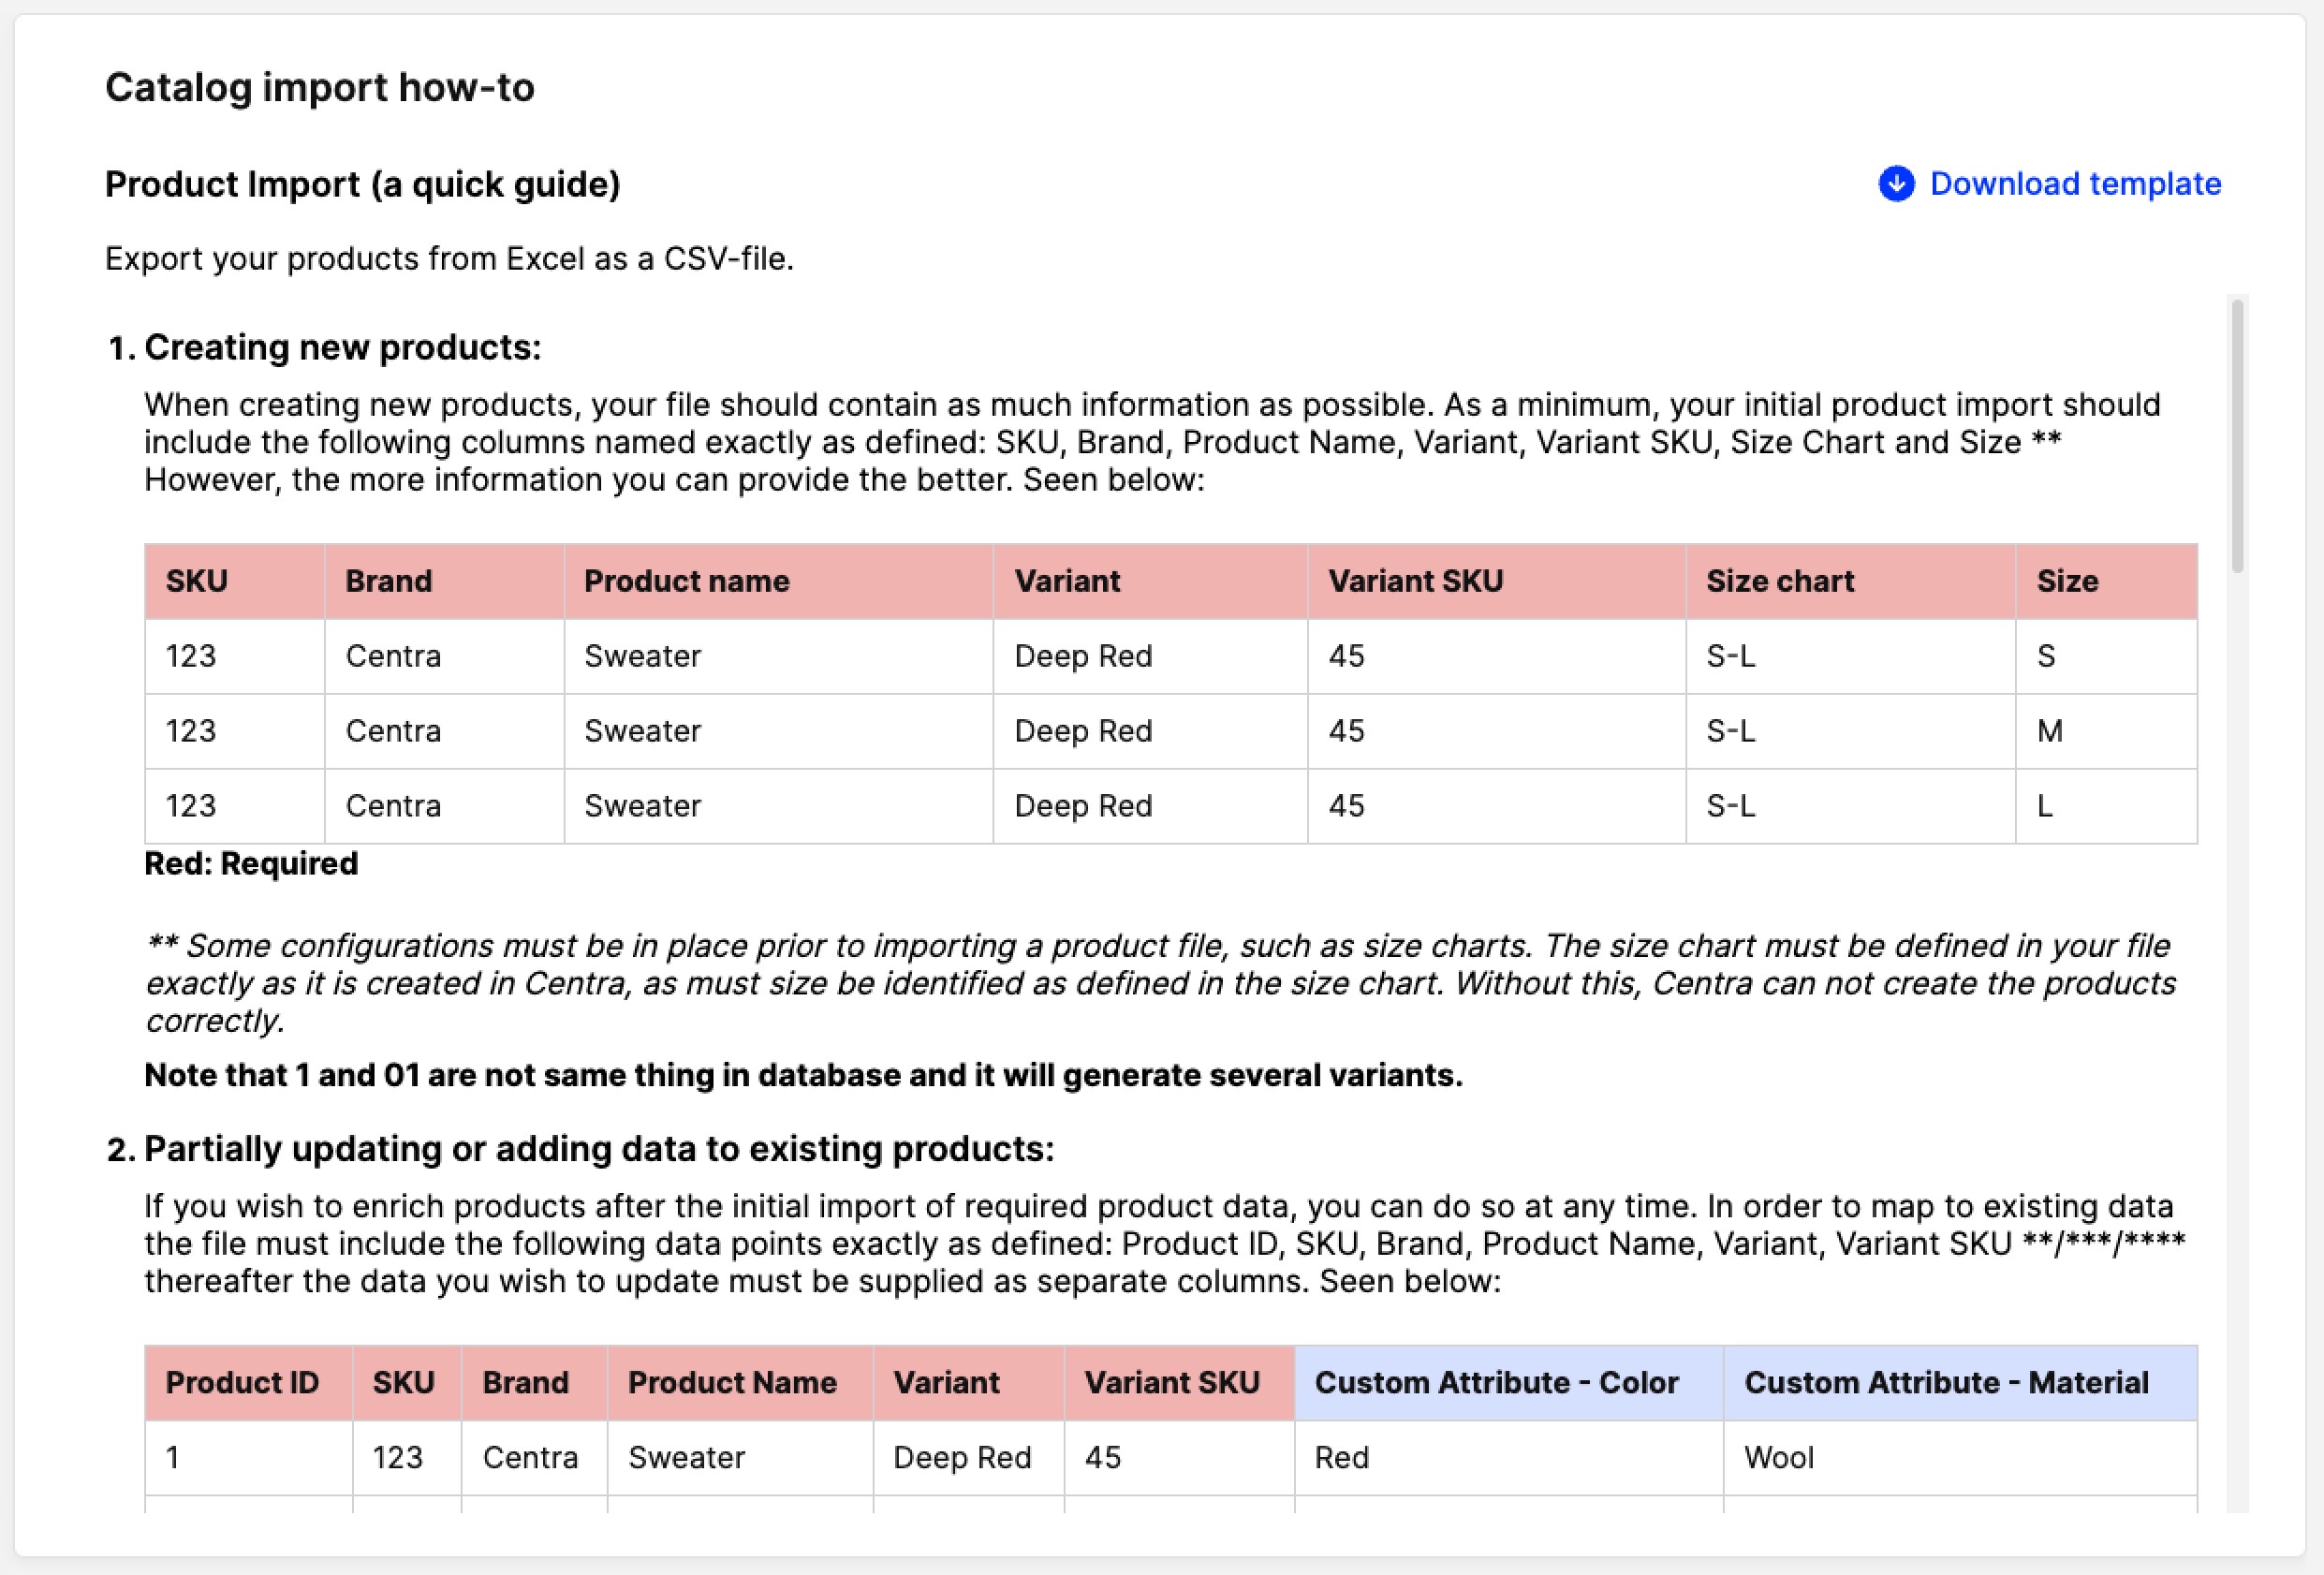
Remember that within the Import section, there is more information regarding the Product import and you can also find a template to download. Go to 'Products', 'Import', select 'Import type:Products'.
The quick guide is right next to the Product import settings and looks like this:
Preparing the import file
Before you start the import in Centra, an import file with all product data you wish to create/update needs to be created. Below we discuss what kind of data you can import into Centra and also how the file should be structured and its format.
Import file structure
We recommend performing a Product Export as this file can be used as a template for your next import. In the Product Export file, each column header represents a product field. When a product has multiple variants, then each variant has its own row. Additionally, if size information is included, then each row showcases data per size. See examples below:
- T-shirt with two variants, no size data included

- T-shirt with two variants and size data included

If you are adding multiple variants or sizes per product, make sure the rows are after each other in the file, without any row breaks or variant/size info from other products in between. Otherwise, Centra cannot map the variant or size to the correct product.
The importance of unique identifiers
When updating existing products, the import file needs to include certain data points to ensure Centra maps out to the right product or its relevant part. See more info below to determine which fields can be used as unique identifiers depending on the layer in which the field(s) you wish to update are located:
- Product level – We recommend using the Product ID to map to a specific product. Alternatively, you can use the combination of Product SKU/Number and Product name. However, since Product SKU/Number and Product name could include duplicates, such as in cases of products sharing stock, it is safer to use the Product ID
If you use the import to change the product name without using the product ID, Centra creates a new product.
- Variant level – Variant name and Variant SKU/Number are best to use to map out a specific variant. The Product level unique identifier is also mandatory in this case
- Size level – Use Size and Size chart together to map out a specific Size. Product and Variant level unique identifiers are also mandatory in this case
- Store attributes level – We recommend performing store-specific updates for each import to ensure that no crossover happens between stores. Pricelist fields include the store name in the export file. However, fields for Meta data, Display name and others do not. The Product level unique identifier and at least a unique identifier of one variant of this product are mandatory as well
- Display level – The Display name and Display URI of each Display is unique and can therefore be used to map to a specific Display. The following unique identifiers are also mandatory: Product level, Variant level, Store attribute level
In reverse, if you are creating new Products, ensure that the Product ID column is empty. This data is generated automatically by Centra and cannot be changed, which is why it cannot be created by import.
This article includes different scenarios of Product import, so you can see case-by-case details.
What data can I import and update
Below you can find all available columns according to Product, Variant, Size, and Display level along with descriptions of each option:
Product level
- Product ID (optional)(cannot be changed) - Product IDs are automatically generated by Centra when a Product is created. They are unique and cannot be edited. This can be used as a unique identifier to map to an existing Product. They’re great to use for mapping purposes when updating an existing Product (i.e. to update the Product SKU/number and/or name). If you want to add new Products based on exported data, make sure this column is removed before importing
- SKU (Product number) - SKU stands for Stock Keeping Unit, which is the style number of the Product
- Brand - Here you can input the name of the Brand selected on the Product you wish to update. If you are importing new Products, you can insert new Brands this way
- Product Name - Insert the name of the Product. Remember that this name is only used internally
- Weight (optional) - Add the weight of the Product, which may be useful for customs
- Folder - Folders are used to categorize Products internally and is not visible in the frontend
- Collection - You can insert the Collection of the Product you are targeting or insert a different/new collection to update the Product with. However, remember that there is a Collection field on the import settings too, and these need to be used with care. More specific information about the differences between them can be found below. A general rule, though, is that Centra looks first at the Collection data in the import file, and overlooks the input from the Collection field in the import settings
- Measurement Chart (optional) - Here you can input the name of the Measurement Chart you would like to use on this Product. To read more about how to create Measurement Charts, click here
- Internal Comment (optional) - You may add an internal comment to this Product
- Harmonization Code - Input the Harmonization code for this Product. More info can be found here
- Customs Description - Enter the Harmonization Code Description
- Supplier Name (optional) - Enter the name of the supplier of this Product. Note that suppliers need to be created first in the Supplier module
- Country of Origin - Enter the ISO code of the country where the Product is manufactured. To read more about ISO codes click here
Variant level
- Variant - Enter the name of the variant
- Variant SKU (optional) - Input the SKU/number of the variant
- Variant Internal Name (optional) - If you would like to add an internal name for this variant, use this data point
- Variant ID (optional) - If this field exists, Centra looks for the existing variant based on this ID. This allows you to modify the name of the variant and the variant SKU/number without any issues due to incorrect mapping against the existing variant that should be updated. If you want to add new variants based on exported data, make sure this column is removed before importing, as the ID is created automatically by Centra
- Cost/Pcs - The manufacturer's price for this product
- Cost Currency - The currency of the manufacturer's price
Size level
- Size Chart - Enter the size chart this product belongs to. Do keep in mind that a Size chart can only be selected on a variant once, and cannot be changed after. In terms of the Product import, this means that Size chart data can only be added to variants that don't have a size chart assigned. However, it is not possible to update a Size chart through the Product import once a selection is made on the variant. If you need to change a Size chart on a variant please follow these instructions instead.
- Size - Enter the size of this specific item that exists in the chosen size chart
- Size SKU Suffix (optional) - Enter the size SKU/number. This can be used to create a unique SKU for your product when you have multiple sizes per item. The SKU for the size should be added here. For example: -s, -m, -l
- EAN (optional) - You may add EAN codes to the products
- Quantity (optional) - You may add the quantities of the products in the import file as well. Be aware that the warehouse you select in the import settings is the one where the quantity is added to
- Preorder - Enter 'Yes' if you would like to ensure this size is set to preorder, and 'No' if you would like it to be handled as normal stock. Preorder means that there is infinite amounts of stock - read more here
- Shipping dimensions - You can insert data with regards to the shipping dimensions of the product. The following data points are available:
- Length
- Width
- Height
- Dimensions Unit
You can set dimensions in centimeters (cm) or inches (in), however, it’s not possible to mix units within one Shipping dimensions section.
- Weight per size - You can use this to indicate weight per size if the weight differs depending on the size of the product
Remember that if you would like to add or update Quantity or mark a size as Preorder, you need to specify the Size chart, Size, and Size SKU values so that Centra knows which exact size to update.
Store attribute level
- Short Description - Provide a short description for the display
- Description - Provide a long description for the display
- Meta Title - Enter the meta title of the display. This is shown in the browser title and can be used by search engines
- Meta Description - Provide a Meta description for the display. This can be used by search engines to display page content inside search listings
- Meta Keywords - Meta keywords are optional and are rarely used by search engines
- Tags - Input tags to associate with this display
- Tax group - Use this if you want the Default Tax group for the store to be overridden. Read more here.
- Retail - USD (Retail only) - Enter the retail price of the display for specified pricelist. If you have or want to update multiple pricelists, ensure that you list them all separately in different columns. For example: Retail - USD, Retail - EUR, Retail - SEK
- Wholesale - USD (Wholesale only) - Enter the Wholesale in-price of the display for the specified WHS pricelist. Similar as above, if more than one pricelist is to be updated, input pricelist data per column
- Wholesale - USD - RRP (Wholesale only) - Enter the Wholesale out-price of the display. As above, each pricelist should be defined in a separate column within your file
Display level
- Display Name - Enter a name for the display. This is the product name displayed on your website for your customers
- Display URI - Enter the URI of the display. The Display URI needs to be unique. If it's not unique, Centra adds characters as a suffix to make it unique
- Canonical category - Enter the name of the canonical category, which is the ‘main category’ of a product display. You can only have one canonical category assigned in a display
- Category - Categories are used to categorize externally in the frontend. Specify here which categories you would like this display to include. If more than one category is available for the display, type them all together in the corresponding cell in your file. For example:
Shop
Shop / New arrivals
Shop / Accessories
Shop / Accessories / Bags
Use Option+Enter for Mac or Alt+Enter for Windows to make a new row within the cell to achieve the above results.
- Display Comment (optional) - You may add an optional internal comment to the product's display. Note that this is not shared in the APIs
Custom attributes added on Product, Variant, or Display level appear last in the file. These can also be updated through Product import using the analogous unique identifiers depending on the level at which they are found.
File format
To be able to import the file into the system you need to save it as a '.csv (CSV UTF-8 Comma Separated)' file. To do this in Excel, click 'Save as' and then select 'CSV UTF-8 Comma Separated (.csv)' in the format drop-down menu.
Please make sure that the file is not too big, by limiting it to maximum 1000 rows.
Importing product data to Centra
Accessing and performing a Product import
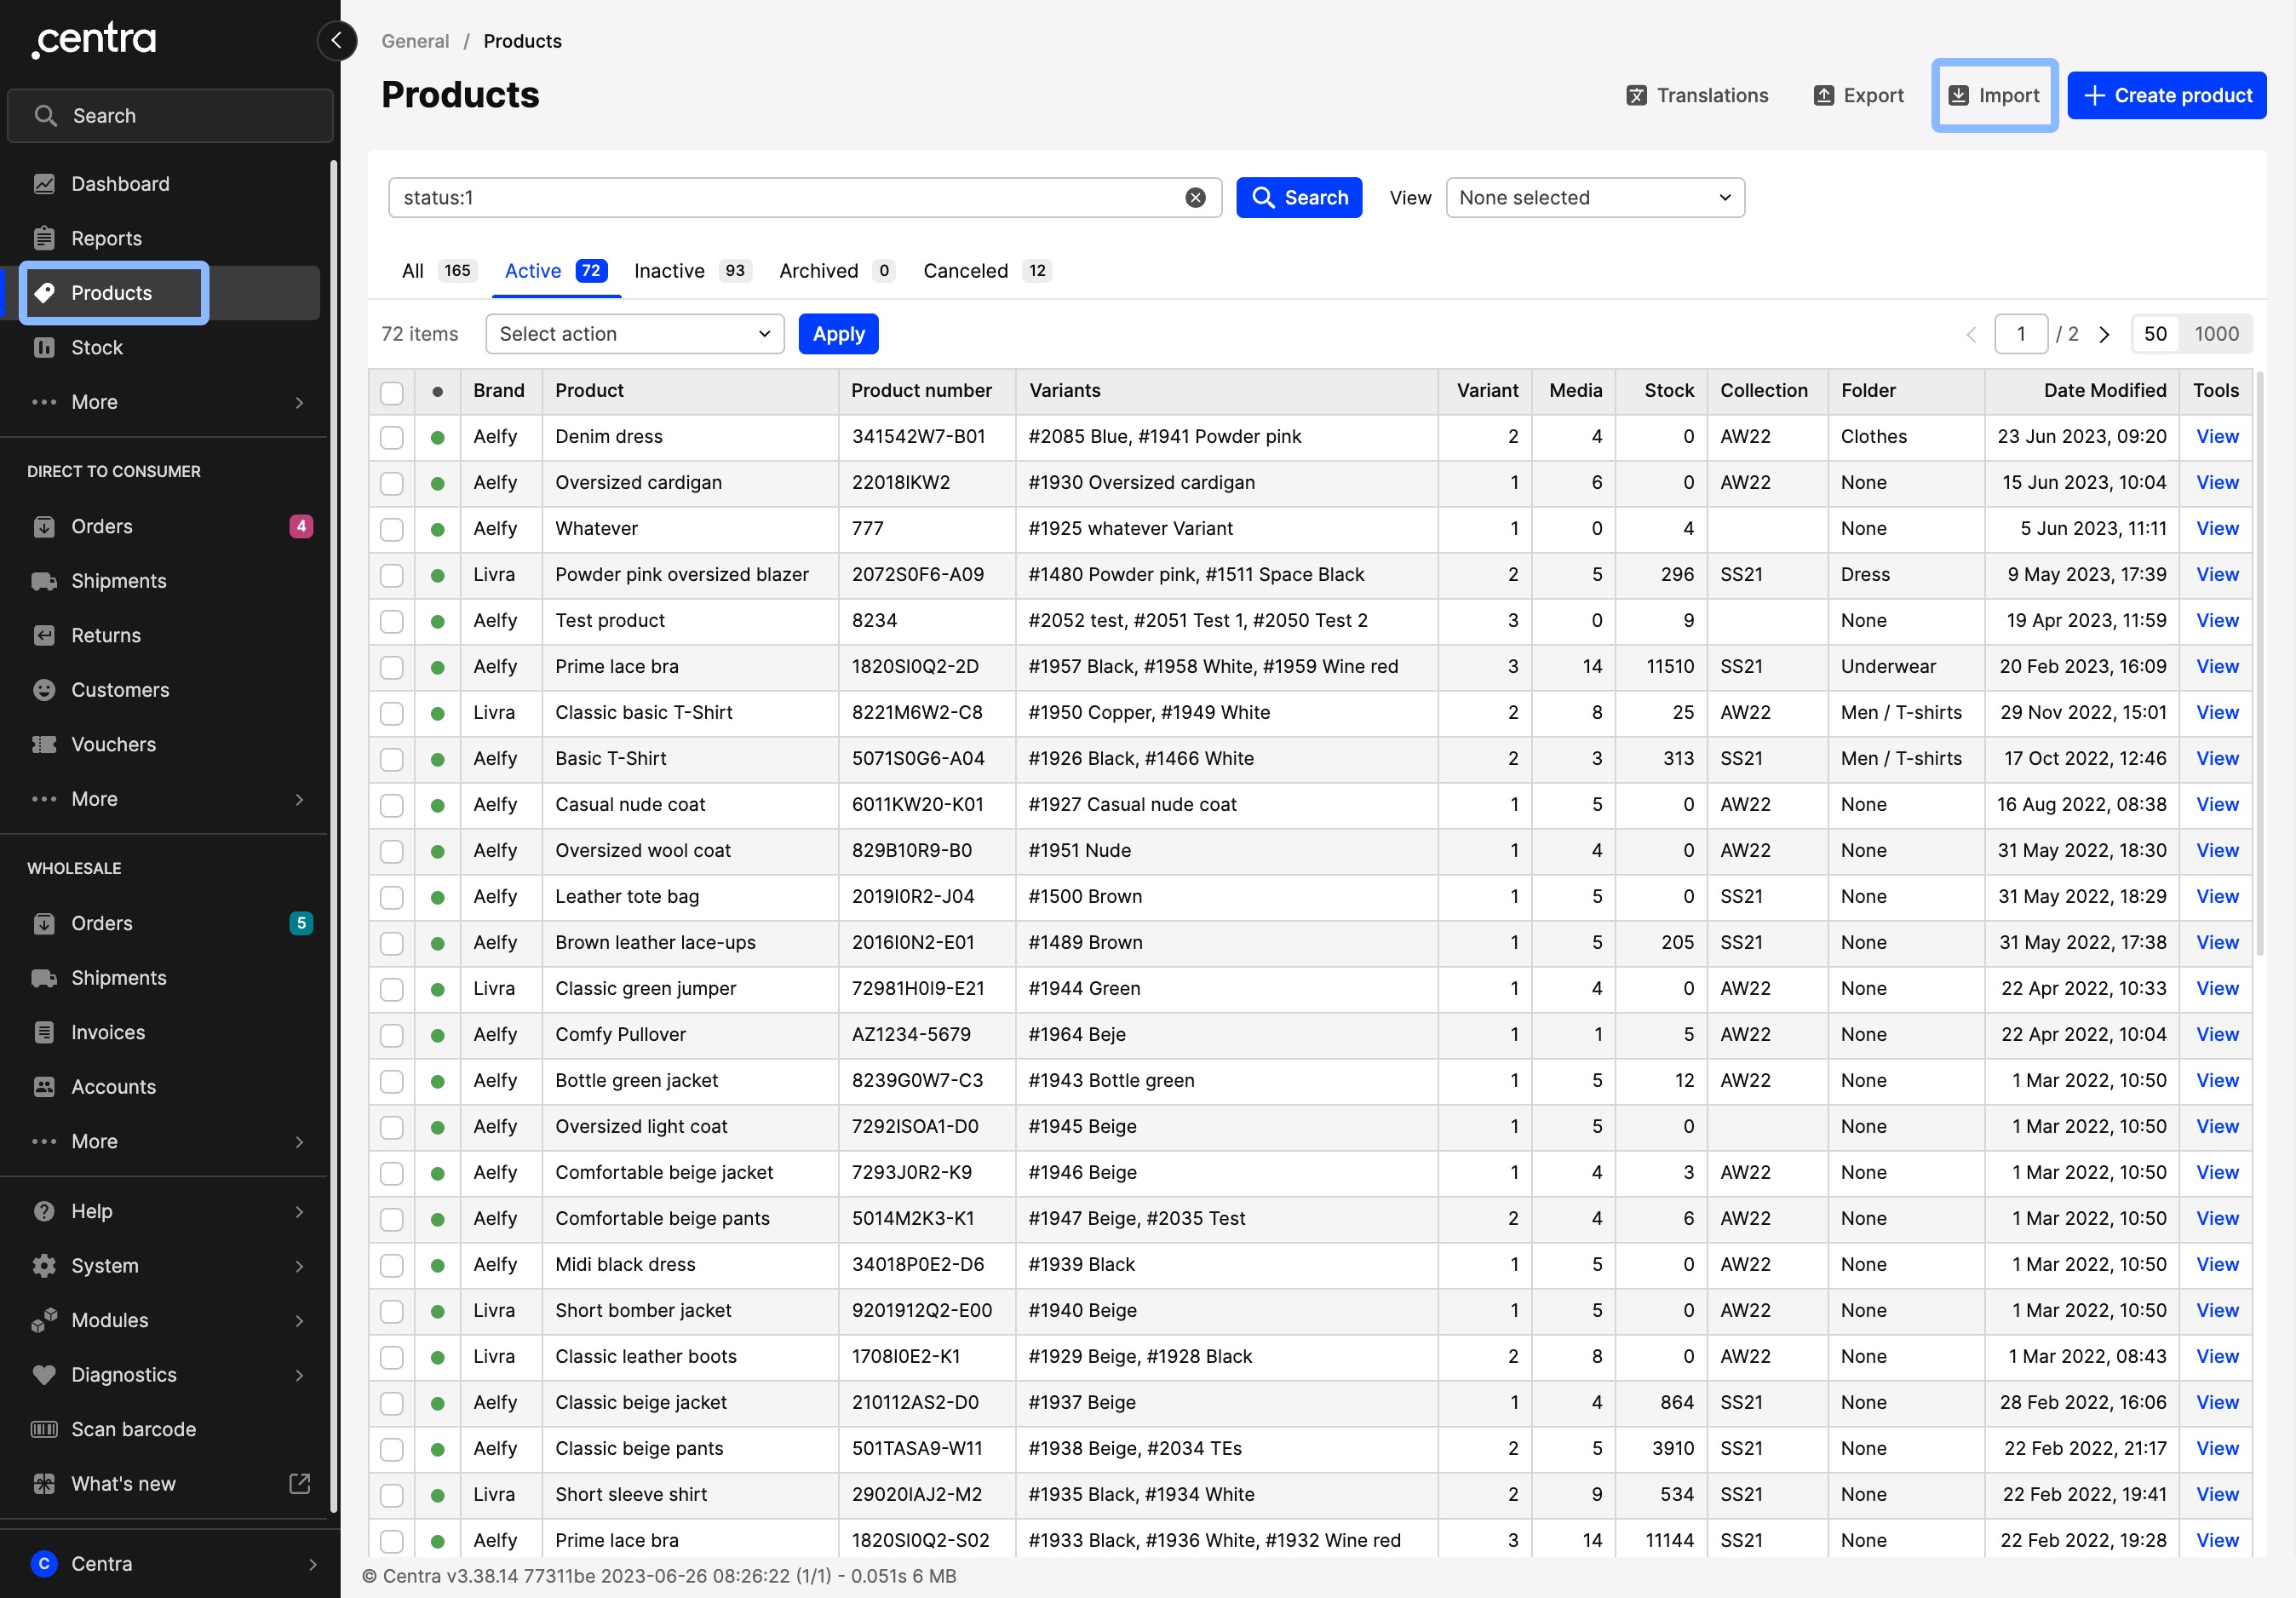
- Go to 'Products' in the main menu to the left and then click 'Import'
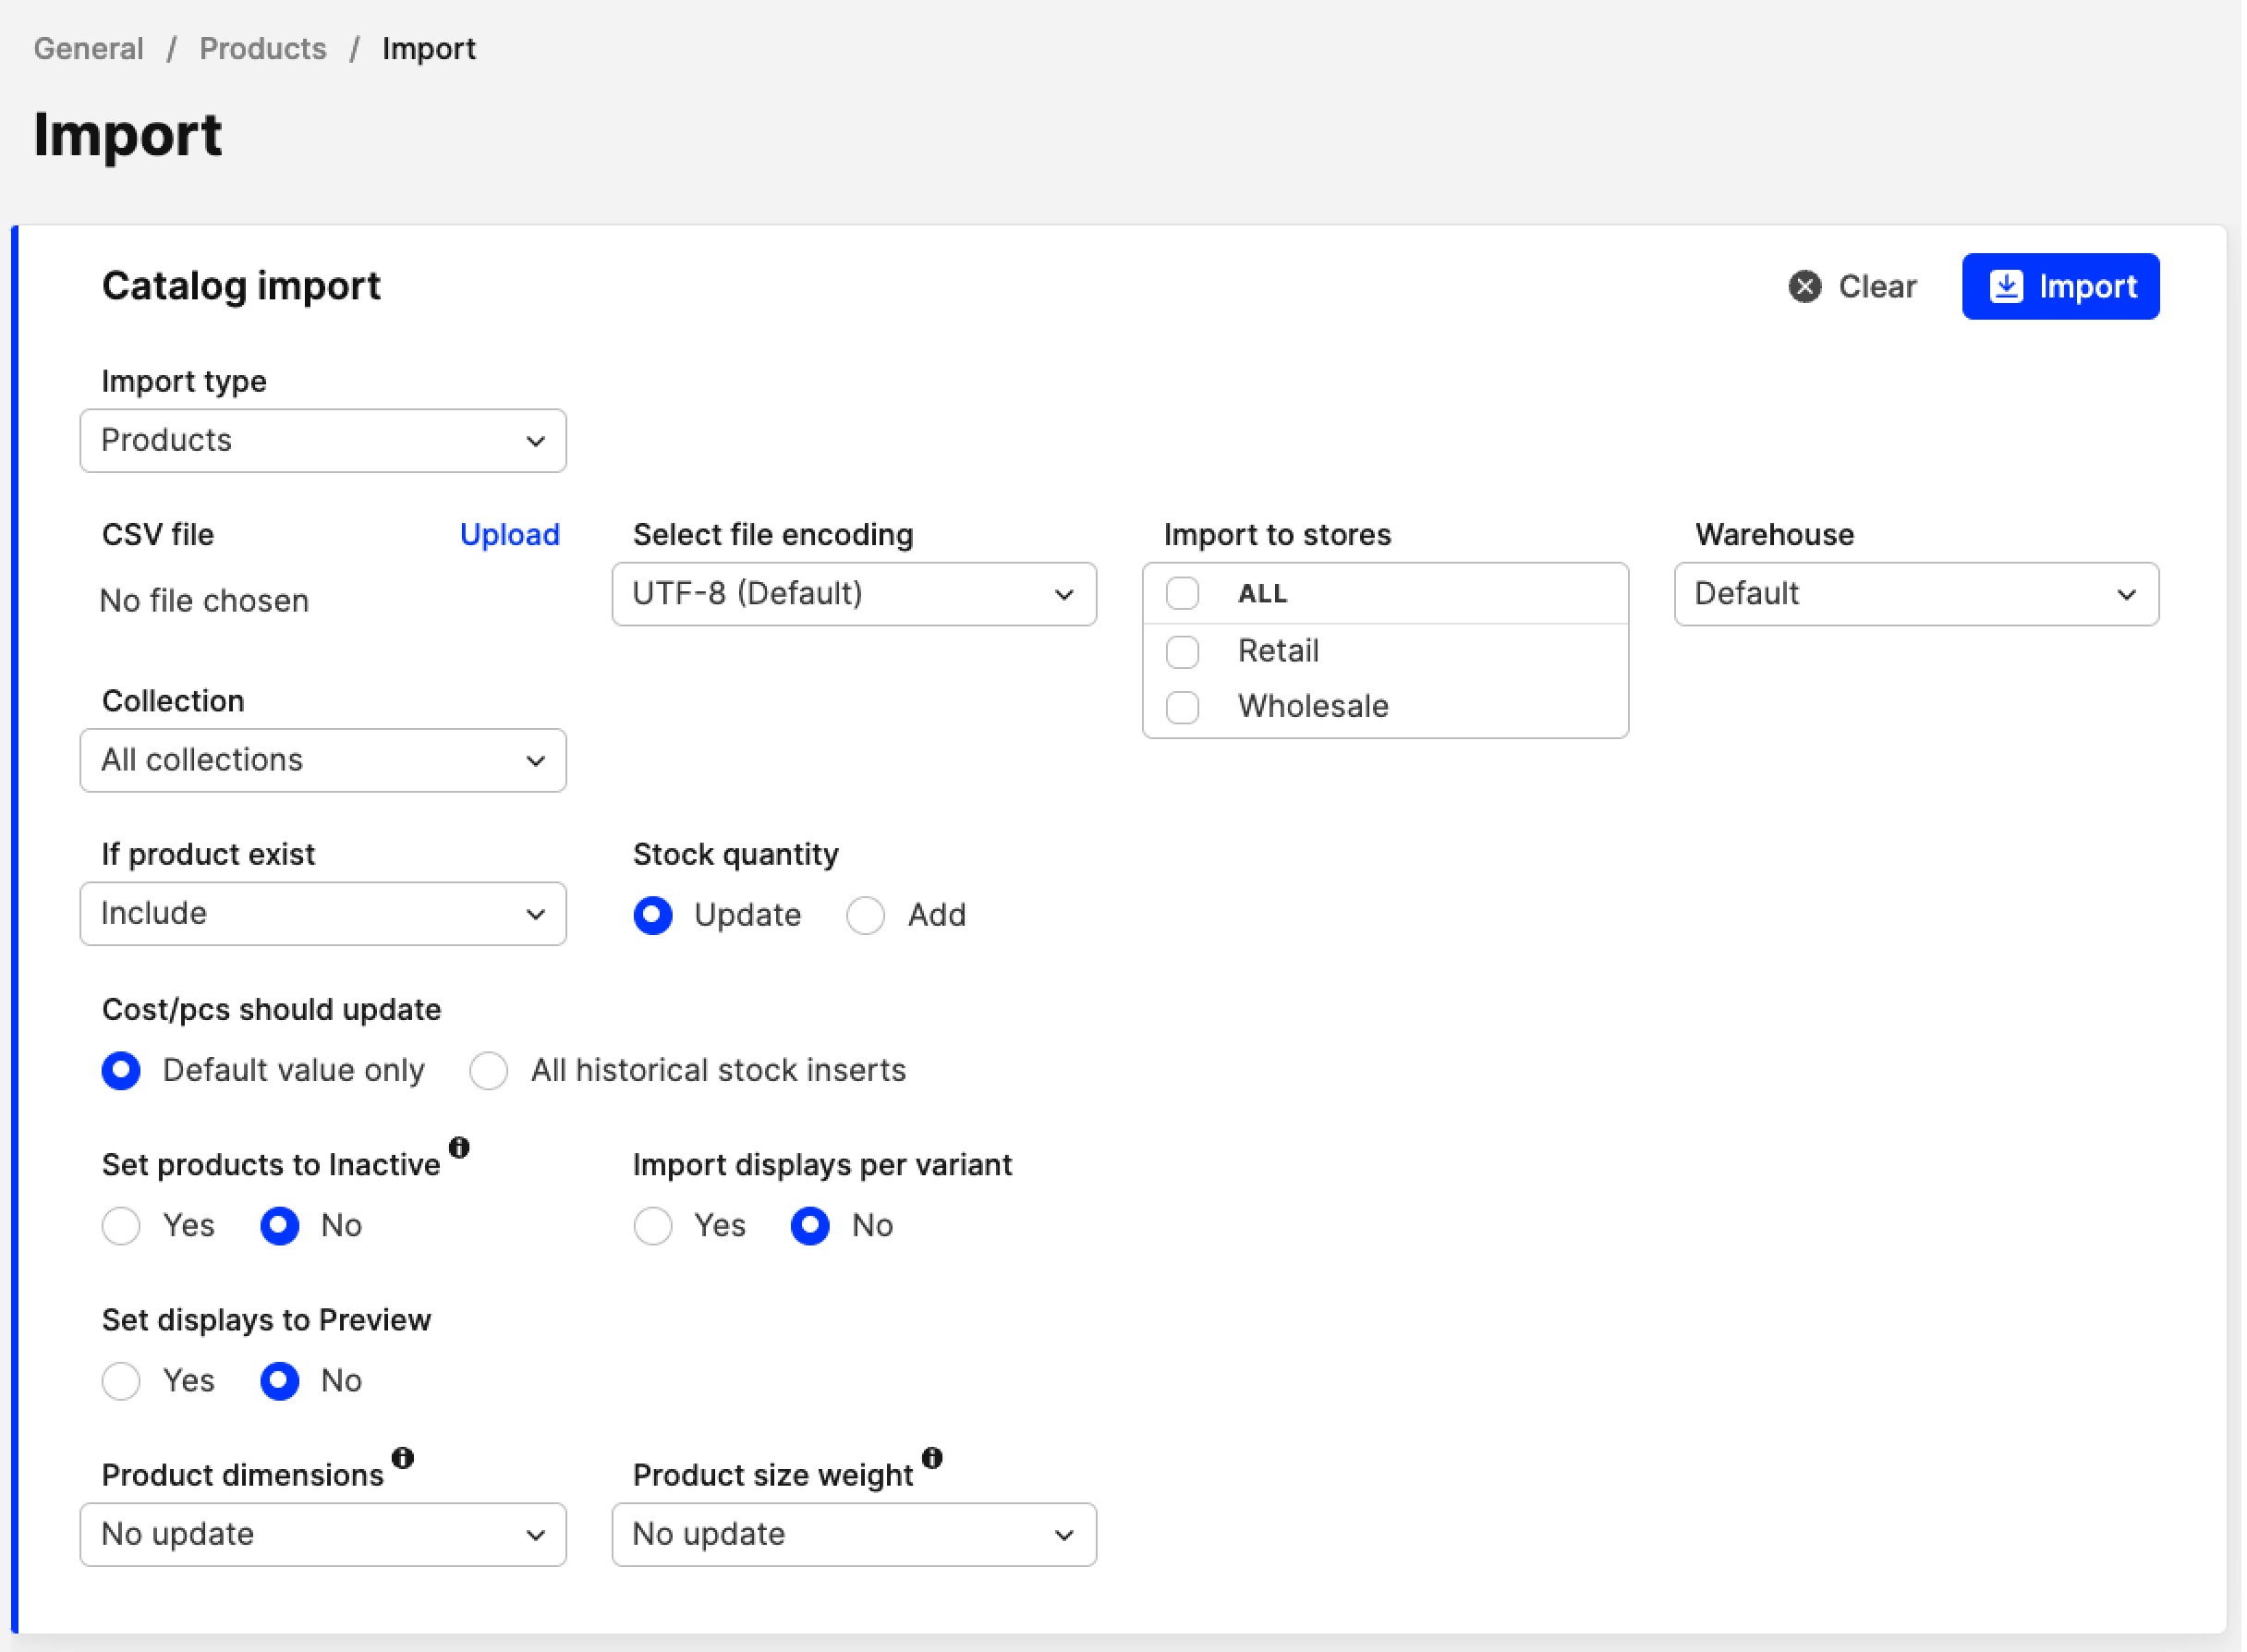
- Select 'Import type:Products' in the drop-down menu and you are redirected to the view shown below. Note that Product import settings are described in a section below
- Once you have reviewed the settings, click the 'Import' button, and you are redirected to the Crosscheck. Here you get the chance to review the data you wish to import, which means that the import is not yet completed. Read more about the Crosscheck below
- Click 'Save' in the upper-right corner to complete the import
Product import Crosscheck
Once the 'Import' button is clicked, you proceed to the 'Crosscheck' step, meaning that the import has not been finalized yet. The Crosscheck looks like this:
 Here is what the Crosscheck can be used for:
- Review the data of your import and make any edits if needed
- Check the 'Existing product' column:
- If you import new products, this column should be empty! If it is not empty, it means that Centra has mapped out to an existing product and updates existing information
- If you are updating existing products, ensure that this column is not empty and that Centra selects the correct product. If the column is empty, you run the risk of creating new products instead. If the wrong product comes up in this field, incorrect updates are made. In such a case, if more than one result appears, you can choose the right option in the drop-down if needed
- If you wish to ignore certain columns from the import, untick the respective box of the column
- If a value is empty but in the file you had specified it, it means that there is likely a typo, so double-check the data in the file
Once ready, click 'Save' for the import to be completed. You get a new section with information on updates and possible errors.
Note that the Weight per size and Size dimensions data are not included in the Crosscheck. This will be changed in the future.
Product import settings
- Select file encoding - Here you can select the file format. We recommend using UTF-8
- Import to stores - If you are updating store-specific information such as Pricelists, Display name, Display description etc., you need to select the respective stores. Note that you can select one or more stores, or all of them
- Warehouse - When updating Quantity information, you need to specify which warehouse these changes should be reflected in.
Note that only warehouses with 'Stock master: Centra' appear in this drop-down menu. You can read more about this here.
- Collection - You can choose between the following options:
- No collection - No collection is added or updated for the products in the file. Note however, that data from the collection column in the file overrides this setting. Therefore, if you have collection data in the file, Centra looks at this information and updates the products according to that, instead of the ‘No collection’ setting
- All collections - This is great to use if you are updating products from multiple collections at the same time
- New collection - When this is selected, another field appears called 'Collection name' where you can input a new Collection for the products you are about to import and therefore create a new collection assigned to them. If, however, your file includes Collection data, the file data overrides the 'New collection' details you inserted
- Specific collection - All available collections are listed after the 'New collection' option in the drop-down menu. You can select the Collection you wish these products to be updated to, or if you are updating products that belong only to this collection. When the import file includes Collection data, this setting is overlooked and instead the data from the file is used
- If product exists - Here you can choose how to continue with the import if a product you are about to update already exists in Centra. The following options are available:
- Include - Even if this product already exists in Centra, this setting ensures that any data meant to be updated through the import file is changed accordingly
- Skip - If the file includes information about products that already exist and this option is chosen, these products are skipped. This means that they are not shown in the Crosscheck either, and therefore no updates are made towards these products
- Skip only if multiple found - If multiple copies of the same product exist in Centra (products sharing the same key info, i.e. SKU), and this setting is selected, they are skipped and no changes are made to any of them through the import
- Only include existing - If the import file includes products that do not exist in Centra, they are skipped and only products that already exist are updated through the import
- Stock quantity - Two options are available here:
- Update - Selecting this option targets a change in the FTA stock values. The Physical value is subsequently affected too, since these values are interconnected through stock calculations (Physical = FTA + Allocated). Example: Physical is 71, FTA is 7 and Allocated is 64. We use Update with 100 pieces, so the stock changes to: Physical 164, FTA 100 and Allocated 64
- Add - This adds stock on top of your current Physical and FTA stock values Example: Physical is 100, FTA is 36 and Allocated is 64. We use Add with 100 pieces, so the stock changes to: Physical 200, FTA 136 and Allocated 64
We recommend using the Stock import instead for stock updates, by selecting 'Import type:Stock'. You can read more about the Stock import here.
- Cost/pcs should update - If you are updating cost/pcs of your variants, you can choose whether you would like to change the 'Default value only' or 'All historical stock inserts'. The former only changes this respective value found on variant level. The latter also updates all previous cost/pcs values seen in the History pop-up (click on 'History' under Tools of a specific variant)
- Set products to Inactive - If you select 'Yes', the status of all products is changed to Inactive. If set to 'No', the status does not change.
If set to 'No', only existing products do not change their status when updated through an import. All new products are imported with status 'Inactive' regardless of the setting.
-
Import displays per variant - If set to 'Yes', this setting ensures that when a product has more than one variant and display information is added or updated, one display is created per variant. If set to ‘No’, all variants are activated in one display only
-
Set displays to Preview - This setting can be used when you import display specific information. If set to 'Yes', the display status is set to 'Preview'. If set to 'No', the display is not affected
-
Products dimensions: Three options are available, ‘No update’, ‘Inherit’ and ‘Overwrite’:
- No update: This is the default option. No updates are made to the Product dimensions when this is chosen. This is also the case if there are dimension columns added in the import file
- Inherit: All sizes of the products you’re importing have the shipping dimensions of the size chart. This happens even if you have added data in the import file - Centra disregards those. The tick box on the size level shipping dimensions is ticked
- Overwrite: The shipping dimensions of the size chart are disregarded and those seen in the import file are added on the size level of the products you are importing. The tick box on the size level shipping dimensions is unticked.
Note:
- If size dimensions are already inserted, the import overwrites any previously inserted size dimensions values
- The import overwrites size dimensions data only in the size level shipping dimensions. This means that the size dimensions on size chart level remain the same
Product size weight: Product size weight: Three options are available, ‘No update’, ‘Inherit’ and ‘Overwrite’:
- No update: This is the default option. No updates are made to the Product size weight when this is chosen. This is also the case if there are weight columns added in the import file
- Inherit: All sizes of the products you are importing have the same weight as that on product level. This happens even if you have added data in the import file - Centra disregards those. The tick box on the size level weight is ticked. This is the default selection
- Overwrite: The weight data set up on product level is disregarded and those seen in the import file are added on the size level of the products you are importing. The tick box on the size level weight is unticked
Note:
- If weight per size data is already inserted, the import overwrites any previously inserted weight per size data
- The import overwrites weight per size data only in the size level weight. This means that the weight per size on product level remains the same
Tips & tricks
- We recommend performing store-specific updates per import to ensure no crossover happens between stores. Pricelist fields include the store name in the export file, however, fields for Meta data, Display name and others do not
- When updating store attributes, ensure that the respective store is selected in the Import settings
- When using unique identifiers, remember that in order for Centra to map out to a specific field, the data needs to match 100%- Example: If a variant name is ‘Black’ and you insert in the file ‘Black ’ (with an extra space), Centra does not detect it
- Do not edit column headers. Edited column headers run the risk of columns being skipped because the name doesn’t match the respective field in Centra
- If you don’t wish to make any updates to a specific section, we recommend removing the whole column completely or unticking the respective column box in the Crosscheck. However, if you decide to delete columns, do this with care, ensuring that no unique identifier columns are deleted, as these are needed for mapping purposes
Blank cells empty out the field in Centra upon import as well. Keep this in mind when deleting columns too - don’t just delete the column data, but the whole column itself to avoid making incorrect updates.
- If a product has multiple Categories and you wish to remove a category from the product by removing it from the import file, it is not removed from the product. The import file can only add categories; never remove them from a product
- Use 'Import displays per variant' with care. This creates multiple displays, and you could end up having more displays than the ones you need
The following columns should be deleted before the import file is saved and imported: Product Status, Variant Status, Display Status
The headers also include the ‘Not possible to import’ message in their title.
- Before you do an import in your production environment, do the following:
- Run a test on your QA environment first. Ideally, with a simple file, updating/creating, for example, 1-2 products. Then use a bigger file
- Once you have confirmed in your QA that this works fine, repeat in production
- The Product import can also be used to create new Brands, Folders, Categories, and Collections. This can be done by assigning them to a product. So, for example, if you wish to create a new Category, you need to add it to the import file when creating a new product or updating an existing one
- When creating Displays through the Product import, all Markets are selected automatically on the created displays. Therefore, if you have products that should be shown in some Markets but not others, review them and change accordingly.