Adding variants to a product
About this article
Learn how to add variants to your products. Variants are used as variations of a product. For example, a T-shirt (product) can come in 3 different colors, i.e. red, blue, green, all of which would be created as a separate variant.
Prerequisites
Before you can add a variant to a product, you need to create the product. To read more about how to create a product, click here.
Adding a variant
To add a variant to a product, follow the steps below:
-
Click 'Products' in the main menu to the left
-
Select the product you’d like to add a variant to
-
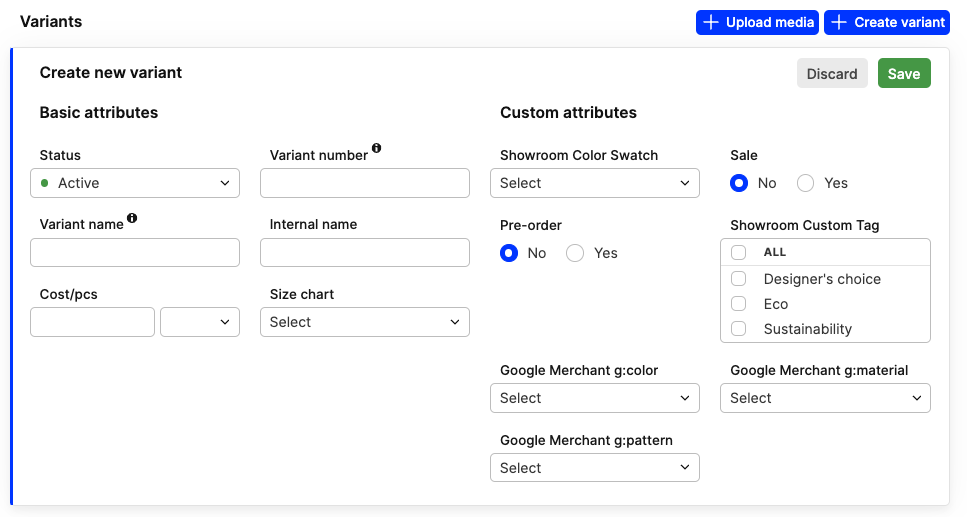
Scroll down to the 'Variants' section and click '+Create variant'
-
Enter the following information:
- Variant status: Select the variant status: Active, Inactive, Disabled
- Variant name: This is the name of the variant, i.e. Blue, Red, Washed. This text may be visible in the front-end depending on how your web store is configured
- Variant number (Variant SKU): This setting is optional and only applies if your variant's SKU differs from the Product number which you entered in the Basic Attributes of the product
- Internal name (optional): This is for internal use only. For example, it can be used in certain reports (i.e. Transactional report) and exports
- Cost/pcs: Add the cost/pcs value and the currency in the drop-down on the right. This is the product's weighted cost price, and this is the value used when calculating COGS or sales margins. To read more about cost/pcs, click here
- Size chart: Once you have selected a Size chart, you can add stock values by clicking 'Edit stock' and the Stock editor pop-up window opens. To read more about how to create Size charts, click here
Once a size chart has been added and saved to a variant, there is no possibility to change the size chart afterwards. You would need to delete the variant, add a new variant to the product, and select the right Size chart. Read more here.
-
Click 'Save' in the top-right corner of the variant editing box.
You can add multiple variants to a product. This is done by clicking '+Create variant' after you save the first variant.
Variants section
In non-edit mode
When the variants are created, you get the following overview of your variants:
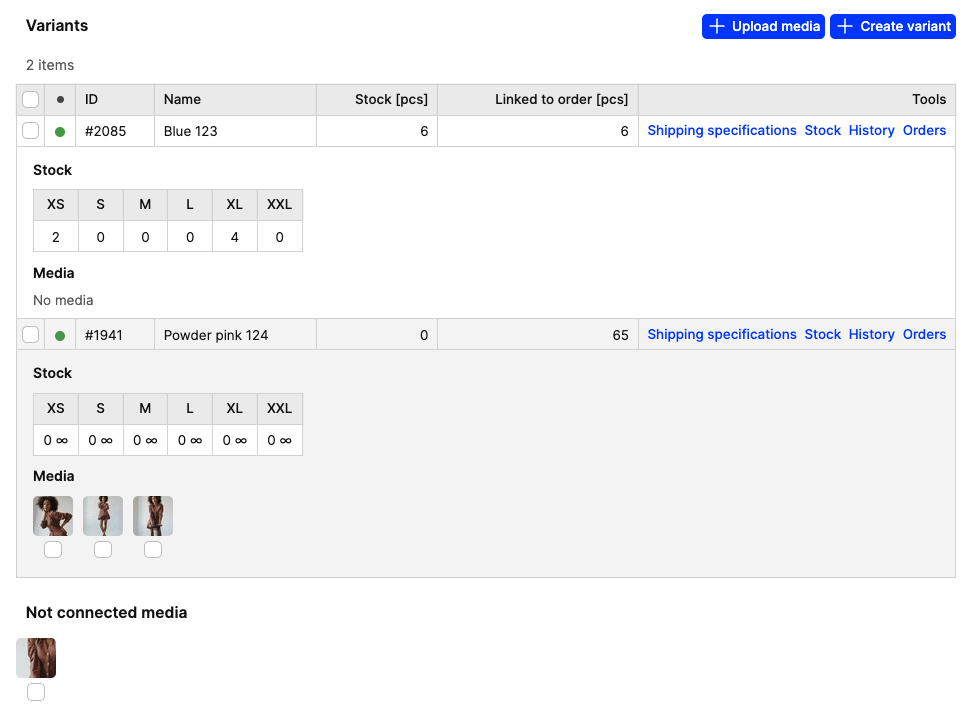
- Status: The status of the variant
- ID: This field shows Centra’s internal database ID of the variant
- Name: This field shows the variant name and the variant SKU/number
- Stock [pcs]: This field will show the FTA (Free To Allocate) stock figure for all of your Warehouses combined
- Linked to order [pcs]: This field shows how many pieces are linked to orders. It should be the same value as the total of orders when you click 'Orders' under 'Tools' for this variant
- Tools
- Shipping specifications: Once clicked, a pop-up appears where you can choose the shipping specification type and access Shipping dimensions and Weight per size. Read more about these here
- Stock: Here you are directed to the Stock editor pop-up where you can edit, move, or transfer stock. You can also go further to 'Size info' and add EAN, Size SKU, or Size comment, for example, a shelf number of where this item is placed in your warehouse. Read more here
- History: Here you can see the historical transactions of stock changes. You can also, for example, adjust historical cost per pcs on an old delivery. More details can be found here
- Orders: Here you see all orders placed on this variant and its sizes. Click here for a detailed description of this pop-up
In edit mode
If you click on a variant in order to expand it, you will be able to edit its content. This looks as follows:
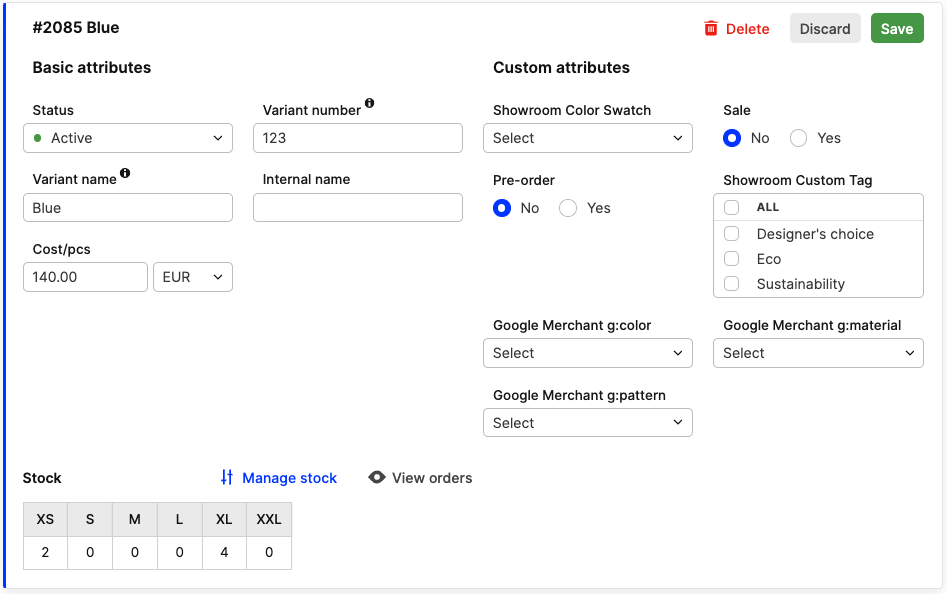 Here you should note that everything is the same as previously described. The only exception is that you can use 'View orders' to see all orders of this variant. This is the same function as the 'Orders' under 'Tools'.