Store-specific attributes and displays
About this article
In this article you will learn how to add Store-specific attributes and displays to your product. Displays are ‘cosmetic’ visualizations of your products. After you have added Basic and Custom attributes to your product and its variants, you need to create Store-specific attributes, and at least one display within that in order to make it viewable in your frontend. Displays are created in the same way whether it is in Direct to consumer or Wholesale. In this article, we explain the process from the DTC perspective.
Prerequisites
Based on the supporting attributes you have already created (products, variants, sizes, you can now create Store-specific attributes and multiple Displays using the variant bank and the media bank. Displays are important elements of how products work in Centra.
Before you create a display you need to have created the following prerequisites:
You can create your Store-specific attributes and Displays either from an existing product or by creating a new one. To read more about how to add a product, click here.
Difference between Store-specific attributes and Displays
After creating a new product, under the General section of the product, you can see the Store-specific buttons that allow you to create displays. You can view different buttons depending on the Stores you have activated in your Centra instance. In the example below, we have the following Stores and their respective Display buttons: Direct to consumer, Wholesale
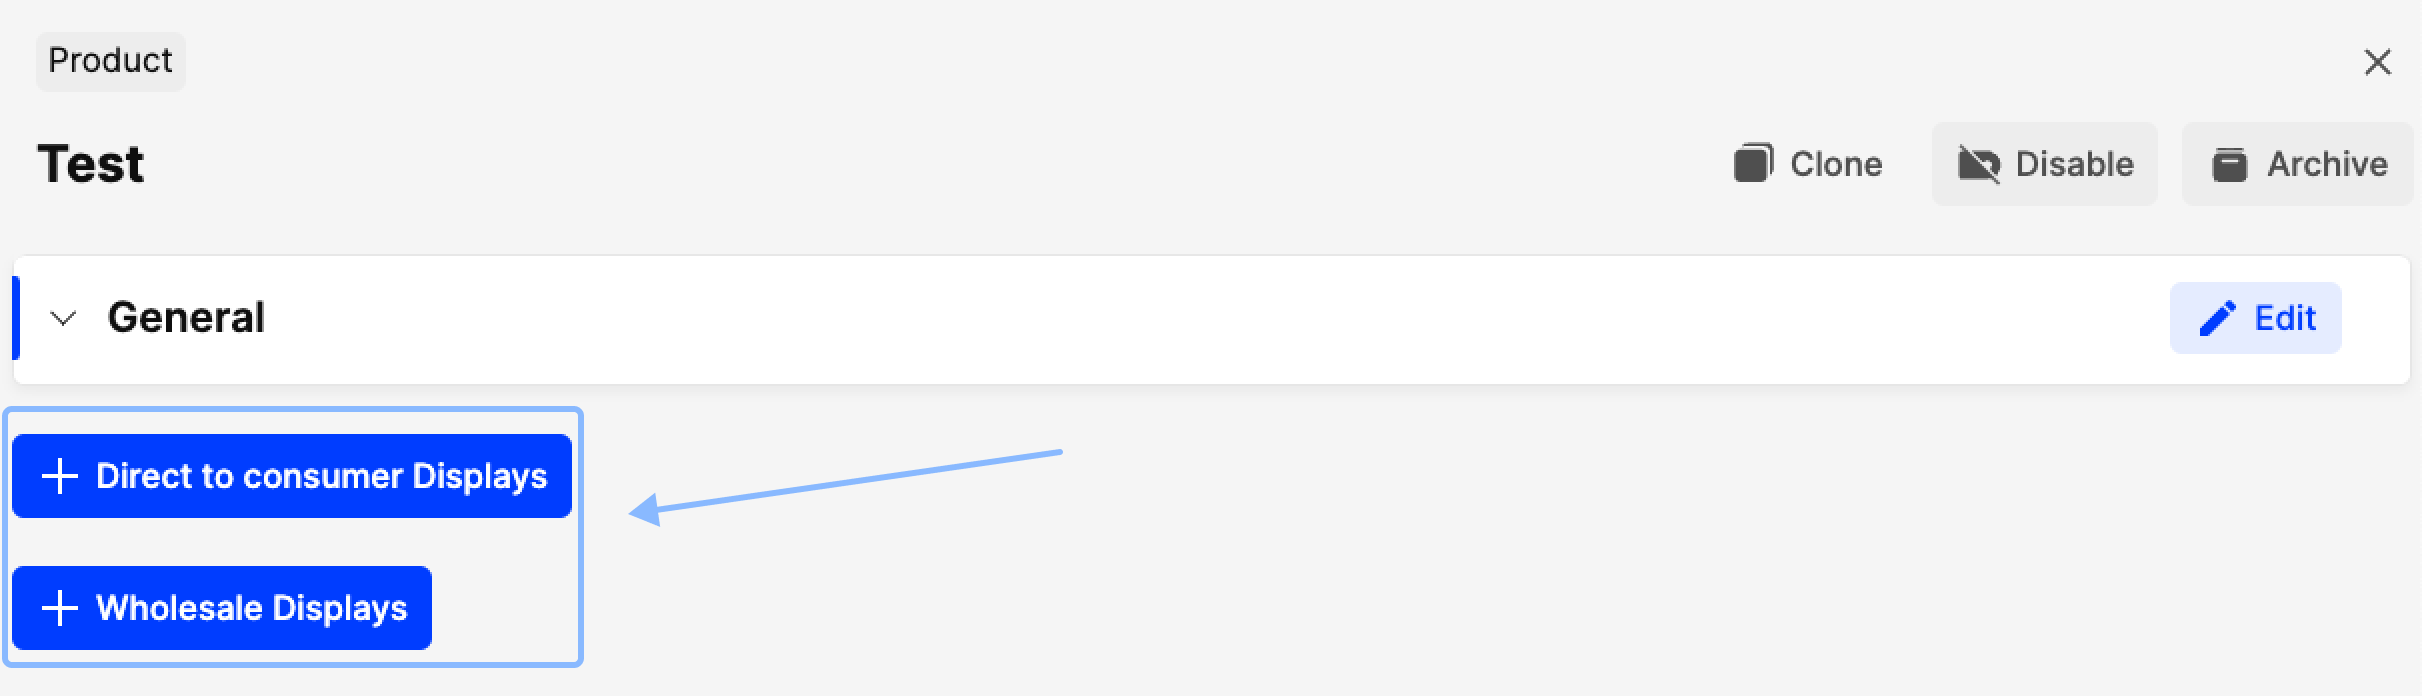
Taking DTC as an example, if you click on '+Direct to consumer Displays', the following section is displayed:
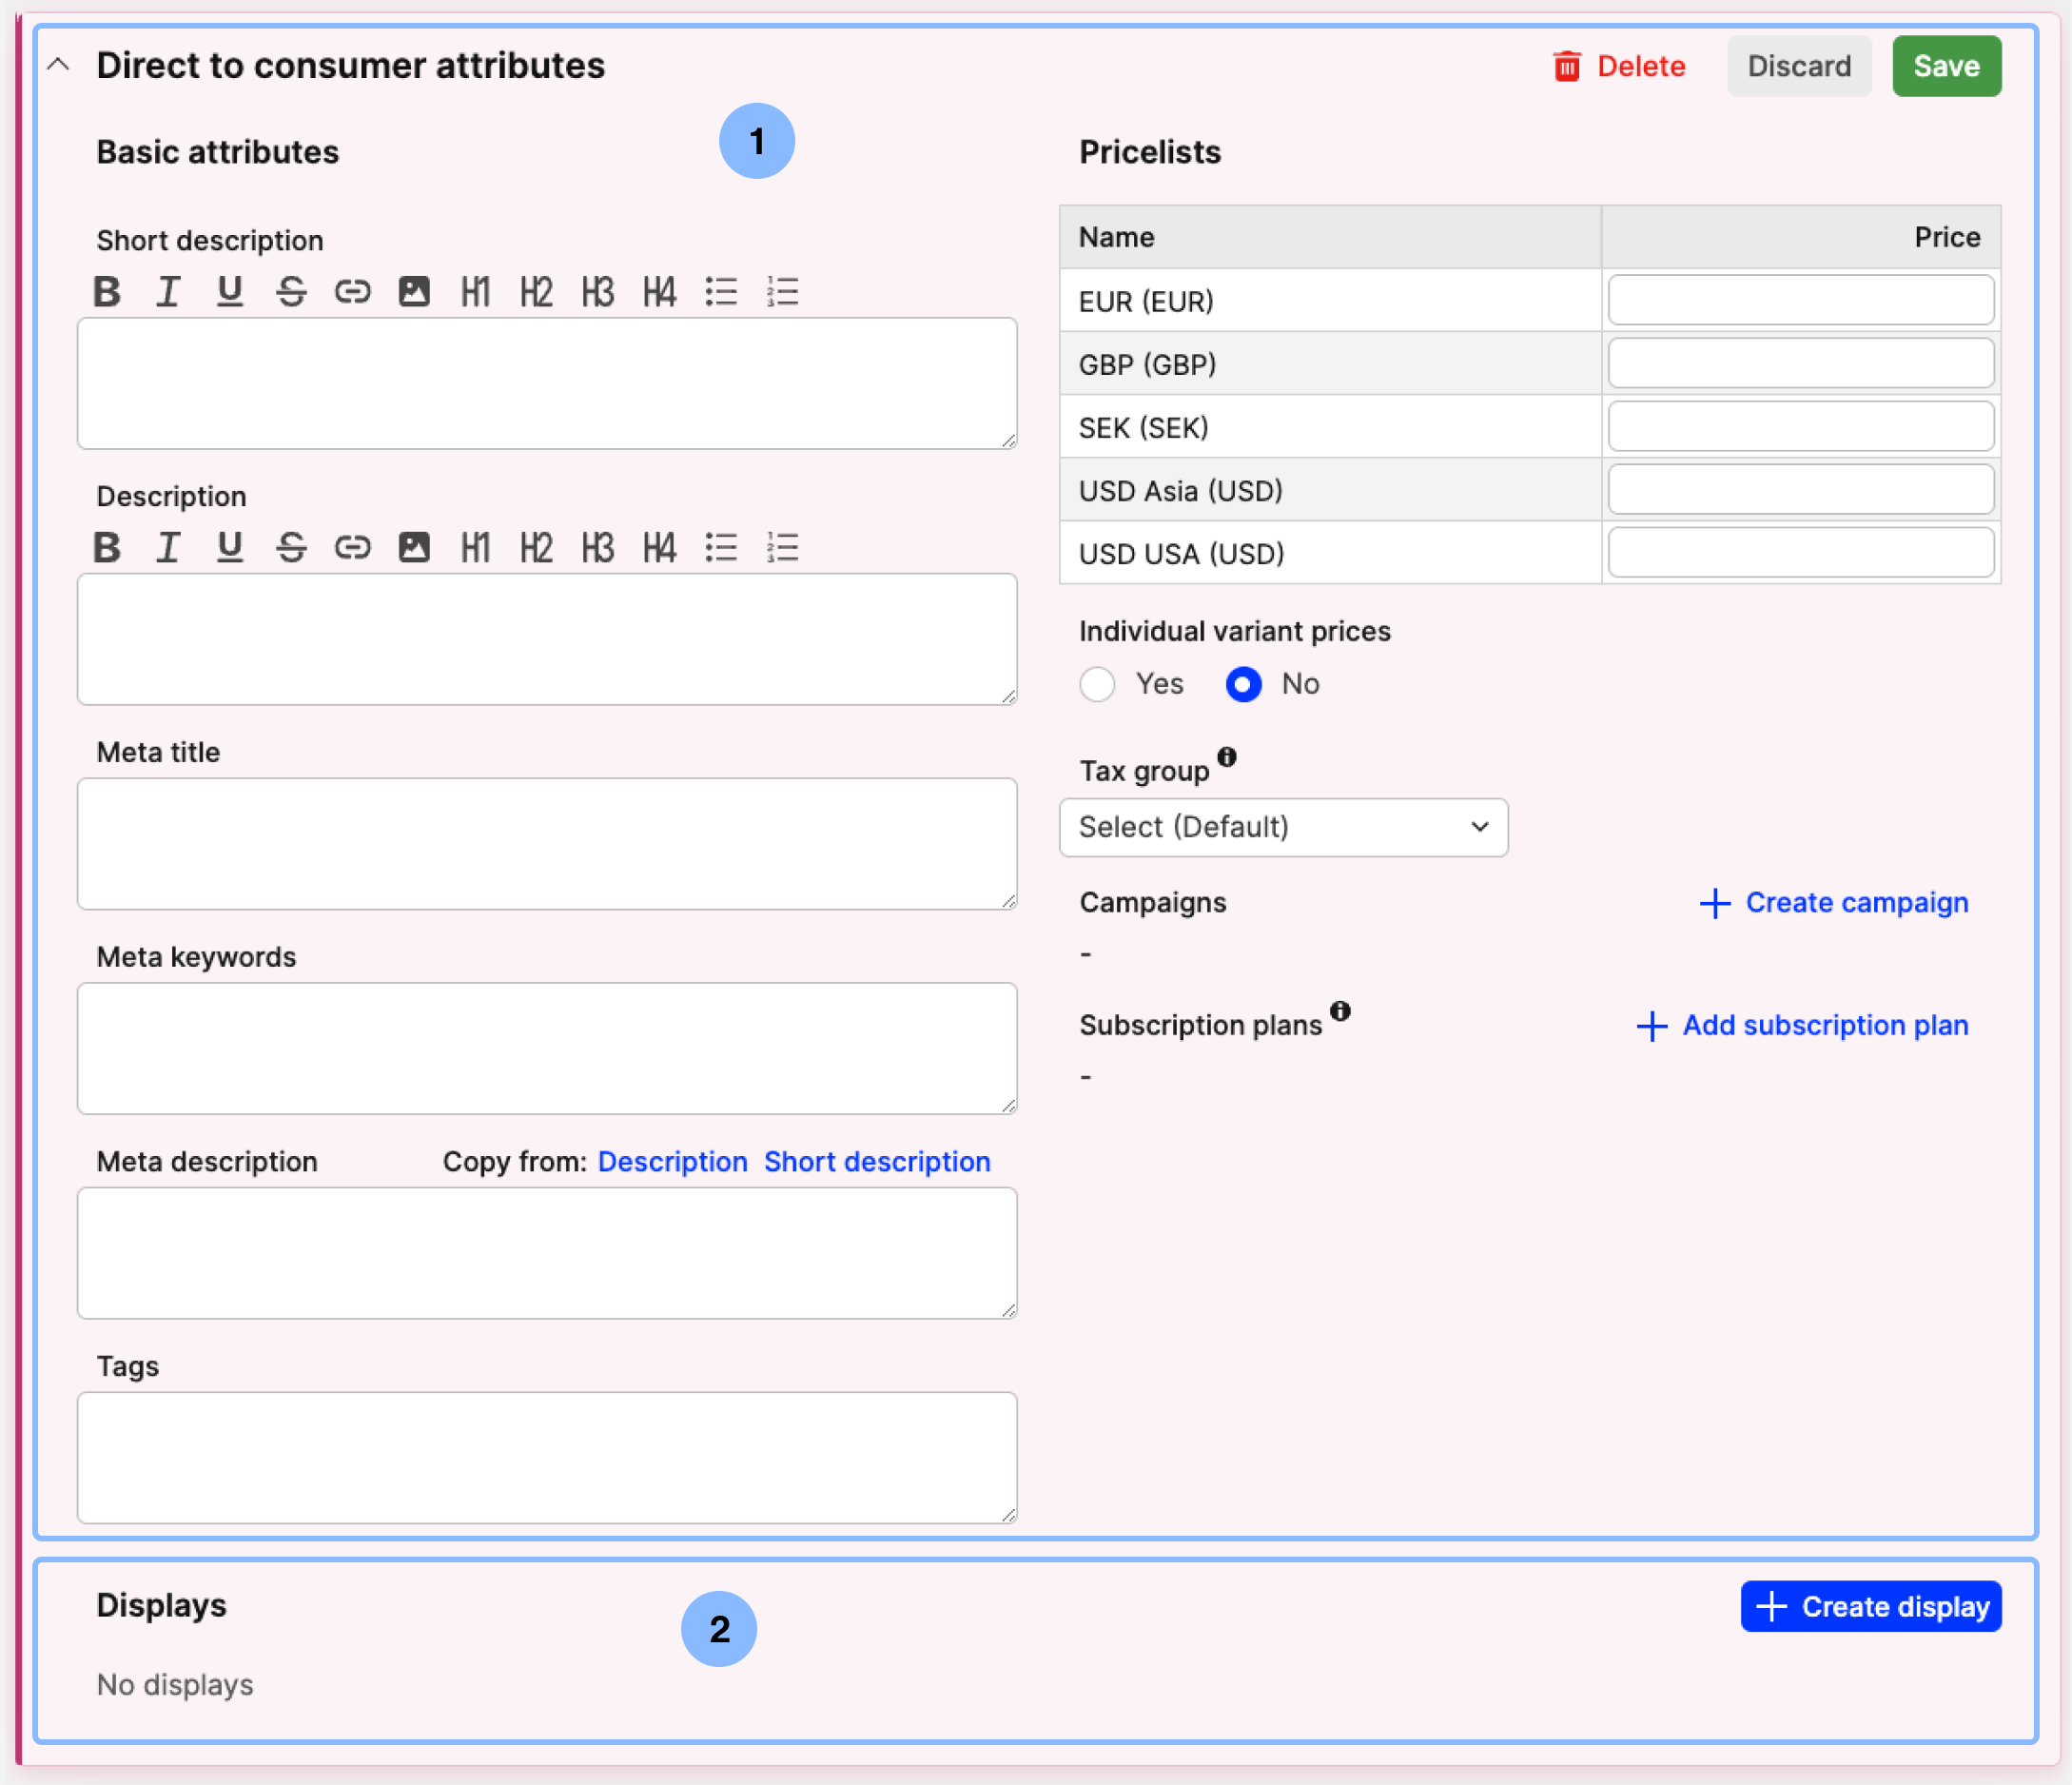
This section can be divided into two sections, Direct to consumer attributes (1) and Displays (2), explaining also the difference between Store-specific attributes and Displays. Each of them are discussed separately in their respective sections below.
Store-specific attributes
As mentioned earlier, depending on the Stores you have activated in your Centra instance, you receive a Store-specific attributes section for each Store. These are mostly the same between the different Stores; however, there are some minor differences detailed below.
Direct to consumer
-
To create a DTC-specific attributes section, click on '+Direct to consumer Displays'
-
The following fields appear:

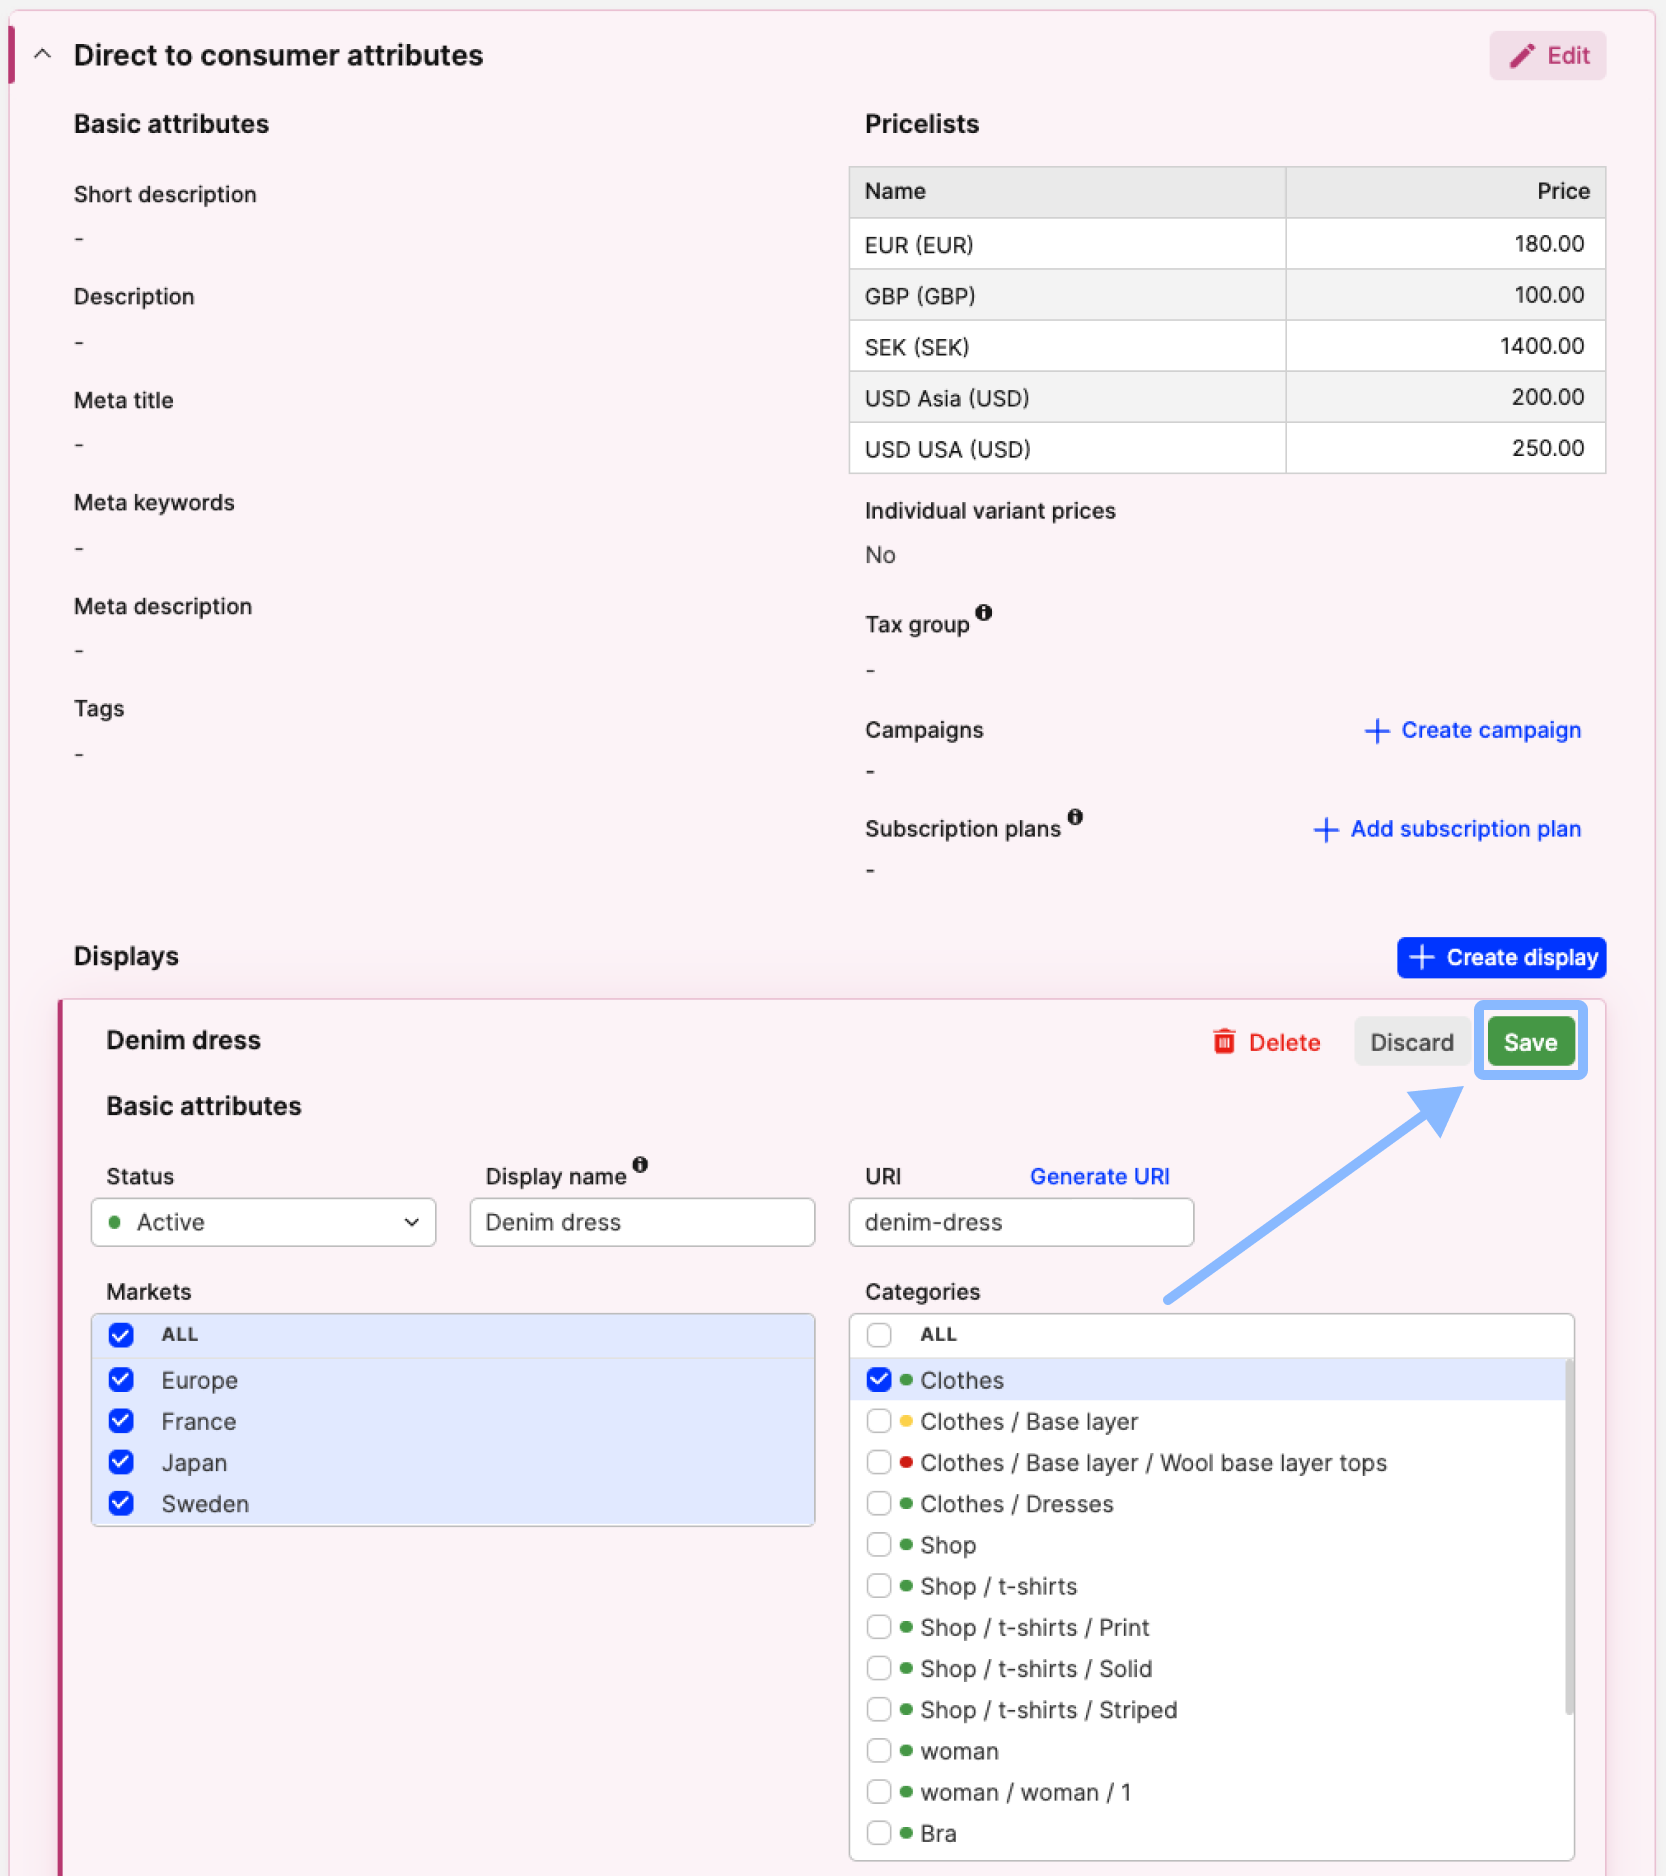
- Short description: Short description is not a default requirement and is only used in cases when your frontend has, for example, containers for description in product listings
- Description: Enter a longer description of the product, which may be shown in, for example, the Product view in your frontend
- Meta title: Enter the Meta title that will be displayed as the browser title. The Meta title will also be used by search engines
- Meta keywords: Meta keywords are optional and are rarely used by search engines. To learn more about Meta keywords, click here
- Meta description: Meta description is a description of the product which in most cases is used by search engines to display page content inside search listings. Enter a Meta description for good search engine optimization
- Tags: Enter tag words that you would like to associate with this product. This field only applies if your frontend design supports tag-browsing and additional logic. Tags can be used to filter when sorting categories
- Pricelists: Enter the price of the product in the different currencies displayed. To read more about how to create a Pricelist, click here
- Individual variant prices: If set to 'No', then the prices set in the Pricelists section above are used for all variants of this product. If set to ‘Yes’, the following fields appear:
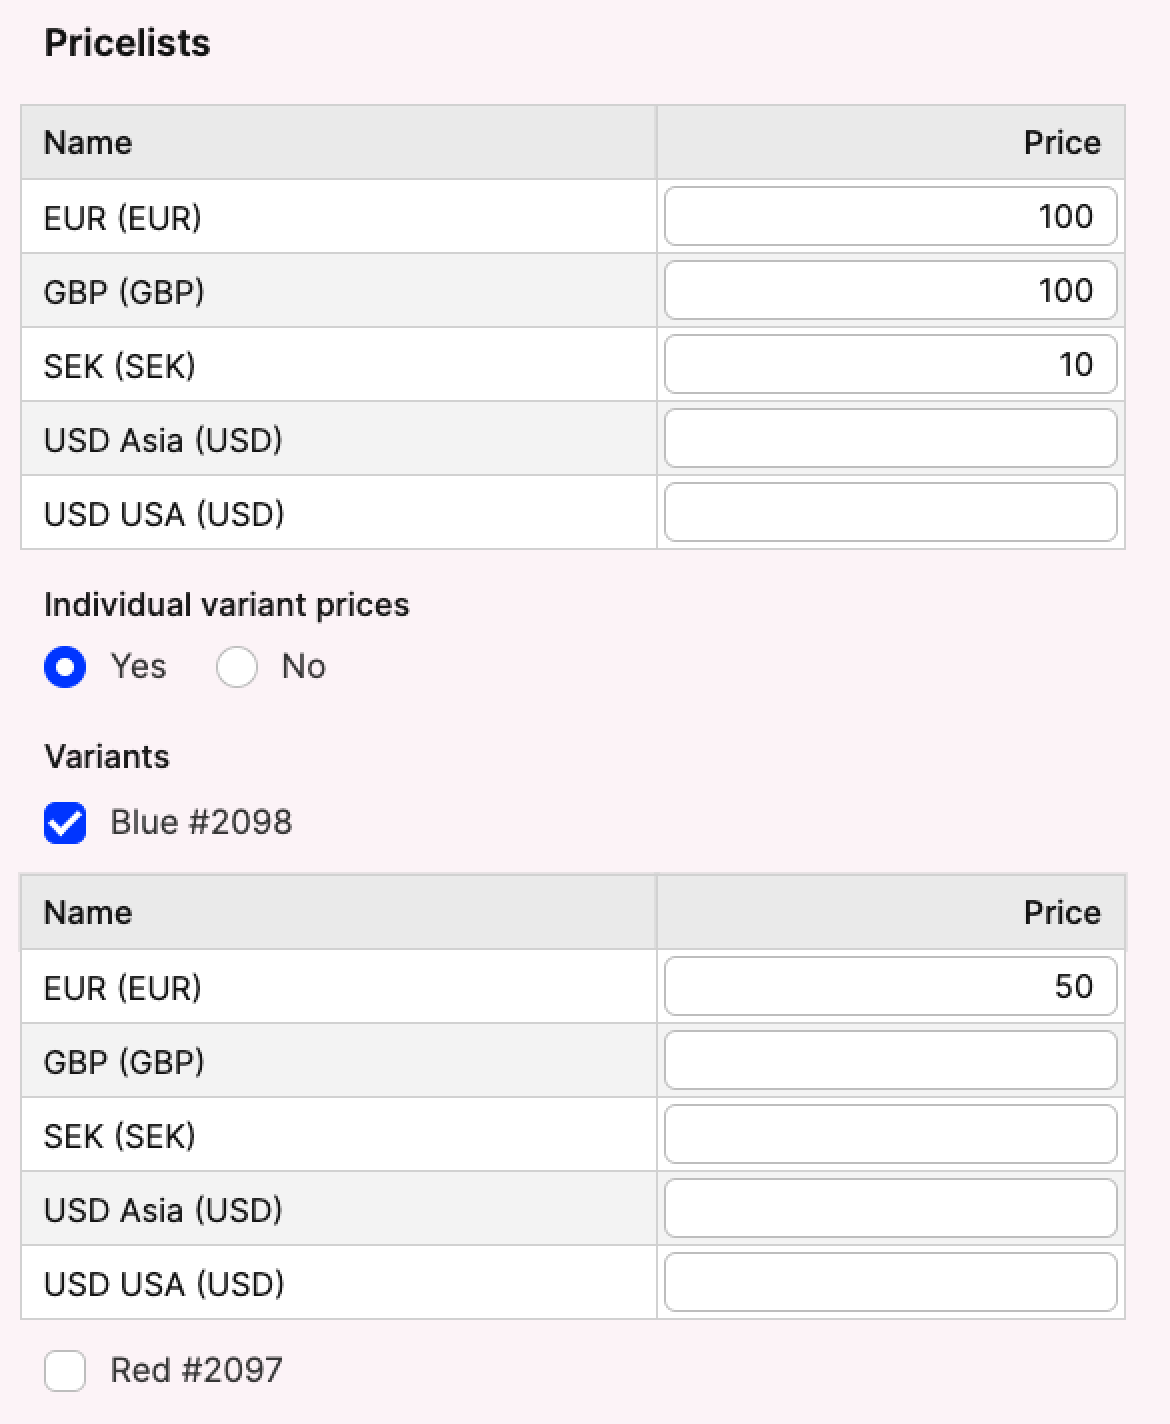
Each variant appears with a tick box on the left side. Once you tick the respective box, you are able to set prices specific to this variant. Any variants that have their respective boxes ticked are sold at the price set within this variant specific section. If a field of a variant price is empty, Centra uses the product price instead.
- Tax group: Taxes are applied to each order as set in the Tax groups section. However, if you have products with exceptions and need to use different Tax groups than the default one for the Store, you can select them here in the respective drop-down menu. To read more about how to create a Tax Group, click here.
- Campaign: Here you can see a list of all Campaigns that this item is assigned to. The following information is listed:
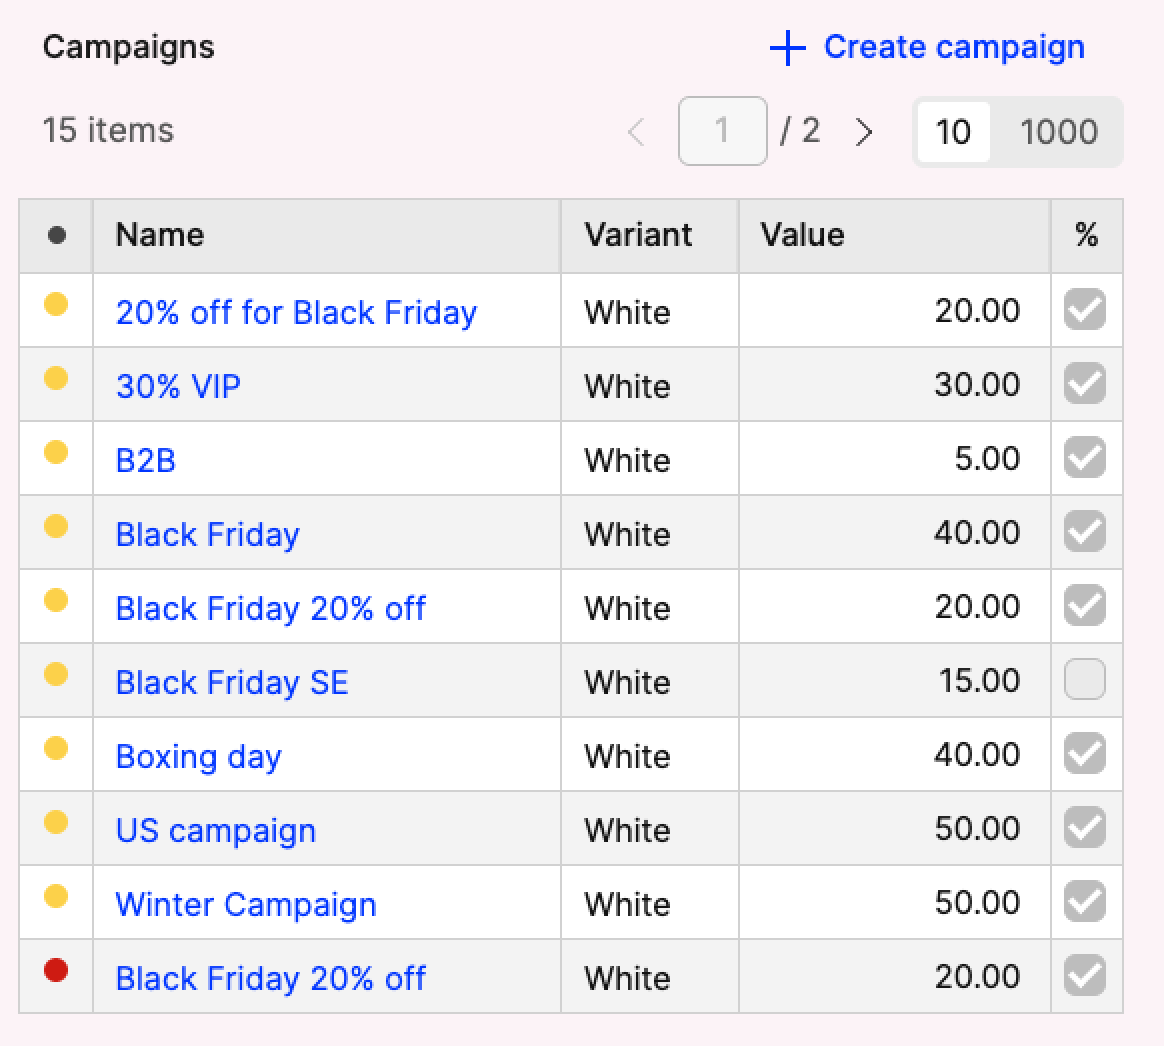
- Campaign status: The status of the Campaign
- Campaign name: The name of the Campaign. If you click on this name, you are taken to this specific Campaign
- Variant: This lists which variant is added in the Campaign of this row
- Value: This is the value set as a Campaign discount
- %: This controls the Campaign type, which can be fixed or percentage - read more here. If this is ticked, it means that the value is shown as a percentage. If it is not ticked, it shows the value of the discount
- +Create Campaign: This can be used to create a new Campaign. Clicking this redirects you to the Campaigns page
Note that active Campaigns are automatically sorted first, at the start of this list. To read more about how to create a Campaign, click here.
- Subscription plans: Here you can see whether any of the variants of this product have been added to any Subscription plans. Note that this is available only if you are using Subscriptions
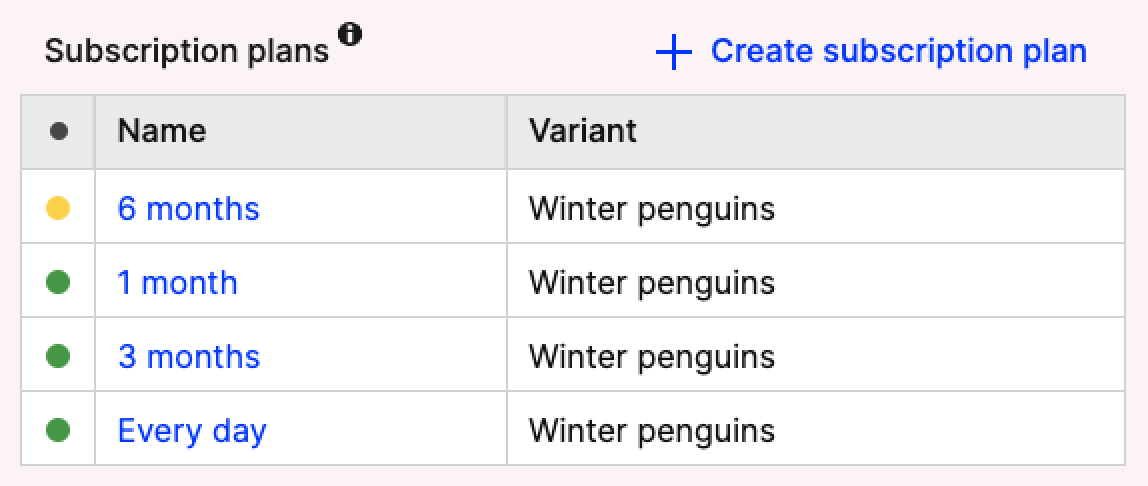
- Status: Status of the Subscription plan
- Name: Name of the Subscription plan. Clicking on this name takes you to this particular Subscription plan
- Variant: This showcases which variant has been added to this Subscription plan
- +Add subscription plan: This allows you to create a new Subscription plan.
-
Click 'Save' at the top right of the Direct to consumer attributes section to ensure the changes are saved.
Wholesale
The Wholesale-specific attributes section is very similar to the DTC one. You can create it in the same way as its DTC equivalent, described above. Below you can see an example of the Wholesale-specific attributes section and a list explaining the additional fields for this section:
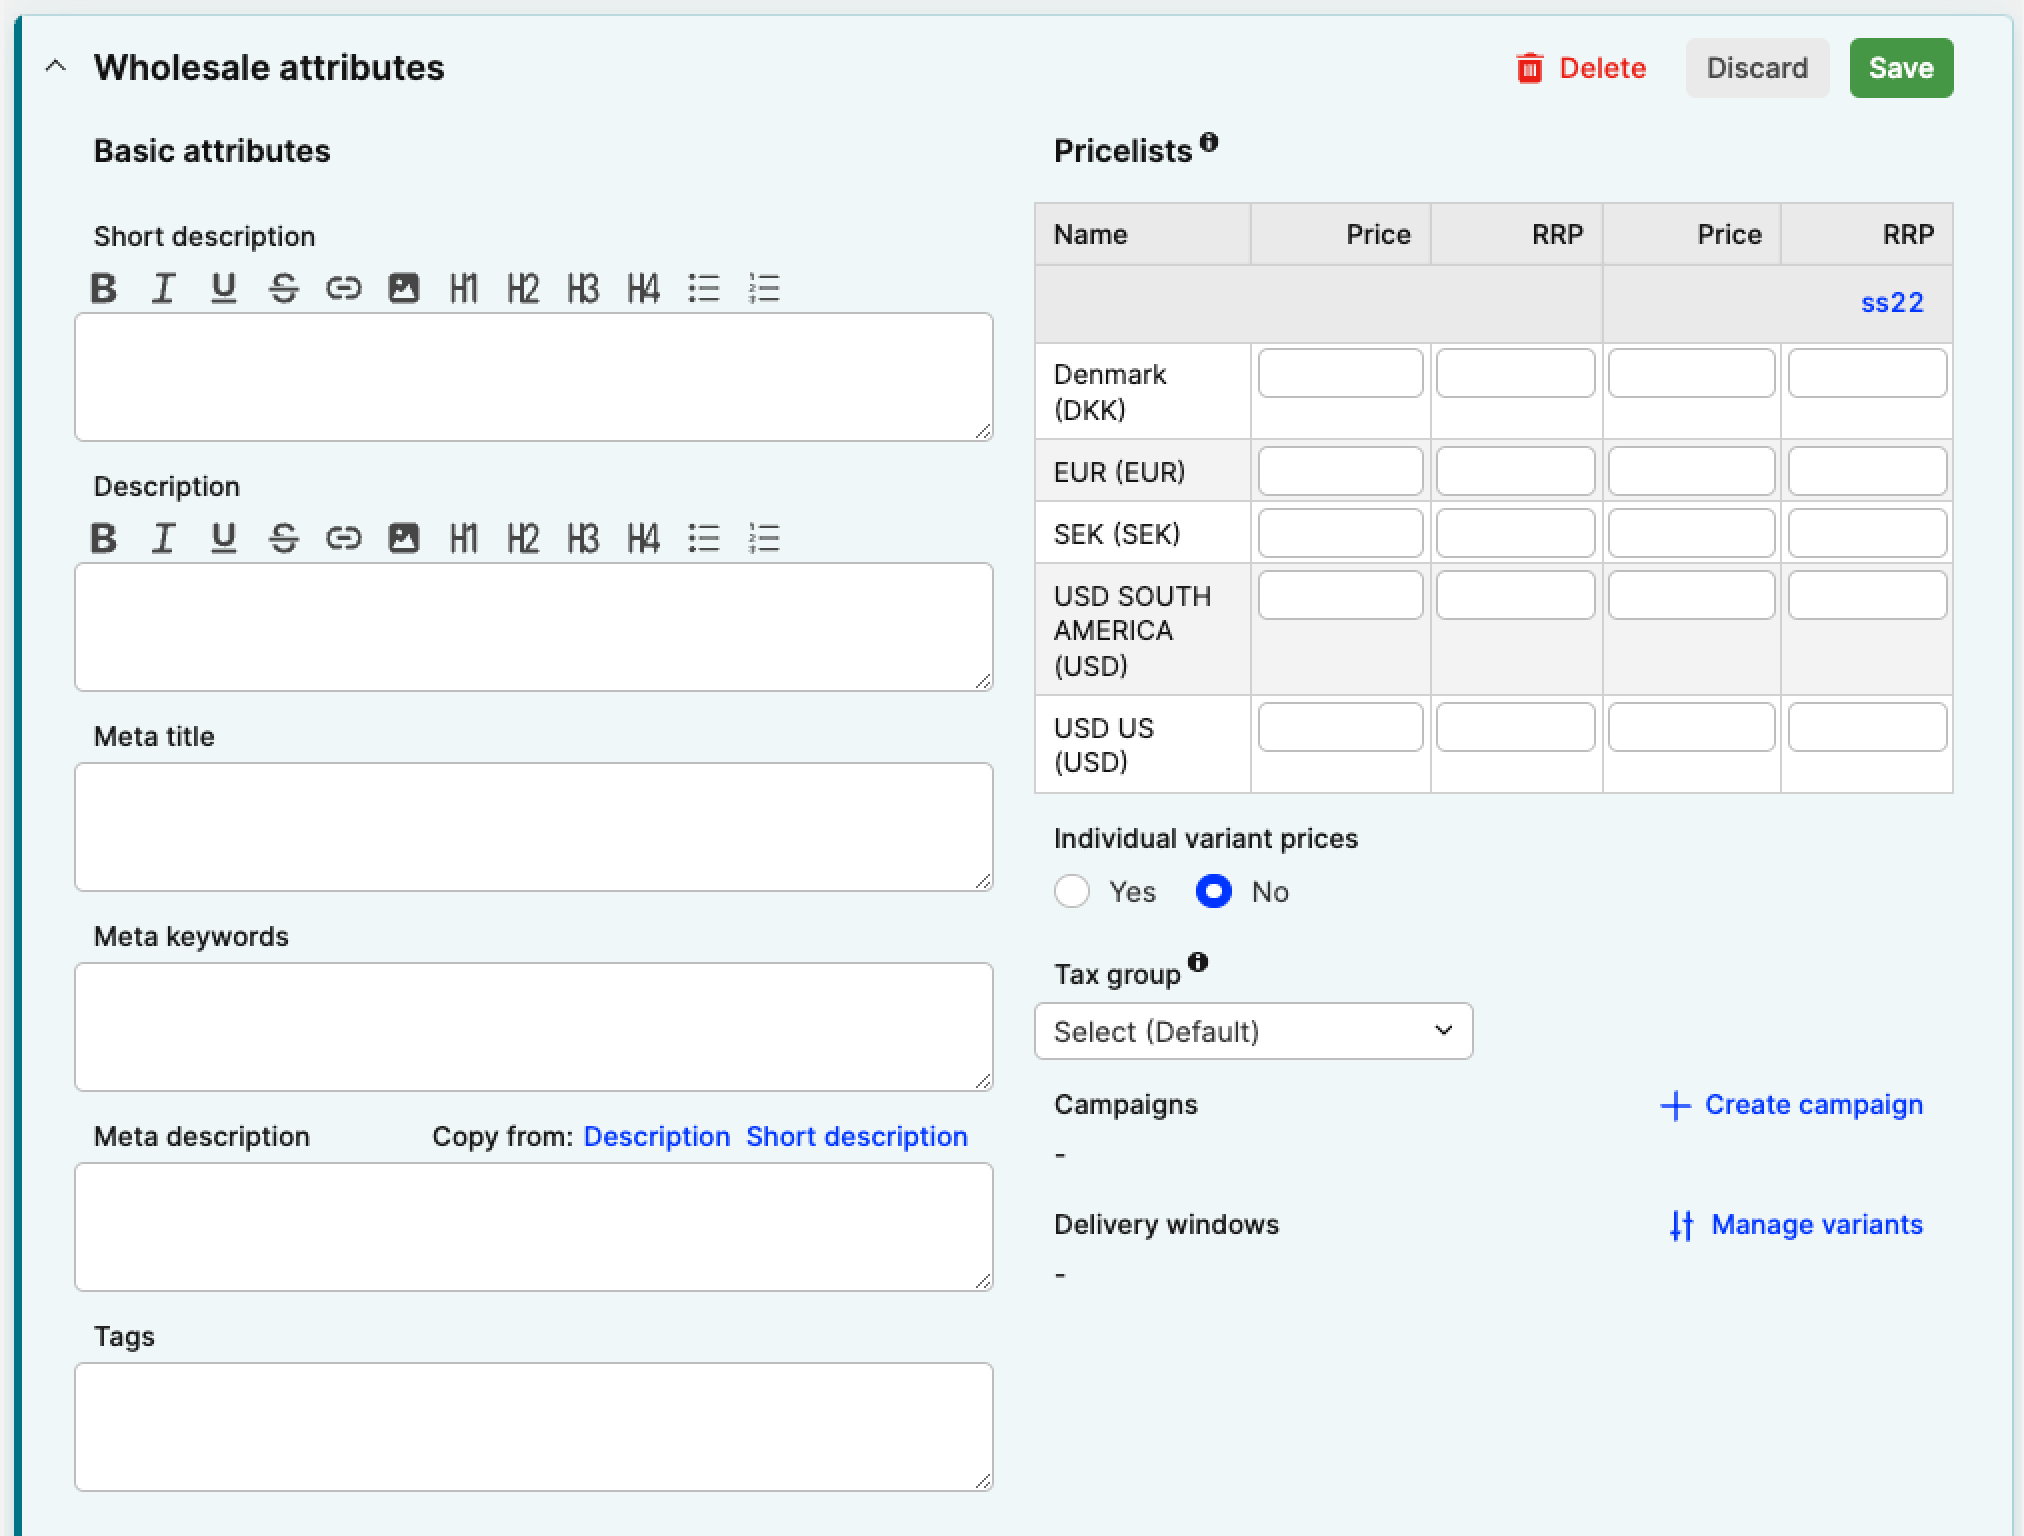
- Pricelists: In Wholesale, you can fill out the Price and the Recommended Retail Price (RRP). Additionally, if you are using Time controlled pricelists, a separate set of columns is also shown here to input values for the Price and RRP of the specific time controlled Pricelist.
- Delivery windows: Here you can see a list of the Delivery windows each variant has been added to. You can see an example below and explanations of each column:
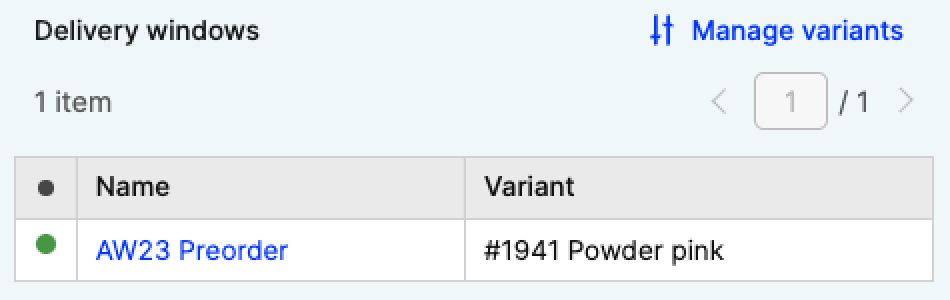
- Status: The status of the Delivery window
- Name: The name of the Delivery window. Clicking on this name takes you to this Delivery window
- Variant: The name and id of the variant that has been added to the respective Delivery window are shown in the row
- Manage variants: A pop-up appears in which all available Delivery windows are displayed, along with all variants. Here you can choose which Delivery windows the variants should be added to without going to the Delivery window section itself

Displays
Please note that the Displays in DTC and Wholesale are exactly the same. Below, we showcase the DTC one as an example.
-
To create displays, click on ‘+Create display’ in the Displays section
-
The following options are available:
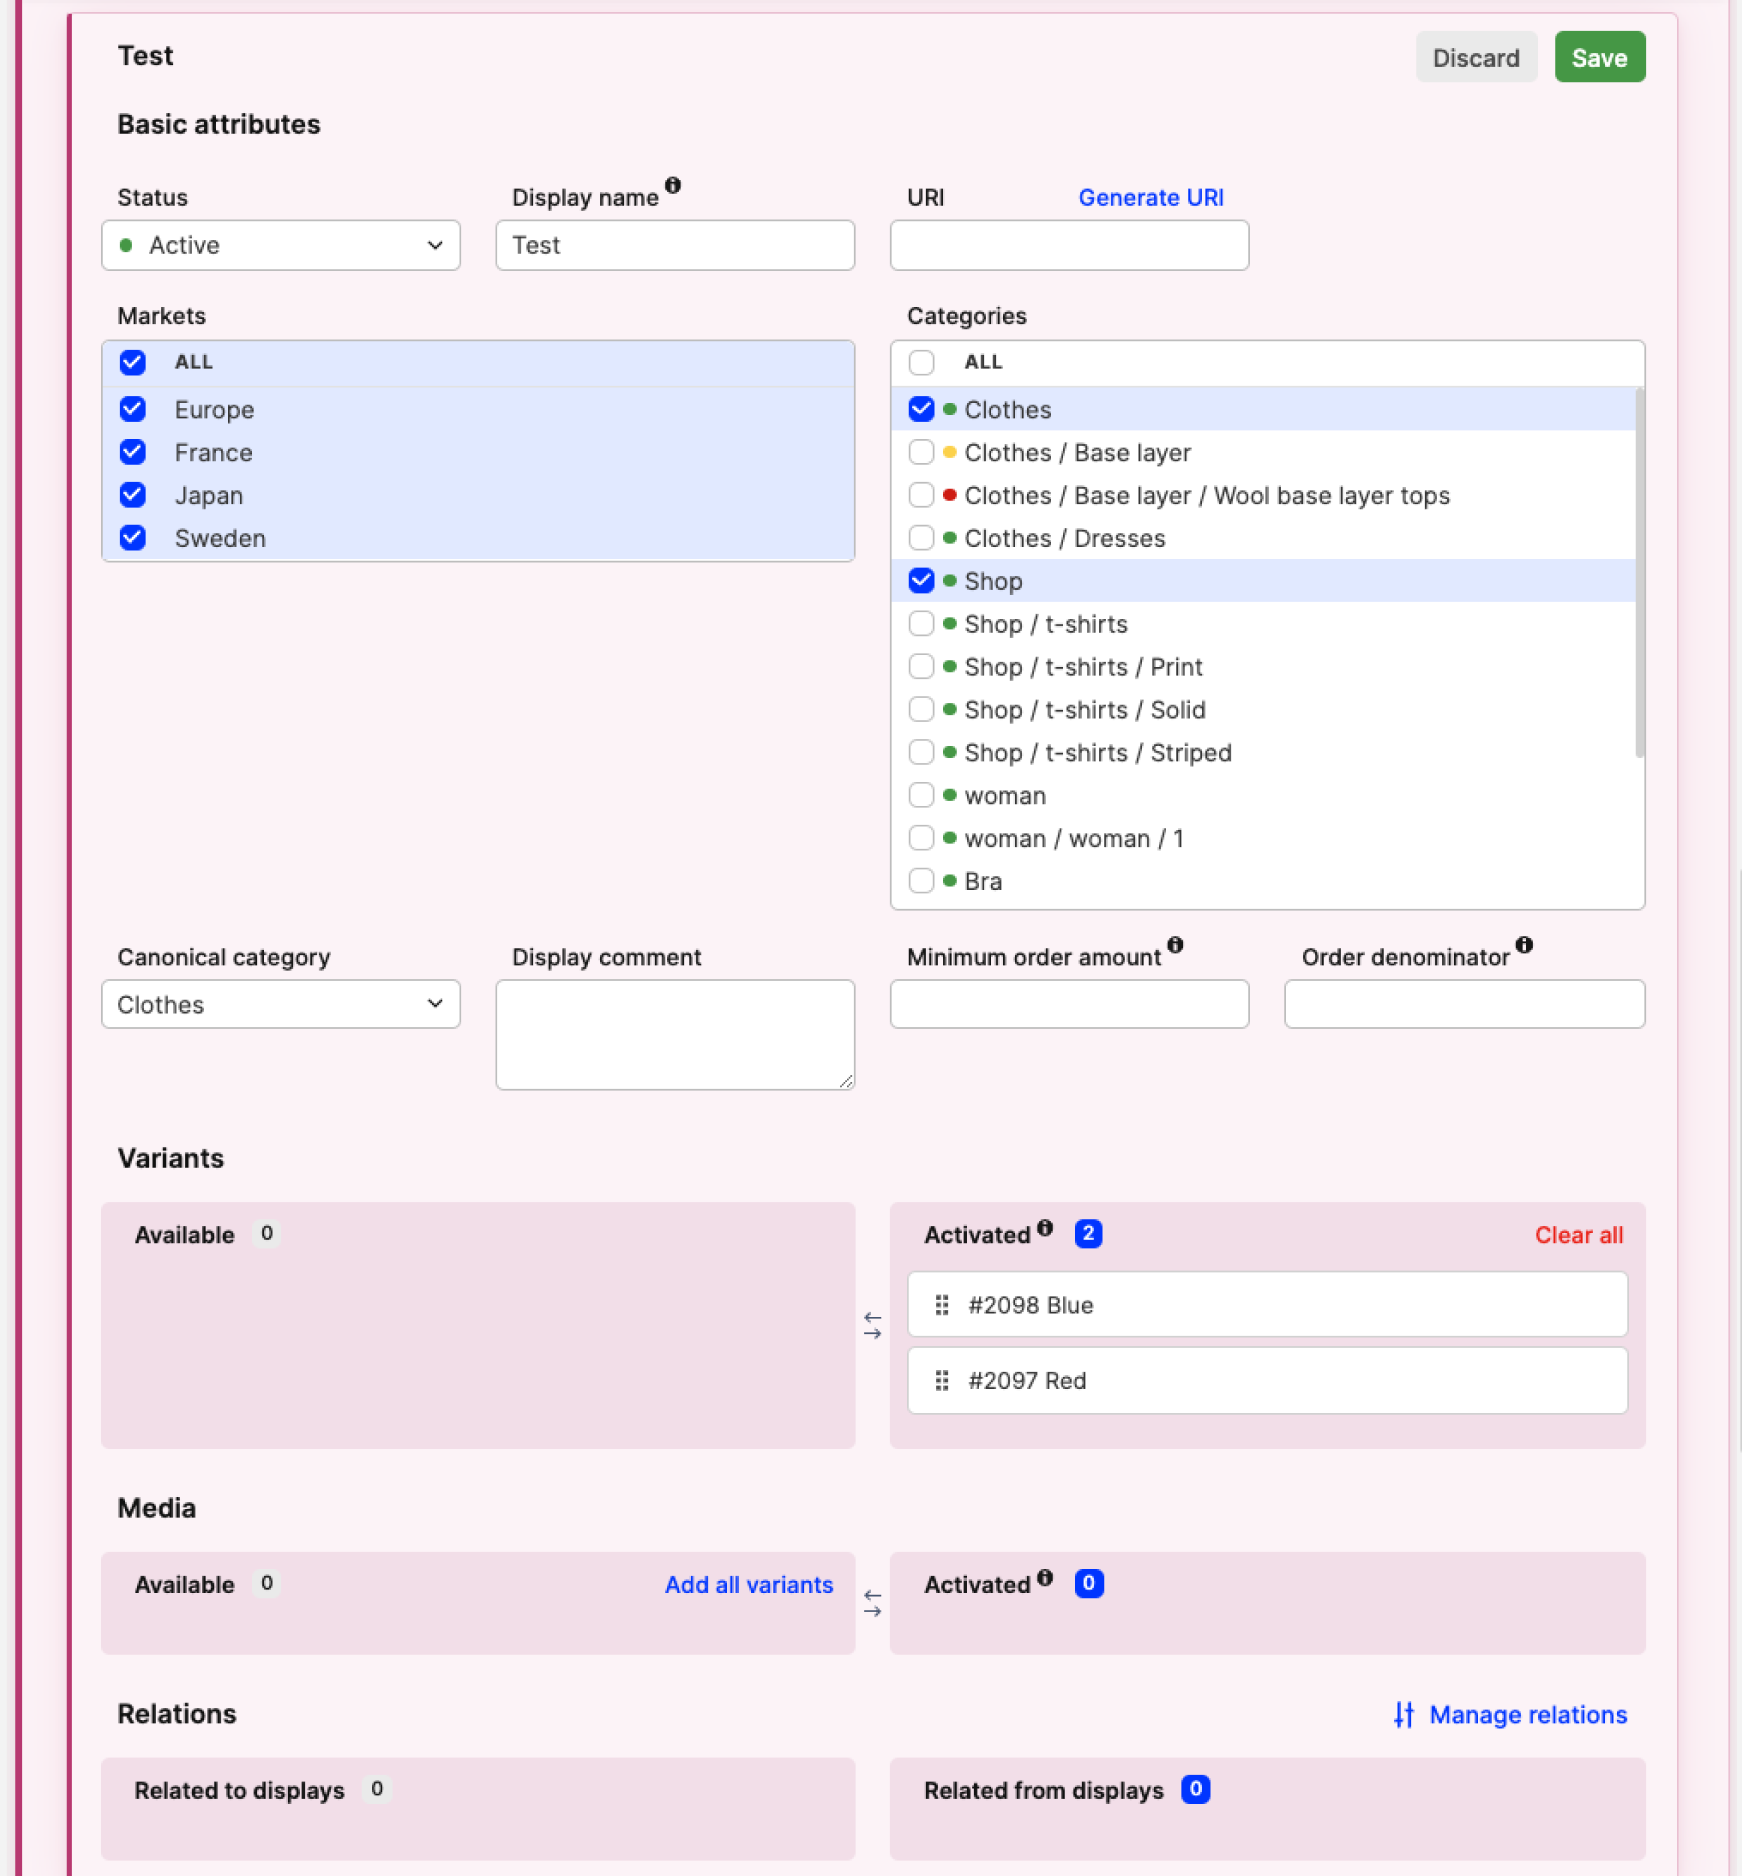
- Status: Here you can choose between the following statuses: Active, Preview, or Deactivated.
Note that if set to ‘Preview’, this display is available to see in the backend when creating an order as long as all the other required settings are done correctly. The same applies to the Shop and Checkout API if the setting ‘Product preview enabled’ is set to ’Yes’ on each respective plugin. However, you are not able to place an order for this item.
- Display name: Enter a name for the display. Note that if the field is left empty, the Product name is entered by default when the Display is saved. This is the name of the product seen on the frontend
-
URI: The URI is part of the address where the product can be found. This URI needs to be unique. For example, if:
- your website’s URL is yourstore.com, and
- the display URI is black-bag-test
You can append the URI (i.e. yourstore.com/black-bag-test) to reach this product on your website. The URI can be entered manually or generated based on the display name by clicking Generate URI.
If the display is saved with an empty URI, Centra populates a unique URI using information from the display name.
- Markets: Select the market(s) you wish to enable the display for. To read more about how to create a market, click here
- Categories: Select one or multiple categories. Read more here about how to add multiple categories using the tick boxes, and here about how to create a category
- Canonical Category: A Canonical Category is the ‘main category’ of a product display, and this is the one sent to Shop API, Checkout API, Integration API, Google feed and Facebook feed to make SEO easier. Choose a category from the list of active categories selected on the product display. If the categories selected on the display are nested categories, you will only be able to choose the nested ones and not the parent categories. If no canonical category is selected, Centra pre-selects the first active category in the list. Additionally, the canonical category is used for building the full product URL on the website. More specifically, it is part of the product URL between the store URI and display URI
- Display comment: This field is where you can add an optional internal comment on the Display level. Note that this is not shared in the APIs
- Minimum order amount: This is the minimum amount of products you need to place on the order to be able to check out without any error messages. If you try to order an amount under the number in this field, you receive an error message in the checkout telling you, for example: ‘Ordered amount for products in your order does not comply with quantity requirements. Please correct the following products
- Order denominator: This is the multiple of the amount. It means that if you enter the number 2 in here you can order 2, 4, 6, 8, 10 pieces of the product. This function combined with a Minimum order amount of 4, for example, means that you cannot buy 2, but you can buy 4, 6, 8, 10, and 12 pieces
- Variants: Drag and drop from the Available section to the Activated section any of the variants that you wish to activate in the display. You can click 'Add all' to move all variants to the Activated section at the same time. Drag the variants up or down in relation to each other to easily rearrange the order of variants within the list of activated variants. To read more about how to create a variant, click here
- Images: Drag and drop any of the images you wish to activate in this display from the Available to the Activated section. You can click 'Add all' to move all media to the Activated section at the same time. If you wish to move all media connected to activated variants, click 'Add all variants'. By using 'Add all' or 'Add all variants', the images also keep the same sort order seen in the Variants section. This is the order dictated by the media import or media upload. Drag the images up, down, or sideways in relation to each other to easily rearrange the order of images in the list if needed. To read more on how to add images to the Media Bank, click here
- Manage Relations: Click 'Manage relations' in the bottom-right corner in the Relations section in the display view, and a pop-up window opens. Select the products you want to relate to your current product either on the left >> box (means relate TO), the right << box (means relate FROM) or both. Selecting both >> and << makes the products mutually relate to each other
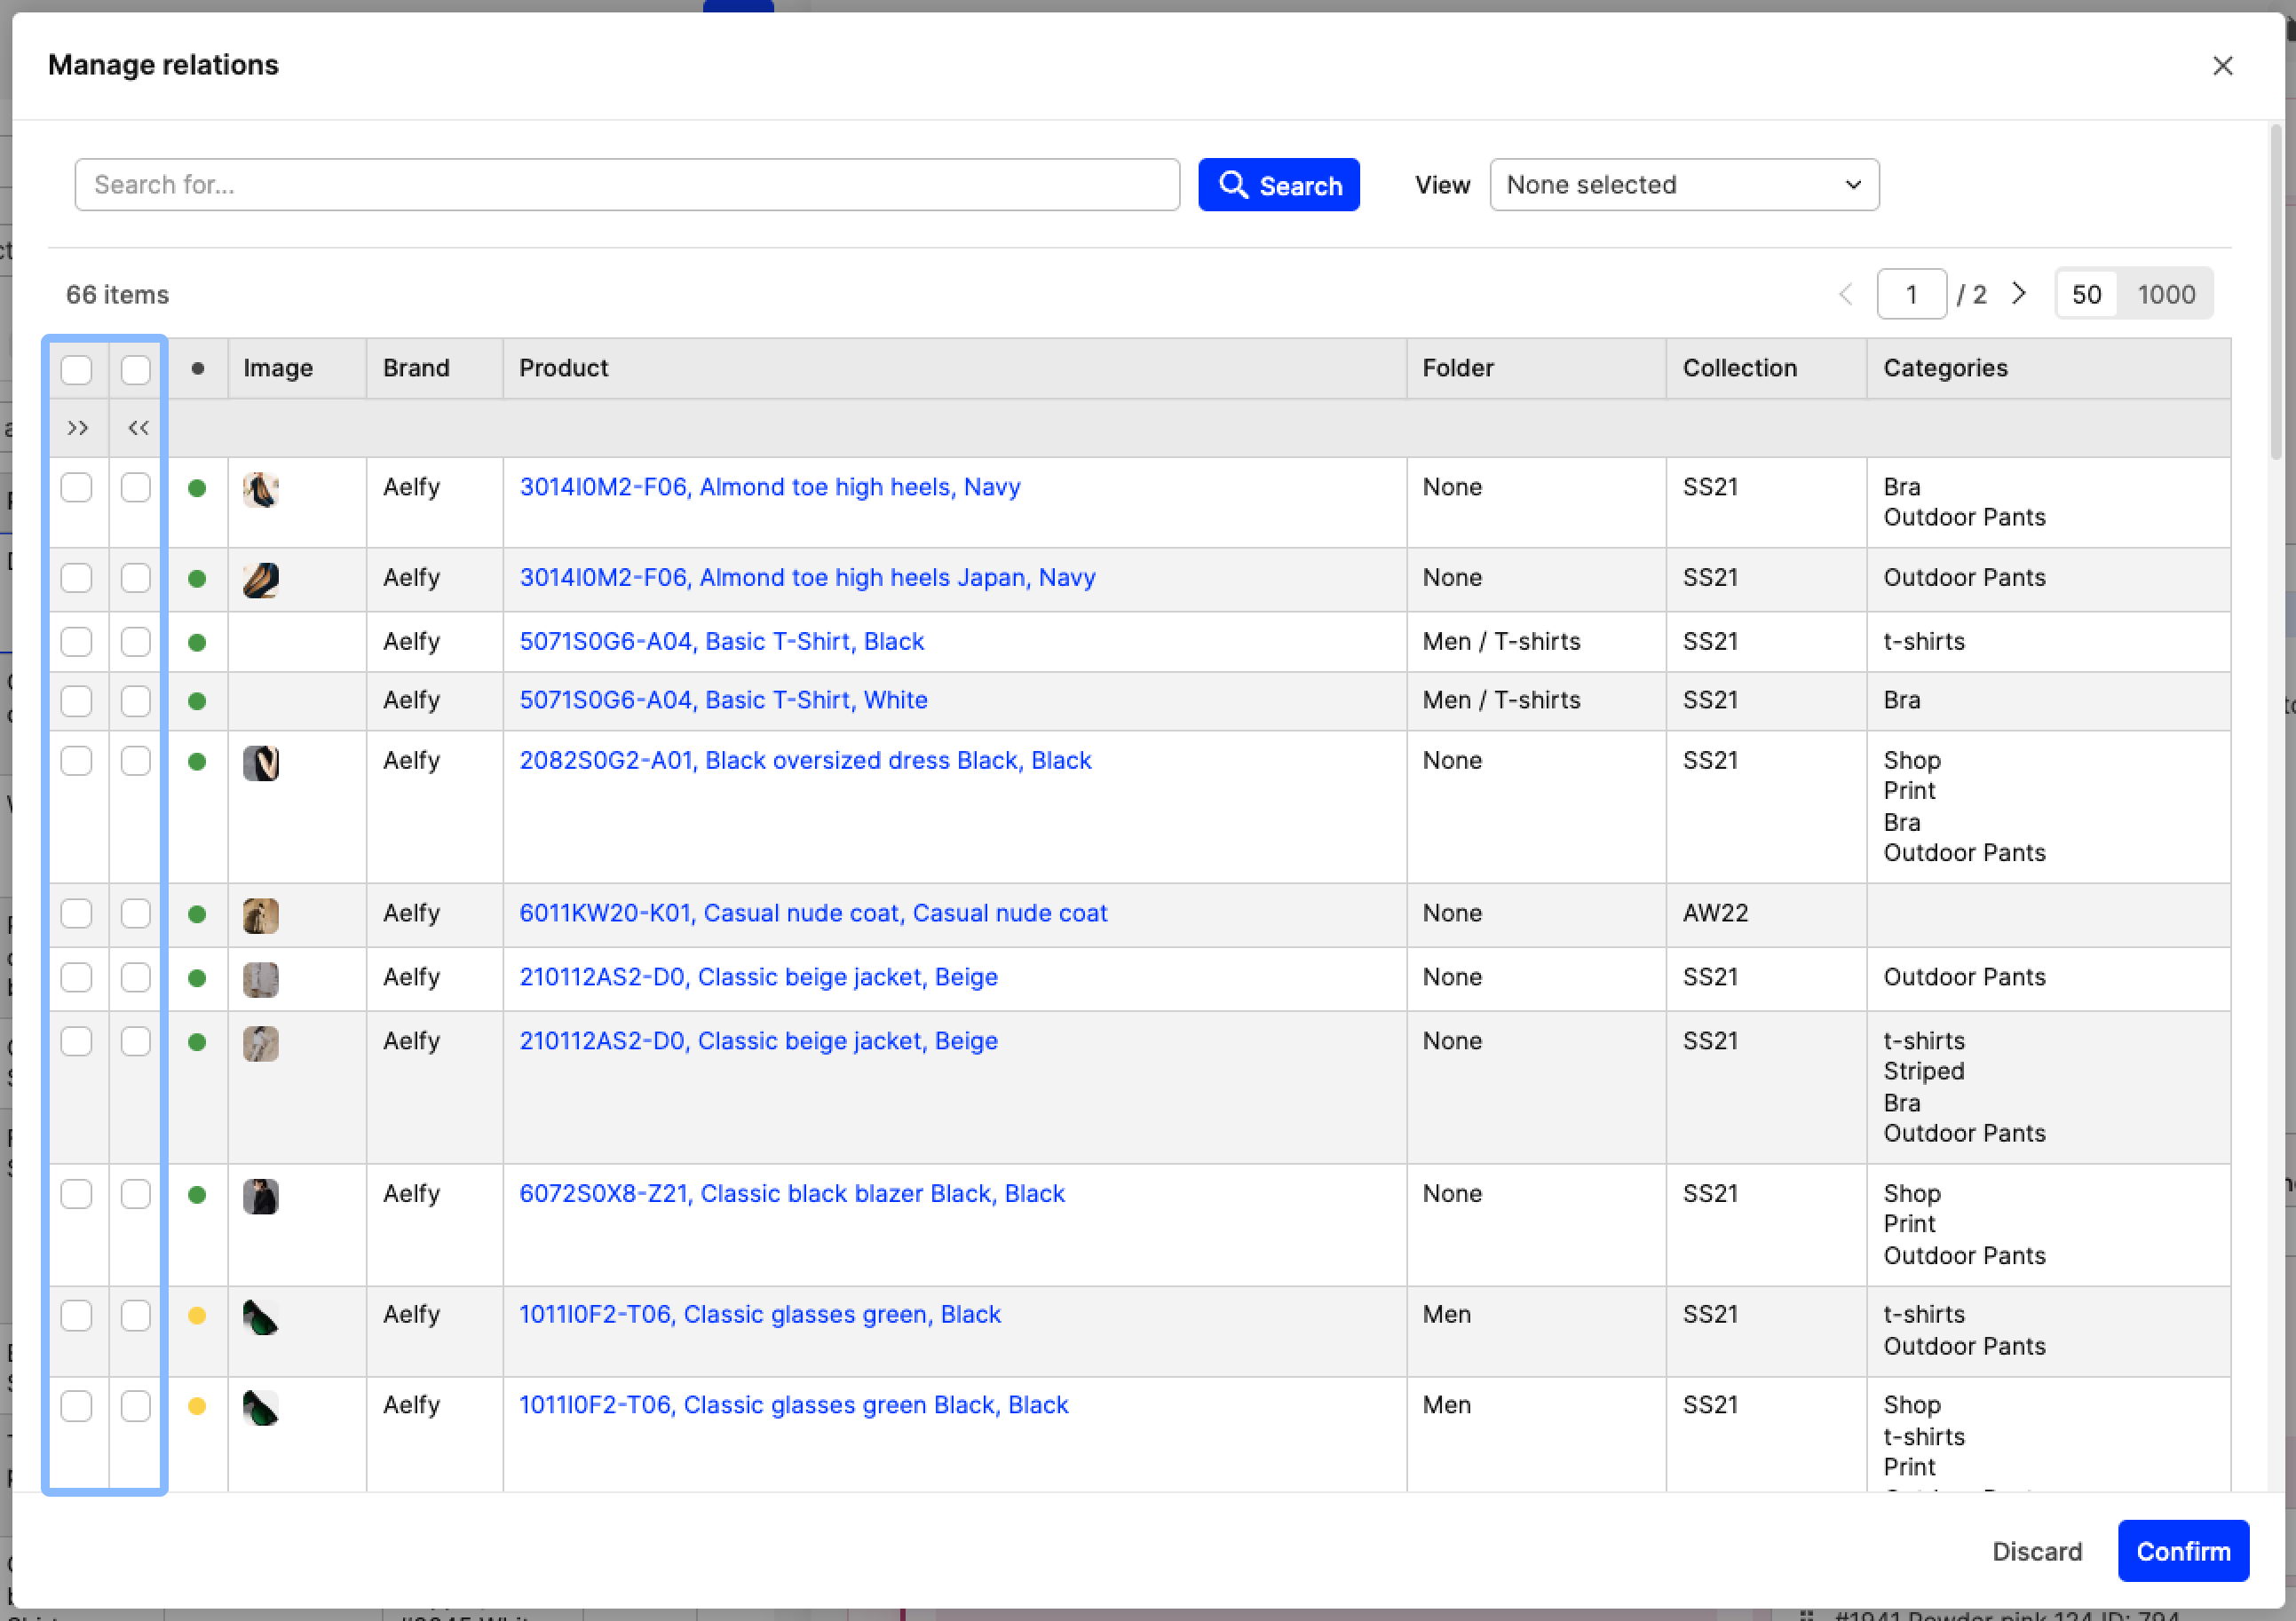 Example: We have display A of product A and display B of product B. When you select display A on the website, you’d like to see the relation to display B. However, when you go to display B, you don’t want to see display A related. To set this up, go to display A and tick the box in the column 'To (>>)' for display B.
Once you have selected the products in the pop-up, they appear in the ‘Relations’ section of the display as follows:
 Here you can choose the relation type for each display you wish to relate. The following types are available:
- Standard - This is used to display sections with other product recommendations, such as 'goes well with', 'other customers also buy', 'have a look at'
- Variant - This is used if you have products that are variants, but they are created as their own separate products
- Size - This is used if separate products are created for different sized products. This is not available in the Showroom
You can find example scenarios of these relation types and how they appear in the front end in this article.
Custom relation types can be created as well. Contact Customer Success or your frontend partner to discuss these in more detail.
In the Showroom you can also have Distinct variant and Multivariant relation types added. Please contact Customer Success to enable these. You can see examples of how these look here.
-
Click 'Save' within the Displays section to save the changes you have applied, as seen below.
It is also possible to add more Custom Attributes on display level. Please contact your frontend partner or Customer Success to set those up if needed.